Translate

**If you have previously subscribed to received my posts via email: Please subscribe to my posts via Bloglovin in the right sidebar.**
Showing posts with label 12 Tags of 2013. Show all posts

Sunday, April 5, 2015

Tagging King Tut's GOLD for Anything But a Card Challenges No. 46 - "FOOL's GOLD"


It's a long weekend for Easter and Passover. With a new challenge to play with, I putter about and catch up on some tag techniques to see what inspiration strikes. 


We have a new Challenge at Anything But a Card Challenges. Challenge No. 46 is "FOOL's GOLD"... uses the prettiest of all metals – GOLD – as your inspiration to challenge your muse. CLICK HERE to jump over to ABAC to see inspiration from our design team.

My tag is based on T!m Holtz' August 2013 Tag techniques and I'm heading to Ancient Egypt to find some Gilded treasure for my creation for the "FOOL's GOLD" No. 46 challenge at Anything But a Card Challenges.


On a sheet of freezer paper, I applied side by side three Ranger Distress Stains - Brushed Pewter, Old Paper, and Antique Linen. I misted my #8 manila tag with a light amount of water then dragged the tag through the puddle of ink. I tapped off the excess liquid and then heat set to dry. Looks pretty grungy and gold... weathered by thousand of years in the desert!


I built up the layers of color with three applications using the same technique above and heat set to dry between layers. The brushed pewter gave a subtle metallic shimmer over the tag that looks like aged sandstone. I overstamped the "Basket Egyptian Goddess" #6101, "Mummy Case/Female" #5806 and "Stylized Dog Border" #9827 {all from Viva Las VegaStamps!} using Staz-On Jet Black ink. I also stamped each on acetate and a scrap paper to create masks for layering and scene building.


I prepared my masks, two on acetate and the others on paper and adhered to my tag with some removable adhesive runner. The colored image will not appear where the masked areas are. This process of building scenes is a bit time consuming with fussy cutting - but the end results are AMAZING - and for me totally worth the effort!


I mounted the "Nile Flower Background" #1657 stamp and then began coloring with Ranger Distress Markers adding different colors directly onto the stamp. This is a detailed pattern, so I had to concentrate coloring similar sections. This was quite fun and relaxing coloring this large background. I remoistened the marker applied to the background stamp by breathing on it then stamped onto the tag. 


The "Mummy Case/Female" #5806 was not as clear as I liked on the painted tag, though I did stamp clearly - so I stamped it again onto a brushed gold cardstock, fussy cut and adhered with Miracle Tape right over the top. This did the trick! The gold gave the pop and extra bling that I desired and looks just like the artifacts in the King Tut exhibit I saw in the Art Museum!

I went around the edge with a distressing tool for a frayed effect and rubbed edge with a couple colors of Distress Markers. To finish off - I added a pink pearl gem, some additional hand coloring and some ribbon to the top and bottom and this tag looks like it's an artifact straight from the Egypt.

Tag ARTifact from the Pyramids...


•••••••••••

Supplies used: STAMPS - "Basket Egyptian Goddess" #6101, "Mummy Case/Female" #5806, "Nile Flower Background" #1657, and "Stylized Dog Border" #9827. Other supplies: #8 manila tag; Staz-On Jet Black ink; Miracle Tape; Ranger Distress Markers; Ranger Distress Stains - Brushed Pewter, Old Paper, and Antique Linen; water brush; brushed gold cardstock; pink pearl gem; and ribbon/trim.

Thanks so much for dropping by. I invite you to play along with us at Anything But a Card Challenges and the new "FOOL's GOLD" Challenge No. 46.

Hoppy Creating!  :) Sb

Sunday, December 15, 2013

A Vintage "Holly Greetings" Tag for Week 3 of Anything But a Card Challenges No. 30


Good Morning Everyone! Today begins week three of Challenge Number 30 at Anything But a Card Challenges. CLICK HERE to jump over to the challenge intro and where to LINK UP your creations. Today my work is featured with a few of the other designers... CLICK HERE to check out the other design team projects today for some amazing inspiration!


The current Challenge... Anything But a Card Challenge #30 - Anything Goes... With a Holiday Twist! This challenge is an open theme – but we love the holidays too and can't wait to see what everyone is creating! Please share any current project you have created, and if it's Holiday themed that's perfectly OK, too! JUST REMEMBER... create anything EXCEPT a card for this challenge AND please mention and LINK BACK to this challenge. ALSO - Please new projects only {no-backlinking}. :)

**A REMINDER** This Challenge will go through midnight Dec. 21st...so you have one week left  to play along and ENJOY the creative process! I hope you a chance to squeeze in some Cre8tive playtime and join the fun.


Today I'm sharing my take on T!m Holtz' December installment of the 12 tags of 2013. If you missed my tag for November... you can click here to view {I promise it's worth a peek}. I took some liberties with creating this month's tag. Using my stash of Viva Las Vegastamps! and other crafty bits already on hand, I experimented and created my own dimensional frosted plastic. I had a bit of fun with this and the result is STUNNING!


Using a section of a recycled #6 take out container, a scrap of vellum cardstock and a section of Miracle Sheet {double sided super sticky tape in sheet form} - I fashioned my own faux frosted plastic by adhering the two together. If you have made your own DIY shrink plastic using a recycled #6 plastic container - you know that the plastic will warp and bend when heated. If you heat it a lot - it will shrivel up into a shrinky dink.


I stamped Holly Large #18930 repeatedly onto the vellum cardstock side using Timber Brown StazOn and then fussy cut out all of my pieces. This vellum is cardstock weight so it's not as translucent as regular weight vellum. I have both - yet the lighter weight remains illusive so I used what I found first.


I started out this month's tag painting the base tag background by dragging tag through smattering of Old Paper, Antique Linen, Antique Bronze and Picket Fence Distress Stains. I distressed the edges with Gathered Twigs Distress Ink. 


Then I began adding my stamped images (Holly Small #18929Holly Leaf 3760Leafy Border #6292; and Ornate Corner Left #18928) creating a border using Timber Brown StazOn Ink. I wanted to keep with the vintage feel so the dark brown ink really compliments the background and will make my colorful holly "POP". I added pattern to the background using an ink blending tool with the Harlequin Mask from UmWowStudio; first using Frayed Burlap Distress Ink. Then I shifted stencil over to hit reverse areas with Iced Spruce Distress Ink. It was a little bright now, so I toned the background down by brayering on a layer of Picket Fence Distress Stain. I finished off with some splatter dots of Picket Fence Distress Stain - the splatter is subtle, yet gives the snowy effect.


Now it's time to color my holly leafs. They all got a quick douse of color with Peeled Paint, Brick Red and Vintage Photo Distress Stains. When dry, I added more detail and color with various Distress Inks and an ink blending tool.


I know it's hard to see here in the photo - but these are my heated and curled dimensional holly leaves. Holding with heatsafe tweezers, I gently heated and shaped each leaf to my liking. In a couple areas I heated the leaves a little too much and the plastic began to shrink a little, but it just added to the charm of the shaped leaves. It's clear and on the backside - so it's not really noticeable.

For the final assembly - I added some Diamond Glaze to add some "POP" to the holly berries and to accent details of the holly leaves (here and there). I layered the sections of holly to my liking and added a piece of black 3-D pop dots to anchor leaves down as they lay naturally. I finished off with adding some pink sticky back crystals and pearls for berries that I colored red with a permanent marker (now they match perfectly). 

Happy Holly Greetings!


This tag is complete... all tied off with a shimmery gold/red satin ribbon. I'm pretty happy the way that it is at this point, but I may go back and add the white splatter for snow. I'm feeling in this case "less is more".

• • • • • • • • • • • • •

Viva Las VegaStamps used: "Holly Greetings" #6043Holly Large #18930Holly Small #18929Holly Leaf 3760Leafy Border #6292; and Ornate Corner Left #18928. Supplies used: Vellum Cardstock; Recycled #6 plastic take out container; Timber Brown Staz-On Ink; various Ranger Distress Distress Stains; various Ranger Distress Inks; Versafine Black Ink; Miracle Sheets, Harlequin Mask from UmWowStudio; Diamond Glaze Dimensional adhesive; Red permanent marker; sticky back pearls and gems; black 3-D pop dots; and ribbon from stash.

• • • • • • • • • • • • •

Thanks for stopping by today! I hope you find a little time to do some creating amongst all the holiday hustle and bustle. I look forward to seeing what you create {CLICK HERE to LINK UP your projects}.  :) Sb

Wednesday, November 20, 2013

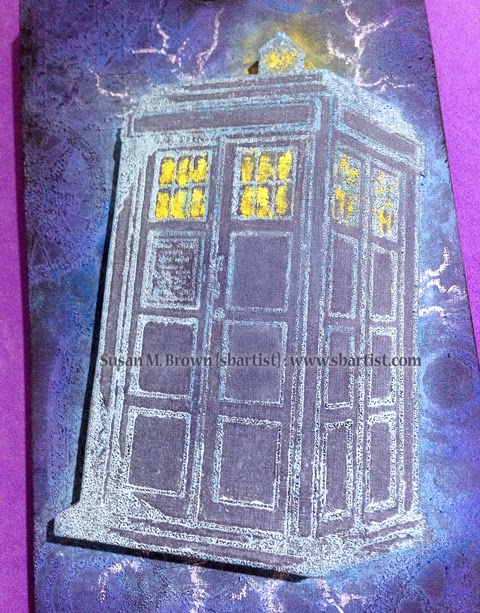
Call the DOCTOR to #SaveTheDAY... November's Installment of Tim Holtz 12 Tags of 2013


Happy Wednesday! I am so excited to share my take on November's T!m Holtz 12 Tags of 2013 that I need to call a DOCTOR!!! In celebration of the 50th Anniversary of Doctor Who which has a marathon all week on BBC America - I am in FULL WHOVIAN mindset. I think I might even catch the Anniversary Episode in the theatres.


My Blue Police Box #19054 stamp available at Viva Las VegaStamps! was the perfect image to use for this month's faux chalkboard technique. I started off with a navy blue cardstock and stamped several other VLVS! images, including the police box following each step of T!m's technique.


Instead of black and white, I used a variety of blue and purple chalks with a pop of yellow; and used white for lightning. Where did I get all the fabulous colors of chalk??? From my street painting festival roll-a-round... it houses an abundance of chalk in every color of the rainbow.


I'm so thrilled with how this came out and I have a little memento to go along with my weekend WHOvian adventure I took a couple weeks ago with my Mom to the 1st Annual Time Lord Fest in Tampa, FL. It was BRILLIANT fun!


Thanks for dropping by. I hope you have a fantastic day! :) Sb

Thursday, October 31, 2013

Happy Halloween... Counting Two Times the October 12 Tags of 2013 FUN!!!


Happy Halloween!!! I can't believe this month is at the end. I had to crack down three days ago and say NO MORE Halloween projects and move on to Christmas projects. In doing so I managed to complete two variations of the Tim Holtz' 12 Tags of 2013 for October. When I saw T!m's tag for October - it was SCREAMING for Amazing Crafting Products... so I have created all my embellishments for this tag using Amazing Mold Putty, Amazing Casting Resin and an assortment of Alumilite Dyes. This tag is totally a Halloween Treat! 


My AMAZING tag for October!


PLEASE CLICK HERE to see the HOW-TO.

Now for the second version - a stamped winter wonderland using the same techniques just different a color scheme and elements... and of course some Amazing Mold Putty too!


PLEASE CLICK HERE to see the HOW-TO.


Thanks for dropping by today. Hope you have a safe and happily haunted Halloween! See you Saturday for my weekly Unscripted Sketches project. :) Sb

Tuesday, October 1, 2013

T!m Holtz 12 Tags of 2013 for September...
and I'm LOVING my new UmWowStudio Masks!!!


I finished off the month completing the September installment of T!m Holtz' 12 Tags of 2013. I think this makes 3 now that I have done - LOL! {Click Here to see March... and here to see August}. It's just fun to try new things and new toys... and that I can share this with all of you. I just got all the new UmWowStudio Masks in the mail and some super awesome chippies and I just dove right in and let my muse fly.


"... you smiled at the stars like they know all your secrets."


I started off following T!m's technique using Paper Artsy Grunge Paste in the top corner and the UWS hexagon confetti mask from UmWowStudio. Then I layered with Antique Linen Distress Paint with an old-school letter stencil {leftover from my art camp}. 


Next I layered this glowing UWS lightbulb mask... I got some bright ideas!


I added more of the UWS hexagon confetti mask to mirror those in the grungepaste; then added the numbers from my old-school letter stencil; and added mini chevron borders from the UWS line of chevrons mask {i think this is my FAV} and large UWS hexagon mask.


I finished off stamping the Viva Las VegaStamps! nesting gears in black and cut up a little quote that I printed off my Zink Happy printer {love that it's already a sticker}. I distressed the tag edges and tied off the top with some fibers and black tulle. Another inspiring piece for my quote art journal... guess I need to make some pocket pages!


I think I'm really hooked on layering with masks and stencils now... and I have been collecting and hoarding quite a few. Can't wait to see what October brings! Have a great day :) sb

Thursday, August 22, 2013

Walk Like An EGYPTIAN... Tag ARTifact for T!m's 12 Tags of 2013 for August


Please take a moment to subscribe to my posts via email or bloglovin' in the right sidebar since google reader/friend connect will be gone any minute now.


I actually was able to squeeze in a little time to play along with T!m Holtz' 12 tags of 2013 for August... except mine is stamped completely with Viva Las VegaStamps! Please CLICK HERE to see the how-to.

Tag ARTifact from the Pyramids...


•••••••••••

Supplies used: STAMPS - "Basket Egyptian Goddess" #6101, "Mummy Case/Female" #5806, "Nile Flower Background" #1657, and "Stylized Dog Border" #9827. Other supplies: #8 manila tag; Staz-On Black ink; Miracle Tape; Ranger Distress Markers; Ranger Distress Stains - Brushed Pewter, Old Paper, and Antique Linen; water brush; brushed gold cardstock; pink pearl gem; and ribbon/trim.

I'm done with my GELLIN' and my paper is painted... sneaking a little here and there to add details on my ARTful lunch ATC No.2. Happy Thursday!!!  Sb

Thursday, August 8, 2013

Stamped Tag Fun... a Handmade Artifact straight from Egypt


Good Morning! Today I have a project featured over at the Viva Las Vegastamps! Blog - my take on the August T!m Holtz' 12 tags of 2013... but done totally Viva Las VegaStamps! Style. I so enjoy the monthly 12 tags techniques and it gives me a chance to try out new things and have some creative PLAY - using stamps/images in my stash that rarely see the light of day.

CLICK HERE to jump on over to the VLVS! Blog to see my Tag Artifact from the Pyramids...

Have a fanstastic Thursday! :) Sb

Wednesday, March 20, 2013

Wishing you a very "HOPPY STEAMPUNK" for LeslieRahye's Hippity Hoppity Steampunk Spring Bloghop


To view last month's Very Steampunk Valentine Bloghop
please click here!


WELCOME to LeslieRahye's Hippity Hoppity Steampunk Spring Bloghop. Thanks to our fabulous hostess for giving us our fill of "STEAMPUNK" - which we all LOVE!! I am totally addicted and a TOTAL steampunk junkie now! Today I'm sharing a tag based off this month's T!m Holtz 12 tags of 2013 using the silhouette of the mechanical bunny stamp from Viva Las VegaStamps!


On a easter colored patterened paper that I grunged up and distressed - I stamped several Steampunk images to have a base then went from there with T!m's inspiration tag.


One more pix to complete the scene... and it's full of gears and metal goodness!


Thanks so much for dropping by. Please click the blocks below to visit the other fabulous stops on this special Spring Steampunk hoppity.
Sb :)


Blog Widget by LinkWithin