Translate

**If you have previously subscribed to received my posts via email: Please subscribe to my posts via Bloglovin in the right sidebar.**

Wednesday, September 14, 2022

Let your #Cre8time Fly... Gina K. Designs and Designer Crafts Connection Bloghop


Greetings everyone! Today I am joining the creatives with the Designer Crafts Connection in getting inky for a new bloghop featuring projects made with Gina K. Designs stamps and die-cut ephemera.


Gina K. Designs carries the highest quality stamps, ink, cardstock, dies, stencils and more! Everything coordinates beautifully so you can start creating right away... inspiring with great ideas for paper crafting success!


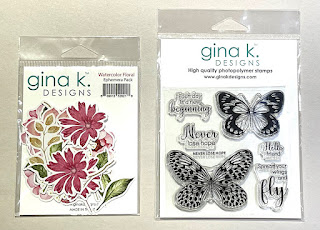
I love to customize a plain composition book and collage with lovely papers, stamps and ephemera. I was provided with these beautiful Gina K. Designs ephemera watercolor floral die-cuts and butterfly "Never Lose Hope" stamps which are perfect to decorate a new inspiration journal.


Supplies: Blank composition book; scissors, glue stick, black Staz-On ink; misc patterned paper and ledger paper; vellum paper; coordinating lace and ribbon; paintbrush; Ranger Old Paper Distress Oxide; double sided adhesive tape; Gina K. Designs butterfly "Never Lose Hope" stamps and ephemera watercolor floral die cuts.


Using Staz-On black ink, stamp many butterflies onto vellum and ledger paper.


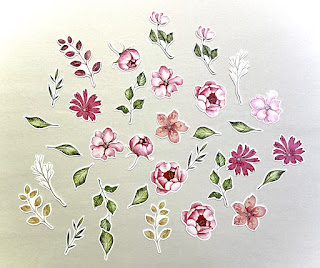
Look at all the flowery goodness here in the ephemera watercolor floral die-cut package!


Before gluing down floral pieces, I quickly antiqued with Ranger Old Paper Distress Oxide applied with a brush.


With just a quick brushing of ink, the die cut pieces look aged with bright colors and whites toned down.


Covering a journal is really straightforward. Trace around the cover onto the back of a patterned paper which is a nice cream with some sparkle detail (pretty sure this was leftover from something Christmas themed). I cut on the traced line and apply a liberal slathering of glue stick to the cover, then press paper onto the cover. Easy-peasy!


Fussy cut out all of the butterflies. I enjoy cutting out a pile of hand-stamped images.


Now I'm ready to grab the glue stick and apply things to the prepared journal.


The combination of the black ink on ledger paper with the antiqued florals give a shabby-chic feel.


I slightly overlap floral pieces and leaves to create depth.


I finish the edge of journal with a piece of lace layered with a tri-color ribbon adhered with double-sided adhesive. This ties everything together to complete my journal redux.

Shabby-Chic Journal takes flight!


With just a few supplies, I have transformed a plain composition book to something that looks like those sold at the bookstore.


The sparkle detail on the paper adds a bit of bling to the neutral colors.


I love the neutral colors with just a pop of color in the florals. This journal is ready to be filled with creative ideas and inspiration from my daily travels.

CLICK HERE to jump over to the Designer Crafts Connection blog to view more projects using Gina K. Designs Bloghop.

For more info on Gina K. Designs Products, project inspiration and to purchase visit Gina K. Designs website HERE.


Thanks so much for visiting! What would create with Gina K. Designs? Sb :)

** This is a sponsored post. Gina K. Designs, LLC provided products for use in this project in exchange for my creative ideas, views and opinions. My ideas and opinions are my own.

Thursday, March 10, 2022

Pinch Me... I'm ShamROCKin' a DIY Ribbon Rosette #NationalCraftMonth


Hello friends... March is National Crafts Month and St. Patrick's Day is right around the corner! Today I'm sharing a quick and easy ribbon rosette project that is perfect for pinning on the winning float at the annual St. Patrick's Day Parade!


For this project I gather a few supplies: gold oly*fun® metallic fabric, scrap of green cardstock, scissors, paper trimmer, hot glue, Scor-Pal®, double-sided adhesive sheets; and fun Irish themed button flair, embellishments and stickers from my fav dollar store.


I have these pins from the dollar store in my crafty stash that would be perfect to transform into ribbon rosettes using gold metallic oly*fun® -- a fun reflective fabric that adds the perfect amount sparkle & shine to cardmaking and other craft projects!!


To make fabric a bit stiffer to fold and hold shape, I mount to green cardstock.


On a scrap of 6" x 9" green cardstock, I placed a cut-to-size section of double-sided adhesive sheet, removed backing, then mounted piece gold oly*fun® and trimmed back the edges.


Following pattern for making rosettes using my Scor-Pal®, I scored both sides of the paper-backed fabric to create peaks and valleys at 1/2" increments.


I divide this scored sheet into three, 2" sections, With some double sided tape, I joined the three sections together into one long strip. Fold back and forth on score lines to make the accordions. When shaped this will make a large rosette to set off my 3" button!


Now the fun begins! Shape the according into a circle and glue in place. It seems to take about 4 hands to form and hold a rosette down to secure, but once you do it a time or two it's pretty easy. For this I apply a ring of hot glue around the edge in the center and placed a faux gold coin on top... Ta-DA! Hold coin in place until glue cools and it is secure then repeat on other side.


I fashion a ribbon tail out of another section of oly*fun® backed cardstock, a smaller section popped up on chipboard cut on my guillotine paper cutter... easy-peasy! Glue the feature button pinback onto the front of the rosette, and added some fun foamy & glittery shamrock stickers to finish things off. Place a sticky back wall hook on the back upside-down and it's ready to hang on the winning float!


I just love the shimmer and shine of the metallic oly*fun®! I can't wait to be ShamROCKin' this over to award to my favorite float at the St. Patrick's Day Parade!

A ShamROCKin' Award....


What are you creating during National Crafts Month?! I'm enjoying the art of cut paper and glue over at the Collage-Lab SPRING FLING Virtual Retreat... you can still join the fun -- all classes are accessible until December 2022.


Thanks for stopping by and have a great day! Clover on over to the Designer Crafts Connection blog for more fun craft ideas!

Happy creating! :) Sb

Tuesday, February 15, 2022

The Countdown is ON! Join me at #CollageLabSpringFling


Hello friends! Who's ready for a vacation?! I am so excited that we are just 14 days away from Collage-Lab's SPRING FLING Virtual Retreat where will be teaching my first virtual workshop "Fabulous FAUX Leather". 

Join me on a Safari in making faux backgrounds! In my workshop, I will teach you three easy “Fabulous FAUX Leather” techniques that have really dramatic results using recycled packing paper, newsprint and a few craft supplies you have on hand… the results will amaze you! Get ready to have fun getting messy!


I invite YOU to join me for a month of COLLAGE-FUN at Collage-Lab's SPRING FLING Virtual Retreat! Grab some scissors, a glue stick and a pile of your paper scraps, magazine clippings & ephemera and join me!


The BEST part you can join from wherever you are...
EVERYONE is invited to join the fun!


Join myself and 14 artists from across the globe at
the Collage-Lab SPRING FLING Virtual Retreat!
It all begins March 1st, 2022. 


Get away from the hustle and bustle of everyday and focus on mixed-media collage for a bit. For the entire month of March 2022, Collage-Lab will bring you a variety of full-length recorded classes, Zoom gatherings, and a whole assortment of collage projects and techniques.

Treat yourself to a gift while supporting
your artist community... a WIN-WIN!

Limited spaces remain for only $100 – The Classroom and Private Retreat FB Group are now open to join the fun... there are even some surprise bonuses! SIGN UP TODAY to enjoy this unique Mixed Media Collage Retreat from the comfort of your own home or studio.

For all the details CLICK HERE.


Full Disclosure: the Collage-Lab SPRING FLING Virtual Retreat pays its instructors. By using my affiliate linkbit.ly/SpringFling_withSB to sign up, I will receive a small commission which goes towards continuing my efforts to bring creative inspiration to you for FREE here in webland. I am so grateful to all of you for supporting me and my creative adventures.

I hope to see you there! It will be so much fun!

Sending you all many {{ BIG Crafty HUGS }}
:) Sb

Monday, January 24, 2022

Shine... StencilGirl® Self Portrait Collaborative


Hello friends! 2022 is underway and today I am excited to share a new StencilGirl® collaborative project -- the "StencilGirl® Self Portrait Collaboration"... a project in which we were challenged to draw/stencil/paint a self portrait using StencilGirl® Stencils.

https://www.stencilgirltalk.com/2022/01/stencilgirl-self-portrait-collaboration.html

I am inspired by so many artists and art journal styles. I recently celebrated a milestone birthday -- a perfect reason for a new spread in my Ranger art journal. I opened the book to this spread that had blue paint rubbed all over from a previous art adventure.


For my thirtieth birthday, my hubs and I traveled to NYC for a bucket list road trip. We saved up all year to attend the Macy's Thanksgiving Day Parade. Along with the parade we squeezed in as much of NYC as we could in the weekend, ending with our last night staying at the Plaza Hotel. In seeing the sights walking around Central Park, we came across an artist who was set up drawing portraits in pencil and chalk right on the sidewalk. I watched him work in amazement and sat with him to have my portrait done to document my milestone birthday.

Portraits have always been a challenge for me, and self-portraits just turn up the stress level. This project was certainly a challenge, and I am happy to have used this challenge to document this time in my life. Out of all the collab projects I have joined, this one is by far my favorite!!


Nestled in my book is this hand-cut self portrait stencil that I made many moons ago at my LSS for a "Creative Jumpstart Meetup" where we created these inspired by Natalie Kalbach's CJS episode that featured this technique.


Even in this simplified format, this was a challenge. I have never used this stencil. I find it interesting how serendipitous artful opportunities present themselves.

Follow along as I share how I built up the layers.


I get out my big bin of Grumbacher Academy Acrylic paints and apply Yellow Ochre and Thalo® Yellow Green using a recycled key card.


Then added some Turquoise Green. I love how buttery
and creamy the Grumbacher Acrylics paints are.


With a base of color, I begin stenciling. Using a triangle sponge applicator, I pounce Payne's Gray through StencilGirl® L517 Shaw -- Triangle Transitions 2 Stencil.


I continue covering the entire right side page.


On the bottom left side page I apply the Payne's Gray through my handmade self-portrait...


Then continue the Triangle Transitions stencil background around the face.


Now its time for adding flowing locks of hair in Dioxazine Purple pounced through the StencilGirl® S321 Stegmiller -- Whimsical Waves Stencil.


I applied some Thalo® Gold across the top of the pages to shape around the hair then pounced over a mixture of Unbleached Titanium White and Titanium White through the StencilGirl® S681 Walker -- Gaol Doorways Stencil making a repeating pattern.


Using markers and Stabilo pencils, I added some detail
to shape the edge of the curls and waves in the hair.


It's really coming along. Now to add detail and color to finish off the face.


Using pencils and some washes of paint and Stabilo pencils, I drew in the features on the left side of face, nose and lips. I drew in the word SHINE with marker within the right eye and added color with markers to bring out the rays.

"SHINE"


Completed spread.


Detail of face.


Detail of hair and hand-drawn waves.


I added jewels to neck using StencilGirl® S735 Walker -- Stone Statue Small Stencil with Alizarin Crimson.


I love how the background is full of texture. It brings together my favorite colors and the stenciled patterns resemble how I see things through my mind's eye.

StencilGirl® Stencils Used : 

M058 Apter -- Stencil Square Urban Insiders

S321 Stegmiller -- Whimsical Waves Stencil

S681 Walker -- Gaol Doorways Stencil

S497 Kerr -- Starlight Starbright Stencil

S735 Walker -- Stone Statue Small

L517 Shaw -- Triangle Transitions 2 Stencil

+ + + + + + + + +

I hope you enjoyed this project. How would you use stencils to create your self portrait? CLICK HERE to jump over to see the other portraits made for the "StencilGirl® Self Portrait Collaboration".

+ + + + + + + + +

Have you heard?! I'm teaching at Collage-Lab's SPRING FLING Virtual Retreat! Join myself and 14 artists from across the globe, for 20 hours of instruction, Zoom gatherings, and an assortment of collage projects and techniques. Get away from the hustle and bustle of everyday and focus on mixed media collage techniques from the comfort of your home studio! The fun begins March 1st, 2022. For all the details visit: bit.ly/SpringFling_withSB.


Thanks for dropping by!  :) Sb
Blog Widget by LinkWithin