Translate

**If you have previously subscribed to received my posts via email: Please subscribe to my posts via Bloglovin in the right sidebar.**

Sunday, August 25, 2013

My Fairy is a Troublemaker... Week Two of Anything But a Card Challenge No. 26


Happy Sunday! Today I am sharing an altered book project that I created last year for my local altered book group. This particular round-robin book had the theme of "Fantasy Fairies" - so I couldn't resist sharing it for week 2 of Anything But a Card Challenges #26 Fairy Tales or Fairy Theme. CLICK HERE to see more fabulous work from my fellow design team members today over at ABAC.


For this book I created a painted/stamped background that goes along with my personal fairy name "Feather Saturnfilter". There is an artist named Emma Davies who makes fabulous handmade Fairy Figurines. She also has a fairy name generator on her site. It's quite fun. CLICK HERE to see. Not only does this give you a name...it also gives you a little description too. I have created my fairy and a background based on the following description:

My Fairy is Feather Saturnfilter.

She is a trouble maker.

She lives in high places where the clouds meet the earth.

She is only seen on midsummer's eve.

She wears pale blue like the sky
and has pale pink wings like a cicada.


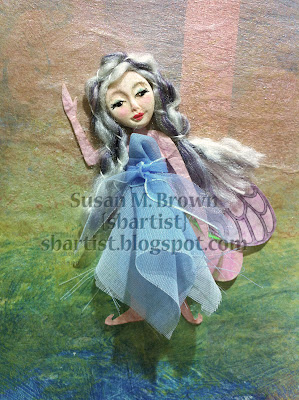
Here's my fairy made out of handmade paper, fabric scraps, two-tone purple yarn and hand-drawn wings. Her face is made using a sculpey face mold and Delight air-dry clay; hand colored with a dusting of chalks and pen detailing.


I painted a rainbow feathered background into an altered book. Then I began stamping the foliage with Hampton Art Dandelion stamp set using black Staz-On ink creating a ground area. This set has dandelions, plants and some butterflies and also a darling dragonfly.

I beautified the Fairy name description with some computer handiwork {shown above}. The finishing touch is the furry fibers down the spine and laced through the tags in pocket accordion. Tags are made using an assortment of Robin's Nest papers - and colors organized like a rainbow [red, orange, yellow, green, blue and purple].


This is the completed altered book spread. Round Robin projects are great because you have to get "out of your box" and work on themes that you wouldn't normally. The book owner was pretty delighted, too.

Thanks for visiting - hope you have a wonderful day! :)  Sb

Please take a moment to subscribe to my posts via email or bloglovin' in the right sidebar since google reader/friend connect will be gone any minute now.

Friday, August 23, 2013

Happy Accidents, DIY Discoveries and Finding
my Muse with Monoprinting


Please take a moment to subscribe to my posts via email or bloglovin' in the right sidebar since google reader/friend connect will be gone any minute now.

What started out as mess on my workdesk... has turned into a daily must have. I wanted to share my discovery on my AMAZING DIY No-Gelatin Rubber Plate and how thinking out of the box with my creative products has helped keep my muse with me throughout a crazy workweek, not just on the weekend.


I'm sharing this over at Tatertots and Jello Link Party Palooza because everyone needs to pack an ARTful Lunchbox and squeeze in just a few moments of creative bliss during a hectic day!


This mess is the result of my newest obsession... I'm finally GELLIN'. A few days ago, I made two (2) of my own No-Gelatin Rubber Plates using the NEW Amazing Mold Rubber {a 2-part silicone mold making kit} and outside of the DAY J.O.B. - this is consuming my waking moments -- AND I had a BRAINSTORM... to pack the little ATC size plate in a travel kit so I can play on my lunch time, or whenever I can sneak a few minutes here and there. So this mess is all the creative goodies I plan to pack into my ARTful Lunchbox.

I made a video to explain my exciting idea...


To see how I made these AMAZING DIY No-Gelatin Printing Plates for monoprinting using the new Amazing Mold Rubber please CLICK HERE or scroll down and read more.


I'm so excited to sneek a little play time during my hectic day and long hours at the busy print shop I work at. I keep adding more creative toys to my ARTful lunchbox and I've had to  shop my stash to upgrade it two times now - LOL! Presently I've settled on a Basic Grey metal box that came with tabbed dividers for making scrapbook pages inside. This one seems to be "JUST RIGHT!" 

***********************


This is ATC No. 1 created. I will be sharing No. 2 and 3 tomorrow. On top of a three color layered monoprint, I overstamped down the side with a pink eraser handcarved stamp. The silhouette man with dog is from Viva Las VegaStamps! standing on top of a torn washi tape boardwalk. I added some ( ) and numbers with plastic letter stencils - ink blotted away before the marker dried to mute the tones.

***********************

As promised - the how-to on how I created my faux gelatin plate. In the process of playing with the brand new product, Amazing Mold Rubber by Amazing Crafting Products;thought about creating a faux gelatin plate. There are loads of DIY tutorials online on how to make one of these with Knox Gelatin, but I thought about it and silicone has similar properties. I mixed up some Amazing Mold Rubber to give it a try... and shazam! The AMAZING DIY No-Gelatin Printing Plate was born!


Amazing Mold Rubber is an easy to use, high strength liquid silicone mold making rubber that is strong, soft and flexible - great for undercut parts and cures in approx. four hours {I timed it for this project - it is 4 hours... YAY}. Amazing Mold Rubber is a two-part liquid rubber used to make extremely elastic molds to produce quick and exact reproductions of your original. Replicas can then be cast in Amazing Casting ResinAmazing Clear Cast Resin for plastic parts - or use other materials such as plaster, wax, clay or polyester... and that's just the beginning to all the fabulous uses just waiting to be discovered!


After four hours my Amazing Mold Rubber was fully cured and my AMAZING DIY No-Gelatin Rubber Plate was ready for a joyride! This second video is a test run on my faux gelatin plate... and my FIRST TRY at Gellin'...


Isn't this totally AMAZING!!! Now I have two plates in different sizes {one 6" x 7" and the other is 3" x 4"} that I can use simultaneously for double the mixed-media fun! I can totally see how this can become addictive. Here is my first three-paint layer monoprint and I can't wait to make more.


I've got my hands on another brayer, and my ARTful Lunchbox is complete. Thanks for dropping by - I hope you are inspired to sneek a few creative moments daily! Have a great day!  Sb :)

Thursday, August 22, 2013

Walk Like An EGYPTIAN... Tag ARTifact for T!m's 12 Tags of 2013 for August


Please take a moment to subscribe to my posts via email or bloglovin' in the right sidebar since google reader/friend connect will be gone any minute now.


I actually was able to squeeze in a little time to play along with T!m Holtz' 12 tags of 2013 for August... except mine is stamped completely with Viva Las VegaStamps! Please CLICK HERE to see the how-to.

Tag ARTifact from the Pyramids...


•••••••••••

Supplies used: STAMPS - "Basket Egyptian Goddess" #6101, "Mummy Case/Female" #5806, "Nile Flower Background" #1657, and "Stylized Dog Border" #9827. Other supplies: #8 manila tag; Staz-On Black ink; Miracle Tape; Ranger Distress Markers; Ranger Distress Stains - Brushed Pewter, Old Paper, and Antique Linen; water brush; brushed gold cardstock; pink pearl gem; and ribbon/trim.

I'm done with my GELLIN' and my paper is painted... sneaking a little here and there to add details on my ARTful lunch ATC No.2. Happy Thursday!!!  Sb

WOYWW August 21 update... Presenting ARTful Lunch {more like dessert} ATC No. 1


An update... I did stick to my goal and get an ATC completed. I created about 4 or 5 papers using my homemade no-gelatin rubber plate. I overstamped down the side with a handcarved stamp that I made in highschool out of a pink eraser. The silhouette man with dog is from Viva Las VegaStamps! on top of a torn washi tape boardwalk. I added some ( ) and numbers with plastic letter stencils leftover from my summer art camp supplies and blotted before the marker dried to mute the tones. I think I'll sleep good tonight knowing I got this done and I can't wait to make another tomorrow LATER TODAY.

***********************


ATC No. 1
 

***********************

Sweet Dreams! :)  Sb


P.S. if you missed out on the story of how this began... I'm packing a daily ARTful lunchbox of creative playtoys to make a daily ATC while I'm at work. CLICK HERE to read post.

Wednesday, August 21, 2013

WOYWW... How to Pack an ARTful Lunch!


Please take a moment to subscribe to my posts via email or bloglovin' in the right sidebar since google reader/friend connect will be gone any minute now.


What is this mess on my workdesk today???
Today is WOYWW 220 {What's on Your Workplace Wednesday}
hosted by Julia Dunnit at Stamping Ground.


This mess is the result of my newest obsession... I'm fianlly GELLIN'. The other day, I made my two of my own No-Gelatin Rubber Plates using the NEW Amazing Mold Rubber {a 2-part silicone mold making kit} and outside of the DAY J.O.B. - this is consuming my waking moments. Yesterday I had a BRAINSTORM... to pack the little ATC size plate in a travel kit so I can play on my lunch time, or whenever I can sneak a few minutes here and there. So this mess is all the creative goodies I plan to pack into my ARTful Lunchbox.

I made a video to explain my exciting idea...


To see how I made these AMAZING DIY No-Gelatin Printing Plates for monoprinting using the new Amazing Mold Rubber please CLICK HERE.


I can't wait to sneek a little play time during my hectic day at the print shop. I wanted to cram so many creative toys in my lunchbox I shared, I had to upgrade it to a larger one I had my jewelry pliers and wires in - LOL!

***********************


ATC No. 1

***********************

Hope you are having a creative day :)  Sb

Tuesday, August 20, 2013

I'm GELLIN'... I'm GELLIN' and I totally made it MYSELF!!!!


Hello everyone! I'm happy to report I've FINALLY crossed off something on my creative "bucket list" – try out Gelatin Plate monoprinting! In the process of playing with a new product, I've created an AMAZING DIY No-Gelatin Printing Plate too! There are loads of DIY tutorials online on how to make one of these with Knox Gelatin, but I did some experimenting and give this a try using the new Amazing Mold Rubber! Today I'm sharing my results – ENJOY :)


Amazing Mold Rubber is an easy to use, high strength liquid silicone mold making rubber that is strong, soft and flexible - great for undercut parts and cures in approx. four hours {I timed it for this project - it is 4 hours... YAY}. Amazing Mold Rubber is a two-part liquid rubber used to make extremely elastic molds to produce quick and exact reproductions of your original. Replicas can then be cast in Amazing Casting Resin, Amazing Clear Cast Resin for plastic parts - or use other materials such as plaster, wax, clay or polyester... and that's just the beginning to all the fabulous uses just waiting to be discovered!


After four hours my Amazing Mold Rubber was fully cured and my AMAZING DIY No-Gelatin Rubber Plate was ready for a joyride! This second video is a test run on my faux gelatin plate... and my FIRST TRY at Gellin'...


Isn't this totally AMAZING!!! Now I have two plates in different sizes {one 6" x 7" and the other is 3" x 4"} that I can use simultaneously for double the mixed-media fun! I can totally see how this can become addictive. Here is my first three-paint layer monoprint and I can't wait to make more.


Now that I've got my hands on another brayer, I'm ready to rock n' roll. One brayer to paint with and the other to roll my impressions.

Why an ATC size plate? For my ARTful Lunch... I'm packing a daily ARTful lunchbox of creative playtoys to make a daily ATC while I'm at work. CLICK HERE to read post.

***********************

ATC No. 1
***********************

I created about 4 or 5 papers using my homemade no-gelatin rubber plate. I overstamped down the side with a handcarved stamp that I made in highschool out of a pink eraser. The silhouette man with dog is from Viva Las VegaStamps! on top of a torn washi tape boardwalk. I added some ( ) and numbers with plastic letter stencils leftover from my summer art camp supplies and blotted before the marker dried to mute the tones.

Thanks for dropping by. Hope you are having a great day! Sb :)

Please take a moment to subscribe to my posts via email or bloglovin' in the right sidebar since google reader/friend connect will be gone any minute now.

Sunday, August 18, 2013

Let Your Creativity Soar with Anything But a Card Challenges No. 26 - Fairy Tales or Fairy Theme


Please take a moment to subscribe to my posts via email or bloglovin' in the right sidebar since google reader/friend connect will be gone any minute now.

Hello! Happy Sunday everyone! I'm so excited to share the new Anything But a Card Challenge... Anything But a Card Challenge 26 is "Fairy Tales or Fairy Theme" - let your imagination soar with this theme... you could create something based on any fairy tale, or fairies, room for lots of possibilities! Let your imagination soar!

I am all about green-crafting! To create proper home for my fairy, I have taken a cigar box lid and some other bits and baubles to transform it into a shadow box straight from Fairyland! I've included a little how-to below on how I've created my "Fairy Frozen Charlotte", too.


**JUST FOR FUN** Here's an idea starter... if you want to channel your own inner Fairy... there is even a Fairy Name Generator. CLICK HERE to generate your very own Fairy, complete with a backstory. Next week I will share a project using one of these generated Fairy names. Just remember create anything except a card... and to have FUN!!!


There's two weeks to play along and link up via inlinkz froggy. Anything But a Card Challenges is a bi-weekly challenge and today, begins a new challenge. Our wonderful Design Team showcases their Challenge 26 "Fairy Tales or Fairy Themed" inspired projects today. Please click here to head on over to ABAC and see the wonderful projects shared by the design team AND submissions by all of you.

REMEMBER this challenge blog is ANYTHING and EVERYTHING... except for Cards. ATC's aren't greeting cards...so please link up your ATC's, too!!!


This project began with a little goodie that was included from an Etsy team-member I purchased some holiday soap molds from. She included this sweet fairy bar of molded goat's milk soap. I have been saving this for a special Amazing Mold Putty adventure... that has evolved into a whole fairyland altered shadowbox project.


I mixed up a good amount of Amazing Mold Putty to cover the front and all sides of the soap. It's about the size of a trading card and the square part of the soap below the relief is about 1/2" thick. I made the mold around the bar and I can use it for just the relief of the fairy - or as more of a sculptural piece.

A little note about the results... as it turns out goat's milk soap is very soft and delicate {but smells lovely}. It wasn't harmed by the mold putty - but the heat of the curing process of the mold putty sort of melted the soap into the edges of it. I had to put it in the freezer for about an hour {because this particular mold is so thick} to help accelerate cooling and release from mold putty. I had to pull a little to get it started, but it worked! My bar of soap has a slight tint of yellow now, but it was a success!


Then I filled the relief part of the mold with Creative Paperclay® and let completely dry. I also put this into the freezer for about 15 minutes so that I could get it out of the mold to dry. When dry I used a water brush to add some muted tones with my Distress Markers and then rubbed the edges and high points with metallic pearlescent dew drop ink pads.

My little fairy frozen charlotte is born!


The lovely detail of my Fairy Frozen Charlotte is painted, worn and weathered.


The Gnome is a vintage collage image from AlteredPages.com and is nestled amongst money shred for grass; layered on top of some patterned and handmade paper scraps, with some chipboard flower stickers and flourishes, paper florals and silk flower leaves I found in the parking lot outside the craftstore. All tied off at the top with a beautiful bow of luscious May Arts Ribbon.


For more projects, ideas and techniques using Amazing Crafting Products, jump over to the Amazing Mold Putty Blog. Go run and get those fairy wings on and let your creativity soar!

Thanks for dropping by today and I hope to see you tomorrow for a sneak peek from  a new project I've created with Amazing Crafting Products. :) Sb

Tuesday, August 13, 2013

Dolls Love a Bubble Bath too! Day TWO of Viva Las VegaStamps! and Scor-Pal Inspiration Week


Hello - welcome to day two of the Scor-Pal and Viva Las VegaStamps! rubber stamps week of inspiration!  Today I have a special project in store. I've created a paper dollhouse powder room, complete with faux ceramic tile, hand doodled vellum shower curtain and a girly bubble bath. 

This little dollhouse scene was totally inspired by two of the amazing tutorials over at the Scor-Pal website {a tile card by Susan Caplan and the "happy place" card by Cary Eldred}. I have this adorable tub stamp and I couldn't help but pay homage to both of these creative ladies cards - combining some elements from each, and housing it in some quick and easy box techniques provided there as well. I usually measure and score my own boxes and such using my paper trimmer - NO MAS! I'm a Scor-Pal girl now.


What does one do on a rainy day??? Play with dolls! I have been busy stamping and scoring up rooms for my neices' dolls. I have scored Kromecote cardstock and vellum hand doodled with Sakura Souffle® 3-D Opaque Ink pens.


This posh powder room has the look of real tiles {but it's only paper} to showcase this adorable bath tub stamp #5508. I've adhered the scored and folded walls edging and details with Miracle Tape from VLVS!, too!


I'm all about the details and I had so much fun customizing this little room all out of paper using my Scor-Pal.


I hand stamped, embossed with VLVS! High Gloss Embossing Powder,then hand colored the tub using Sakura of America Gelly Stardust Pens. I fussy cut and set aside.


I hand doodled a sheet of vellum and scored
at 1/4" intervals then accordion folded.


Detail of my hand coloring using


I pinched accordion together and punched
a hole to suspend curtain on a wire.


I scored and rolled over edging secured with Miracle Tape.


 I set an eyelet to accept wire to suspend curtain.


Curtain suspended from wire.


Detail view from top.


The faux tile is Kromecote cardstock scored on the Scor-Pal and swiped with a pale blue ink. Looks so realistic and it was so quick and easy to make. The details are what makes handmade goodies like this so special. My niece is sure to enjoy playing with this.

CLICK HERE to jump on over to the
VLVS! Blog to see MORE of what's in store today. 

ALSO there's blog candy to be won along with a "just because" sale, too! Get 20% off STOREWIDE through the 15th. use coupon code { aug20 } in your cart!


Thanks for visiting! Have a wonderfully creative day :) Sb

Monday, August 12, 2013

Viva Las VegaStamps! and Scor-Pal Inspiration Week Starts Today...


All week myself and my inky cohorts at Viva Las VegaStamps! are teaming up with the folks at Scor-Pal and using their amazing scoring tool in conjunction with Viva Las VegaStamps! rubber stamps for a week full of inspiration! You are just in time for the event.

CLICK HERE to jump on over to the
VLVS! Blog to see what's in store today. 

ALSO there's blog candy to be won along with a "just because" sale, too! Get 20% off STOREWIDE through the 15th. use coupon code { aug20 } in your cart!


Please drop by tomorrow for day two of this event... and my project using Viva Las VegaStamps! and Scor-Pal. Happy Monday :) Sb

Sunday, August 11, 2013

Gimme a SLICE of SUMMER FUN... Anything But a Card Challenges No. 25 - Week 2


Please take a moment to subscribe to my posts via email or bloglovin' in the right sidebar since google reader/friend connect will be gone any minute now.


Happy Sunday everyone! It's week #2 of the current Anything But a Card Challenge... Challenge 25 "Summer Fun". CLICK HERE to jump on over to ABAC to view more inspiration from our fabulous design team and the creations submitted by all of you. It may be summer vacation, but we are still taking time to create and play.


The current Challenge... Anything But a Card Challenge 25 is "SUMMER FUN". Splish-splash for hot fun in the summertime! For this challenge it could be all things summer, vacation, tropical beaches, sun, summertime colors {orange, bright blue, teal, yellow, tan} - anything goes! Just remember create anything except a card... and to have FUN!!!

REMEMBER this challenge blog is ANYTHING and EVERYTHING... except for Cards. ATC's aren't greeting cards...so please link up your ATC's, too!!!


I know I shared my project last weekend, a flip-flop vacation mini album - but I couldn't resist sharing this tote that I created using Amazing Crafting Products. If you aren't familiar with this AMAZING line of products - you want to CLICK HERE and check it out right away. 

PSST... I happen to have the "INSIDE SCOOP" that there will be a GINORMOUS announcement on their blog tomorrow that you don't want to miss out on {wink... wink}!!


This tote is totally hand-stamped using a stamp I created from a mold cast from a citrus slice using Amazing Mold Putty. CLICK HERE to see how I did it.

Thanks for dropping by today and I hope to see you tomorrow for the BIG REVEAL from Amazing Crafting Products. :) Sb
Blog Widget by LinkWithin