Translate

**If you have previously subscribed to received my posts via email: Please subscribe to my posts via Bloglovin in the right sidebar.**
Showing posts with label techniques. Show all posts

Monday, November 15, 2021

Great News!!! I'm TEACHING at the #collagelabspringfling


Keep calm and put the bacon on! Hello friends! The time is finally here and I am so excited and thrilled to tell you the NEWS!! I've kept this post brief, so please read to the end. This is my first EVER announcement of this kind and I am bringing it to YOU, my blog readers first. XOXOXO


It's a rare occurrence that someone catches me in a photo. This one surely speaks for itself! I have a new workshop that I am teaching... and I invite YOU. Grab some scissors, a glue stick and a pile of your paper scraps, magazine clippings & ephemera and join me!


While in-person engagements are still limited, the magic of technology has made it possible for me to teach online -- and I have been invited to teach at Collage-Lab's SPRING FLING Virtual Retreat!


The BEST part is EVERYONE is invited to join the fun!


Join myself and 14 artists from across the globe at
the Collage-Lab SPRING FLING Virtual Retreat!
It all begins March 1st, 2022. 


Get away from the hustle and bustle of everyday and focus on mixed media collage for a bit. For the entire month of March 2022, Collage-Lab will bring you a variety of online classes, Zoom gatherings, and a whole assortment of collage projects and techniques.

Treat yourself to a gift while supporting
your artist community... a WIN-WIN!

SIGN UP TODAY for the low Early Bird Price of $100 and unlock all of the adventures of this unique Mixed Media Collage Retreat from the comfort of your own home or studio.

For all the details CLICK HERE.


Full Disclosure: the Collage-Lab SPRING FLING Virtual Retreat pays its instructors. By using my affiliate linkbit.ly/SpringFling_withSB to sign up, I will receive a small commission which goes towards continuing my efforts to bring creative inspiration to you for FREE here in webland. I am so grateful to all of you for supporting me and my creative adventures.

I hope you will sign up and join me! It will be the best gift ever!

Sending you all many {{ BIG Crafty HUGS }}
:) Sb

Friday, October 8, 2021

Color all the Things... Dive into the World of Artesprix® Sublimation Ink

Hello friends! It's finally Friday and I have something new and exciting to share that I have been keeping a secret all Summer. Earlier this year, I responded to the call for Artesprix® Design Team and I was invited to be a Guest Designer for the Artesprix® Blog.

Today I am thrilled to introduce you to the world of Artesprix® and working with Sublimation ink. 


My guest designer project is to feature Artesprix® Bookmarks, and I was sent this assortment of Artesprix® Sublimation Markers, Sublimation Stamp Pad, Blanks and everything I need to dive into the world of sublimation.

For my first project I grabbed a never used stencil from my stash and the Artesprix® Sublimation Markers to create a bright colorful bookmark... and though I tried to get my hubs to play with me, he only chose the colors! Artesprix® bookmark blanks are the perfect canvas to creating personalized art to mark your books.


So... what are Artesprix® Sublimation markers? 

Artesprix® markers have a specially formulated ink that transforms anything colored on plain copy paper into a heat-transferrable iron-on design onto polyester items. With the magical Artesprix® Sublimation Stamp Pad and Sublimation Markers and plain paper and a hand-drawn, stamped or stenciled design, I can customize all the things! What the WHAT?!! The holidays are just around the corner...


Materials needed: Plain Copy Paper; Pencil; Artesprix® Sublimation Markers; Artesprix® Heat Tape; Artesprix® Protective Paper Roll; Artesprix® Project Mat; Artesprix® Bookmarks 4ct; Stencil -- Art by Marlene MASKBM17 from Studio Light B.V.; and a Heat source -- Cricut Easy-Press Mini™ (Artesprix® Heat Press or Home Iron).

Ready to play...


Using a pencil trace Bookmark blank onto plain copy paper. For paper size, plan to leave approximately 2" on all sides to yield for coloring outside the blank shape and applying heat tape. Trace stencil design within bookmark outline and be sure to add about 1/8" to 1/4" of coloring outside the lines.


Using the yellow Sublimation Ink Marker I set off to fill in all of the lines.


The pens have a nice chisel tip that makes it easy to draw a thin or wide line.


First layer of color done... next the background.


Using the blue Sublimation Ink Marker, I filled in all the negative spaces.


The tiny areas were tricky but this is why I did the lighter color first.


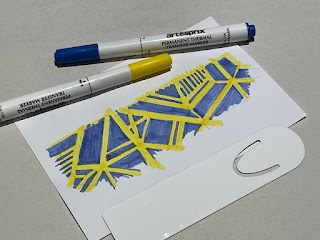
OK... all colored! I think I want to add some outlines.


Using the Black fine tip Sublimation Ink Marker, I re-traced the stencil design shapes, then added some hand drawn lines and cross-hatching in a few areas to make it a bit more artsy.


I love it! Yes the color looks a bit dull... but not to worry -- it needs some heat to come to life!


Pre-heat Cricut Easy-Press Mini™on the highest temperature setting and prepare bookmark for thermal transfer magic by placing face down within pencil lines secured with Heat Tape. You can see why I colored outside the lines -- there will be no white edges when transferred.


With the Project Mat on bottom, I make a "Sublimation Sandwich” — a piece of Protective Paper at the top and bottom of your bookmark taped face down onto stenciled design. I used two layers of protective paper on top and bottom for good measure.


Now the fun part... apply heat! Starting at one end I press and hold Cricut Easy-Press Mini™for 45 seconds, then move to next unpressed area, slightly overlapping and pressing again. I repeat 3-4 times until entire length of bookmark has been heat pressed. 

I have to admit this is not what I intended to be doing when I purchased this little mini iron... but I love it!


Let cool a bit -- the bookmark is metal... and keeps heat a while. Take a peek check by gently peeling back one section to peek and see if thermal transfer is complete.


If it looks good, let bookmark fully cool then remove Heat Tape.


Wowee!!! Look how bright and vibrant the blue and yellow is!!


The heat transferred bookmark next to the hand-colored stencil design on paper.
This bookmark certainly won't be missed in the pages of a book.

The possibilities are endless with a variety of Artesprix® Blanks that can be customized with hand-drawn art or using my stash of stamps. These custom bookmarks are so easy to make and is a fun project to do with kids (heat part adult supervised of course).

What else did I make??! Hop on over to see my Guest Designer Project on the Artesprix® Blog... and see how my love of stamps meets bookmarks.

Thanks for visiting... I'd love to hear how you would art up your own bookmark using Artesprix® sublimation markers.

Happy creating! Sb

** This is a sponsored post. Artesprix® provided products for use in this project in exchange for my creative ideas, views and opinions. My ideas and opinions are my own.

Saturday, October 7, 2017

Stamping a #Cre8time Storm


Hello Friends and Happy World Cardmaking Day! For today I am sharing one of my favorite cards and a fun technique that is one usually done with the Kiddos. Living in South Florida, I am in Hurricane alley and the past several weeks the storms have been relentless with Harvey, Irma, Maria and now Nate. There is a silver lining - storms are a perfect time to get crafty!


For today's project I am sharing a shaving cream technique to make a swirly background to go with this Hurricane Blowing Trees stamp. This technique is quick and easy and so much FUN!


I sprayed some shaving cream into a paper plate, spread around with a plastic knife, then dripped in three colors of Distress Ink re-inkers {peeled paint, old paper, and iced spruce}.


Drag the knife through the shaving cream to swirl colors around in patterns. If you do this too much, you will completely blend the ink into shaving cream.


Place your piece of cardstock into the shaving cream mixture and press flat to make sure entire paper has made contact. I'm using a smooth natural ivory colored cardstock as my base.


Gently remove the paper from the shaving cream and then scrape off the shaving cream with the plastic knife. Place paper onto a paper towel and wipe off the remaining shaving cream off using a soft towel. Finally I give the papers a zap with the heat gun to dry and to set color.

This technique is really easy and this project is great for kids, too. I colored several pieces of paper using the shaving cream mixture. When the color became too solid, I added a spray of fresh shaving cream and swirled it in. The white areas of shaving cream result in a color resist. My backgrounds are ready to get stamped.


I inked up my stamp with Versafine Black Ink and stamped onto the shaving cream painted paper. **PLEASE NOTE** The shaving cream leaves a film on the paper that makes the stamped image slightly distressed. I also tried stamping with dye ink on another paper and the image was blurred and resisted in areas. The Versafine ink version came out the best and I heat set this one to dry.

Now for assembly! I tore the edges away on each side of my stamped image. A SECRET... I layered this onto the unusable dye ink stamped image torn in the same fashion, leaving a larger border. For my card base I used a section of distressed corrugated mounted onto a Kraft card base using double sided tape. I adhered the base painted paper, then mounted a strip of burlap, and overlayed the stamped image. I finished off with two sea glass nuggets for a little bling.

Presenting my windblown Hurricane Card!!!


Thanks so much for dropping by and I hope you are having an inky day!! What cards are you making for World Cardmaking Day?  Sb :)

Sunday, April 19, 2015

#Cre8time Paint Play brings #MixedMedia Variety...


Join me today for another installment of my "Thoughtful Abstractions" column at Unruly PaperArts. The theme for April is Gelli® Plates and Monoprinting... focusing on the mixed-media painting technique that virtually ANYONE can do – anywhere! This is one of my favorite techniques and is a source of Cre8time inspiration.

CLICK HERE to jump over to Unruly Paper Arts to read my latest column that includes a monoprinting tutorial.

Monoprints are so versatile and can be a starter for all sorts of projects. Here are a few examples of projects I've made using different techniques.


My "Faux Van Gogh" stamped collage is a fusion of three layers: the base a painted sheet of white cardstock; a monoprint created with Liquitex Soft Body Acrylic paints {Cadmium Orange Hue and Cerulean Blue} and deli paper on a Gelli Arts® Gel Printing Plate {yes, I do actually own one}; and a stamped image on deli paper. This is a fun way to use your monoprints. This blue and orange was acutally a clean-up sheet that I was rolling my paint filled brayer on. CLICK HERE to view tutorial on how I created this.


How about using a monoprint to découpage onto a dimensional project? Oh yes! This made painting so quick and easy and my whimsical steampunk pinewood derby car came to life in minutes. CLICK HERE to see the entire project.


Round monoprinting plates are the lastest craze and it dawned on me that I also have loads of round shapes lying around, too! A whole pile of them!!! Several of my mold rubber molds sitting in pretty little stacks like crafty pancakes.

First I applied some colors to one of my rectangular plates with a brayer, then pressed my nut and bolt mold into the paint – this leaves a beautiful circle with hexagons in the negative space. Then I can stamp off the color from the MOLD onto another print or blank paper. Gorgeous!!! CLICK HERE to view more variations of applying color.

Thanks for visiting and I hope you are inspired to try some painterly play during your Cre8time! Have a wonderful Sunday. :) Sb

Monday, February 2, 2015

My LOVE of STAMPING meets #Cre8time Organization


Hello Everyone! Today is the first monday of February {as well as Groundhog's Day here in the U.S.} which brings another Designer Crafts Connection Bloghop! Our creatives are sharing projects of "LOVE This..." which is anything having to do with creativity - tools, techniques, products, or craft genre!


I don't know about you, but for me January flew by in like a minute... and I'm trying to "SIMPLIFY" my life in 2015. I've combined my love of STAMPING and MIXED-MEDIA to create a creative calendar, by mounting an original stamped collage into an acrylic craft frame that I can change for each month with some fun wet-erase markers.

In my effort to reorganize my life and Cre8time, my stash of Deflecto Craft Solutions are making my studio, sleek and streamlined... but also modern and completely "ME".


This project is featuring the Deflecto Hanging 8 1/2" x 11" Craft Frame #68201CR – which I measured out a blank calendar grid marked out with thin washi tapes... quick and easy!


Starting with a blank sheet of white letter size uncoated cardstock, I used clear embossing fluid to stamp images onto sheet; then applying embossing powder and heat embossing to create an emboss resist. I worked in sections at a time, stamping, applying powder then heating to build up a scene. This is one of my favorite stamping techniques and is totally worth the time invested to build a background.


Now for the MAGIC! I colored over the top with Faber-Castell Gelatos and blended out with my finger. In doing this, some of the stamped images blend into the background becoming more muted adding depth and interest. Much of the stamped imagery gets covered up, so to expose the resist areas I gently rub the surface with a papertowel to remove the color away from the embossed areas... and the embossed white areas reappear! Love... love... LOVE!!! I repeated adding layers color and rubbing away until coloring was to my liking. 


I have an instant mixed media painting... with stamps! I have so many stamped images here to create my "mind's eye" scene... too many to count, so I have listed all below in supplies list. 


With my collage complete - I gently slide it into the frame and prepare for hanging. Super easy and protected from the elements... a total INSPIRATION piece!


I used my labelmaker to make some days of the week title stickers for the top of my calendar grid, then topped off the frame with sari ribbon and hemp twine for hanging. My calendar can be changed easily each month with wet erase markers. 

"My Cre8time is Ready for February"


• • • • • • • • • • • • •

SUPPLIES: All stamps from Viva Las VegaStamps -- "Eye and Brow" #4487"Stars" #19291"Washi Lines Background" #19073"Creative Minds are Rarely Tidy" #1501"Question Everything" #18824"Paris Address" #17539"Writing Triangles" #19571"Double Coffee Rings" #19568"Measuring Tape Section" #19565"Mesh Texture" #19569"Bubble Wrap Texture" #19566"Texture Background" #19570"Writing Circles Background" #19567"Color Wheel Lines" #19338; and "Solid Color Wheel" #19339Other Supplies: VLVS! Miracle TapeVLVS! Ultra High Gloss Embossing PowderWhite Cardstock; Deflecto hanging 8 1/2" x 11" Craft Frame #68201CR; Deflecto Wet Erase Markers; rainbow colors of Faber-Castell Gelatos; Globecraft Embossing Ink Dauber; labelmaker; washi tape; sari ribbon and hemp cord.

+ + + + + + + + + + + +

Thanks so much for visiting! Continue on the Designer Crafts Connection "LOVE THIS..." Bloghop by selecting hop back/forward on the logo below to enjoy all of the wonderful inspiration. Sb :)
Blog Widget by LinkWithin