Translate

**If you have previously subscribed to received my posts via email: Please subscribe to my posts via Bloglovin in the right sidebar.**
Showing posts with label stencils. Show all posts

Monday, October 23, 2023

Small things Bright and Beautiful... StencilGirl® Zine Challenge


Hello friends! It's a new season and though it's been awhile... I'm still creating! This has been a year of putting family and home first, and getting back to painting. I have lots to catch up on in the coming days and weeks.

Today I am excited to share the "StencilGirl® Zine Challenge"... a new collaboration project in which Tina Walker posed the challenge to create a one-sheet ZINE using StencilGirl® Stencils. These collab projects are fun and really stretch my creative muscles!!

For this challenge I used things that end up in my purse and pockets... the tags with quotes from my daily cup of tea. My ZINE is fashioned from a recycled ledger paper folded to ATC size (2 1/2" x 3 1/2"), which is the perfect size and scale to properly showcase these tags. My ZINE of "Wise Words from the Tea Leaves" is made using my stash of StencilGirl® ATC stencils.


This is the inspiration we were provided for this Zine Challenge. With a simple sheet of letter size paper folded following the illustration, a mini book is created. Size it up or down, this format can be arted up in a zillion ways!

I think this will be really interesting out of a large sheet of painted up watercolor paper, but for this challenge I am working small so I can use some of my stash of StencilGirl® ATC stencils that I've never used. I love to make "Artist Trading Cards" (ATCs) for trading with artsy friends. This small art is sized at 2 1/2" x 3 1/2" and making a book using this sizing proved to be quite fun!

I let the muse rule here and she always goes for the "one touch rule"... using things that I have picked up on search for other things. My base is a sheet of ledger paper on the table leftover from an altered composition book project. An interesting choice – OK why not?!

The paper is slightly larger than letter size. I want my end result to yield  ATC size pages so I do a few measurements and tear edges down to size. I want to stencil black on this greenish paper, though it is a bit thin. I'm concerned about bleed-through on this old paper. The way the paper folds to create the zine I won't be utilizing the back of sheet when folded down. I applied a light coat of black gesso to the back with an old hotel key card. Sorry no photo, I spilled my black gesso and had a mopup painting emergency. I'm happy to report that no paint went to waste! LOL!

With paper dry and reinforced, I followed the zine folding steps and went over folds with a bone folder to make them nice and sharp. Since my outer edges were torn, I also tore the center where the diagram says to cut. Fold down a quick and easy book!

Follow along as I share how I built up the layers on this spread in my Zine...


Overall I stenciled with Vicky Boutin Gold stencil paste using StencilGirl® L763 -- ATC Mixup NASSER


Wow!!! I love the shine and contrast on the ledger paper. 


Next I pounce blue acrylic through this wonky squares pattern on StencilGirl® stencil L543 -- ATC MIxup 1


Now we're getting somewhere! 
Loving this but I'm about to go crazy...


Grabbing what is on the table, I used a cheap office store brand glue stick through the star pattern on StencilGirl® L657 -- ATC Mixup DUBE


I am using a fun and messy technique – a glue stick resist. First, I apply glue stick through stencil, let dry. Then I apply a layer of black acrylic over the top. While wet, gently wipe paint away in a circular fashion to remove the glue stick with the excess paint to reveal the lovely layers below. 


This glue stick didn't mask everything like I had expected but the effect is pretty exciting! I go back with some pens and markers to complete and add some more stars. Next time I will get out my "art project" assigned glue stick, not the cheap gooey one for sealing envelopes.


I attach the tag, finish the final details with scribbles and pens. This page is the perfect backdrop for this tea tag wisdom.

"BRIGHT and BEAUTIFUL"


Completed spread.


Detail of tea bag tag quote...
"The universe is withing you. Bright and beautiful."
An inspiration worthy of being a mantra.

I love the size and scale of my Zine and it fits nice in the pocket of my purse. I am enjoying making additional volumes of this to use more of my tea bag tag quotes. I have a whole baggie of them that need a home.


StencilGirl® Stencils Used :


+ + + + + + + + +

I hope you enjoyed this project. How would you create your own ZINE? CLICK HERE to jump over to see the other zines made for the "StencilGirl® Zine Challenge".

Thanks for dropping by! :) Sb

Monday, January 24, 2022

Shine... StencilGirl® Self Portrait Collaborative


Hello friends! 2022 is underway and today I am excited to share a new StencilGirl® collaborative project -- the "StencilGirl® Self Portrait Collaboration"... a project in which we were challenged to draw/stencil/paint a self portrait using StencilGirl® Stencils.

https://www.stencilgirltalk.com/2022/01/stencilgirl-self-portrait-collaboration.html

I am inspired by so many artists and art journal styles. I recently celebrated a milestone birthday -- a perfect reason for a new spread in my Ranger art journal. I opened the book to this spread that had blue paint rubbed all over from a previous art adventure.


For my thirtieth birthday, my hubs and I traveled to NYC for a bucket list road trip. We saved up all year to attend the Macy's Thanksgiving Day Parade. Along with the parade we squeezed in as much of NYC as we could in the weekend, ending with our last night staying at the Plaza Hotel. In seeing the sights walking around Central Park, we came across an artist who was set up drawing portraits in pencil and chalk right on the sidewalk. I watched him work in amazement and sat with him to have my portrait done to document my milestone birthday.

Portraits have always been a challenge for me, and self-portraits just turn up the stress level. This project was certainly a challenge, and I am happy to have used this challenge to document this time in my life. Out of all the collab projects I have joined, this one is by far my favorite!!


Nestled in my book is this hand-cut self portrait stencil that I made many moons ago at my LSS for a "Creative Jumpstart Meetup" where we created these inspired by Natalie Kalbach's CJS episode that featured this technique.


Even in this simplified format, this was a challenge. I have never used this stencil. I find it interesting how serendipitous artful opportunities present themselves.

Follow along as I share how I built up the layers.


I get out my big bin of Grumbacher Academy Acrylic paints and apply Yellow Ochre and Thalo® Yellow Green using a recycled key card.


Then added some Turquoise Green. I love how buttery
and creamy the Grumbacher Acrylics paints are.


With a base of color, I begin stenciling. Using a triangle sponge applicator, I pounce Payne's Gray through StencilGirl® L517 Shaw -- Triangle Transitions 2 Stencil.


I continue covering the entire right side page.


On the bottom left side page I apply the Payne's Gray through my handmade self-portrait...


Then continue the Triangle Transitions stencil background around the face.


Now its time for adding flowing locks of hair in Dioxazine Purple pounced through the StencilGirl® S321 Stegmiller -- Whimsical Waves Stencil.


I applied some Thalo® Gold across the top of the pages to shape around the hair then pounced over a mixture of Unbleached Titanium White and Titanium White through the StencilGirl® S681 Walker -- Gaol Doorways Stencil making a repeating pattern.


Using markers and Stabilo pencils, I added some detail
to shape the edge of the curls and waves in the hair.


It's really coming along. Now to add detail and color to finish off the face.


Using pencils and some washes of paint and Stabilo pencils, I drew in the features on the left side of face, nose and lips. I drew in the word SHINE with marker within the right eye and added color with markers to bring out the rays.

"SHINE"


Completed spread.


Detail of face.


Detail of hair and hand-drawn waves.


I added jewels to neck using StencilGirl® S735 Walker -- Stone Statue Small Stencil with Alizarin Crimson.


I love how the background is full of texture. It brings together my favorite colors and the stenciled patterns resemble how I see things through my mind's eye.

StencilGirl® Stencils Used : 

M058 Apter -- Stencil Square Urban Insiders

S321 Stegmiller -- Whimsical Waves Stencil

S681 Walker -- Gaol Doorways Stencil

S497 Kerr -- Starlight Starbright Stencil

S735 Walker -- Stone Statue Small

L517 Shaw -- Triangle Transitions 2 Stencil

+ + + + + + + + +

I hope you enjoyed this project. How would you use stencils to create your self portrait? CLICK HERE to jump over to see the other portraits made for the "StencilGirl® Self Portrait Collaboration".

+ + + + + + + + +

Have you heard?! I'm teaching at Collage-Lab's SPRING FLING Virtual Retreat! Join myself and 14 artists from across the globe, for 20 hours of instruction, Zoom gatherings, and an assortment of collage projects and techniques. Get away from the hustle and bustle of everyday and focus on mixed media collage techniques from the comfort of your home studio! The fun begins March 1st, 2022. For all the details visit: bit.ly/SpringFling_withSB.


Thanks for dropping by!  :) Sb

Friday, October 8, 2021

Color all the Things... Dive into the World of Artesprix® Sublimation Ink

Hello friends! It's finally Friday and I have something new and exciting to share that I have been keeping a secret all Summer. Earlier this year, I responded to the call for Artesprix® Design Team and I was invited to be a Guest Designer for the Artesprix® Blog.

Today I am thrilled to introduce you to the world of Artesprix® and working with Sublimation ink. 


My guest designer project is to feature Artesprix® Bookmarks, and I was sent this assortment of Artesprix® Sublimation Markers, Sublimation Stamp Pad, Blanks and everything I need to dive into the world of sublimation.

For my first project I grabbed a never used stencil from my stash and the Artesprix® Sublimation Markers to create a bright colorful bookmark... and though I tried to get my hubs to play with me, he only chose the colors! Artesprix® bookmark blanks are the perfect canvas to creating personalized art to mark your books.


So... what are Artesprix® Sublimation markers? 

Artesprix® markers have a specially formulated ink that transforms anything colored on plain copy paper into a heat-transferrable iron-on design onto polyester items. With the magical Artesprix® Sublimation Stamp Pad and Sublimation Markers and plain paper and a hand-drawn, stamped or stenciled design, I can customize all the things! What the WHAT?!! The holidays are just around the corner...


Materials needed: Plain Copy Paper; Pencil; Artesprix® Sublimation Markers; Artesprix® Heat Tape; Artesprix® Protective Paper Roll; Artesprix® Project Mat; Artesprix® Bookmarks 4ct; Stencil -- Art by Marlene MASKBM17 from Studio Light B.V.; and a Heat source -- Cricut Easy-Press Mini™ (Artesprix® Heat Press or Home Iron).

Ready to play...


Using a pencil trace Bookmark blank onto plain copy paper. For paper size, plan to leave approximately 2" on all sides to yield for coloring outside the blank shape and applying heat tape. Trace stencil design within bookmark outline and be sure to add about 1/8" to 1/4" of coloring outside the lines.


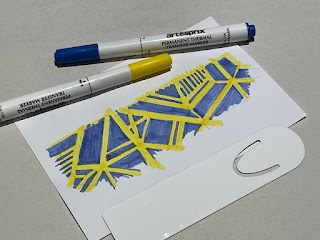
Using the yellow Sublimation Ink Marker I set off to fill in all of the lines.


The pens have a nice chisel tip that makes it easy to draw a thin or wide line.


First layer of color done... next the background.


Using the blue Sublimation Ink Marker, I filled in all the negative spaces.


The tiny areas were tricky but this is why I did the lighter color first.


OK... all colored! I think I want to add some outlines.


Using the Black fine tip Sublimation Ink Marker, I re-traced the stencil design shapes, then added some hand drawn lines and cross-hatching in a few areas to make it a bit more artsy.


I love it! Yes the color looks a bit dull... but not to worry -- it needs some heat to come to life!


Pre-heat Cricut Easy-Press Mini™on the highest temperature setting and prepare bookmark for thermal transfer magic by placing face down within pencil lines secured with Heat Tape. You can see why I colored outside the lines -- there will be no white edges when transferred.


With the Project Mat on bottom, I make a "Sublimation Sandwich” — a piece of Protective Paper at the top and bottom of your bookmark taped face down onto stenciled design. I used two layers of protective paper on top and bottom for good measure.


Now the fun part... apply heat! Starting at one end I press and hold Cricut Easy-Press Mini™for 45 seconds, then move to next unpressed area, slightly overlapping and pressing again. I repeat 3-4 times until entire length of bookmark has been heat pressed. 

I have to admit this is not what I intended to be doing when I purchased this little mini iron... but I love it!


Let cool a bit -- the bookmark is metal... and keeps heat a while. Take a peek check by gently peeling back one section to peek and see if thermal transfer is complete.


If it looks good, let bookmark fully cool then remove Heat Tape.


Wowee!!! Look how bright and vibrant the blue and yellow is!!


The heat transferred bookmark next to the hand-colored stencil design on paper.
This bookmark certainly won't be missed in the pages of a book.

The possibilities are endless with a variety of Artesprix® Blanks that can be customized with hand-drawn art or using my stash of stamps. These custom bookmarks are so easy to make and is a fun project to do with kids (heat part adult supervised of course).

What else did I make??! Hop on over to see my Guest Designer Project on the Artesprix® Blog... and see how my love of stamps meets bookmarks.

Thanks for visiting... I'd love to hear how you would art up your own bookmark using Artesprix® sublimation markers.

Happy creating! Sb

** This is a sponsored post. Artesprix® provided products for use in this project in exchange for my creative ideas, views and opinions. My ideas and opinions are my own.

Blog Widget by LinkWithin