Translate

**If you have previously subscribed to received my posts via email: Please subscribe to my posts via Bloglovin in the right sidebar.**
Showing posts with label altered books. Show all posts

Wednesday, September 14, 2022

Let your #Cre8time Fly... Gina K. Designs and Designer Crafts Connection Bloghop


Greetings everyone! Today I am joining the creatives with the Designer Crafts Connection in getting inky for a new bloghop featuring projects made with Gina K. Designs stamps and die-cut ephemera.


Gina K. Designs carries the highest quality stamps, ink, cardstock, dies, stencils and more! Everything coordinates beautifully so you can start creating right away... inspiring with great ideas for paper crafting success!


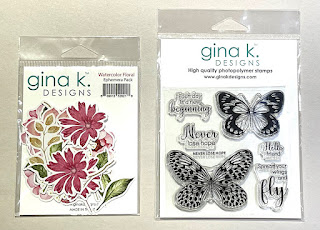
I love to customize a plain composition book and collage with lovely papers, stamps and ephemera. I was provided with these beautiful Gina K. Designs ephemera watercolor floral die-cuts and butterfly "Never Lose Hope" stamps which are perfect to decorate a new inspiration journal.


Supplies: Blank composition book; scissors, glue stick, black Staz-On ink; misc patterned paper and ledger paper; vellum paper; coordinating lace and ribbon; paintbrush; Ranger Old Paper Distress Oxide; double sided adhesive tape; Gina K. Designs butterfly "Never Lose Hope" stamps and ephemera watercolor floral die cuts.


Using Staz-On black ink, stamp many butterflies onto vellum and ledger paper.


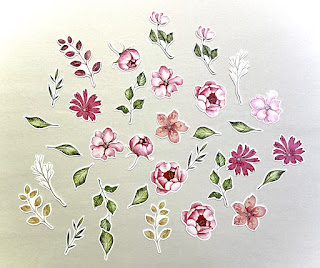
Look at all the flowery goodness here in the ephemera watercolor floral die-cut package!


Before gluing down floral pieces, I quickly antiqued with Ranger Old Paper Distress Oxide applied with a brush.


With just a quick brushing of ink, the die cut pieces look aged with bright colors and whites toned down.


Covering a journal is really straightforward. Trace around the cover onto the back of a patterned paper which is a nice cream with some sparkle detail (pretty sure this was leftover from something Christmas themed). I cut on the traced line and apply a liberal slathering of glue stick to the cover, then press paper onto the cover. Easy-peasy!


Fussy cut out all of the butterflies. I enjoy cutting out a pile of hand-stamped images.


Now I'm ready to grab the glue stick and apply things to the prepared journal.


The combination of the black ink on ledger paper with the antiqued florals give a shabby-chic feel.


I slightly overlap floral pieces and leaves to create depth.


I finish the edge of journal with a piece of lace layered with a tri-color ribbon adhered with double-sided adhesive. This ties everything together to complete my journal redux.

Shabby-Chic Journal takes flight!


With just a few supplies, I have transformed a plain composition book to something that looks like those sold at the bookstore.


The sparkle detail on the paper adds a bit of bling to the neutral colors.


I love the neutral colors with just a pop of color in the florals. This journal is ready to be filled with creative ideas and inspiration from my daily travels.

CLICK HERE to jump over to the Designer Crafts Connection blog to view more projects using Gina K. Designs Bloghop.

For more info on Gina K. Designs Products, project inspiration and to purchase visit Gina K. Designs website HERE.


Thanks so much for visiting! What would create with Gina K. Designs? Sb :)

** This is a sponsored post. Gina K. Designs, LLC provided products for use in this project in exchange for my creative ideas, views and opinions. My ideas and opinions are my own.

Monday, July 26, 2021

Destiny Found... Cooking with Tina StencilGirl® Stencil Collaboration


Hello friends! It's been a long time since I've played in my art journal and Tina Walker cooked up a FUN art journaling project to challenge me and kept me working on the same page for the past couple of months.

Join me today in the final reveal of the latest StencilGirl® collaborative project, "Cooking with Tina" featuring the art journals of eight artists all following the same RECIPE – a few ingredients being our favorite StencilGirl® Stencils.

For me art journaling isn't something I do on a regular basis. I enjoy working in a journal and this fun collab let me ease into creating an art journaling practice. Also it didn't require a lot of time or the pressure to complete a page in one long session.


Tina kept us on the edge of our seats each week – adding another ingredient (creative twist) to apply over the 12 weeks. This is the final recipe card that includes all 12 ingredients.


I worked in my journal with black paper pages.
Read on to see my steps in order followed by the finished page.


Start by prepping surface page with gesso. I used Liquitex black gesso. This sounds weird, though it makes the dark paper have a nice, rich surface and the colors POP.


Add 2 colors of acrylic paint to the surface. I used a green Ranger Adirondack acrylic to draw in swirls and a tube of Heidi Swap yellow straight from tube making striped strokes.


Add collage to surface. I set out with more pieces
of collage fodder than I ended up using.


Stencil a repeating pattern to surface. I applied Payne's grey acrylic paint through the StencilGirl® L456 - Buenos Aires stencil.


Scribble or doodle on surface.
This was fun! I used three Stabilo woody crayons.


Represent "opposites" in project. For this I added opposing words "LOST" and "FOUND" using StencilGirl® S305 - Text and Texture Transform Stencil using many layers of acrylic paint, markers and pencil so the words could emerge from the background.


This week's recipe presented an interesting twist! Draw a face. First I sketched in with Stabilo pencil, followed by a flesh colored Stabilo woody, then added water to paint in the area. I added features with layers of pencil.


Add the color RED. I added red in areas, bringing out some of the florals using a Vicki Boutin water soluable crayon (these are so buttery).


Stencil with a Tina Walker stencil. Using StencilGirl® S822 - Cathedral Floor and a mixture of Payne's grey and white acrylic followed by yellow, I aligned the pattern of cathedral floor join up with the stone path I collaged in earlier.


Add ink. I added four colors of Liquitex inks, two of them metallic -- adding a little bling and contrast to certain areas. The metallic is hard to see, but it really added a lovely glowing effect to the Cathedral.


Add words. For this I added the words "Destiny" using StencilGirl® S306 - Text and Texture Explore Stencil peeking in and around the florals and one that stood out to complete the phrase "destiny found".


Cover something up. Another plot twist! The face needed some work as it was just floating there. I used a swirled decorative staircase that I had leftover from the collage ingredient to form a head-dress and trees amongst the flowers. This tied the face together nicely with the image of the statue from my Grandmothers garden.


Add finishing touches. Using pencils, Stabilo woody's and markers, I added details, built up contrast and finished up the lettering to complete this moody colorful garden.

"In this Garden... Destiny Found"


This art journal page is full of luscious layers and texture. It was a challenge to let the ingredients lead the direction of where the art wanted to go. I'm in love with how it turned out. This page helped heal my heart I have spent much time away from home during this challenge -- sitting in my Grandmothers home, and her garden, reflecting on all the wonderful memories spent together.

It was fun to add a new ingredient each week and I enjoyed leisurely playing along!! I look forward to using this recipe style on new pages -- next time starting with surface prepared with white gesso.

StencilGirl® Stencils Used:

CLICK HERE to jump over to see the other fabulous journals made for the Cooking with Tina... StencilGirl® Collaborative. Did you play along? I'd love to see -- leave me a comment with a link to your art journal page created using the recipe card above.

Thanks for dropping by! Sb

Monday, January 27, 2020

Sparkling City Lights... a StencilGirl® Pop-Up Extravaganza

Disclosure: This post contains my amazon affiliate link for a book I am referencing in this post. This means that–at no extra cost to you, I can make a commission on a purchase you make if you use my link.


Hello Friends! It's a new year and January is always a whirlwind. Today I am proud to be part of a special COLLABORATIVE project hosted by Tina Walker and StencilGirl®... a StencilGirl Pop-Up Extravaganza! CLICK HERE to POP on over and be inspired to make your stencil art POP off the page!


I am a city girl from Chicago who lives in SoFL and I love my hometown skyline at night. So for this pop-up project, I stenciled a layered and mirrored skyline onto two base papers painted with an ombre of three colors of ColorShift paints, using only 2 stencils: S305 Apter, Text and Texture Transform and ATC Mix-Up Borloz L655.


After creating the skyline by repeating the stencil across my papers, I added highlights, water reflections and windows details using a couple Sakura Gelly Glaze pens.


 I traced this textural pattern over the row of buildings which brought the night sky to life!


A larger look...


I have quite a collection of books on bookmaking and folded paper techniques and for this artwork I selected a technique that creates a pop-up dueling accordion pullout from the book, "Pockets, Pullouts and Hiding Places".


For added contrast between the two layers, I trimmed one skyline down around the buildings before scoring, folding and assembling.

Sparkling City Lights


To frame this pop-up I have nestled inside of a notched cut-out accordian of navy blue cardstock. When closed and folded flat this mini will fit into an A2 envelope -- how fun is that?! Enjoy these details.


StencilGirl® stencils used: ATC Mix-Up by Andrew Borloz and Text and Texture Transform stencil by Seth Apter.

• • • • • •

Thanks for dropping by! I hope you are inspired add a POP of dimension to your handmade books and cards using StencilGirl® stencils! Have a creative day :) Sb
Blog Widget by LinkWithin