Today is the big day - time for my Round 2 submission for May Arts Design Team. I would like to take a moment to thank Bethney, the Ribbon Lady for this opportunity and for enabling me to go ahead with this large project, as I needed a lot of ribbon for my wall art.
I started out on a venture to create a wall hanging with a summer theme... then my greencrafting gene kicked in! Remember the good old days when HGTV actually had shows that were interesting... Freestyle, Design on a Dime, Decorating Cents and others. I used to watch HGTV almost exclusively - every night. Nowdays we have Pinterest to fill our DIY cravings.
I loved that show Freestyle, where they would redo a room in a place by only shopping around for items already in the homeowner's house - it was great! So I planned to take an old frame that has been hanging in my spare bedroom {for nearly 10 years}. A leftover from my art supplies and canvases from my art studio days that now reside in our spare bedroom {aka storage}. We had open houses monthly, so I kept framing and canvas stretcher bars on hand to finish off new works quick and easy. This was one of those frames - and - due to it's large size, it remained artless. NOT ANYMORE!
So here is where my artful shopping begins...
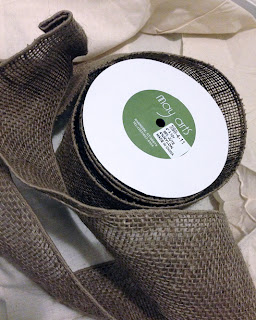
I grabbed the frame, my spool of 4" May Arts Burlap and an offcut of natural color muslin - and set off to make my recycled pallet inspired wall art.

To give the strips of burlap some stability, I needed a base so that when wrapping the centers won't sag. Easy enough, I'll stretch the muslin over the frame like a canvas with my staple gun and then I'm ready to go. Not so fast, crafty girl!
The muslin looked stark white next to the jute coloring of the burlap so off to shop the stash - looking for something to paint or dye my fabric brown. I ended up in the kitchen to polish off my morning java and a LIGHTBULB went off... use the morning's leftover coffee.
So I grabbed a bowl, bunched up the fabric and poured in the coffee grounds and the leftover coffee. I added a little more water, to completely saturate the fabric. Since my coffee is BUSTELO, a super strong, dark espresso it should work perfect. I mixed it all around and popped it in the microwave to warm up for a couple minutes, then rinsed.
I stapled the damp fabric to the frame as you would stretching a canvas; working from the center on the horizontals across from each other, then repeating with the verticals. One... two... three... four... REPEAT. Over and over, one staple at a time, round and round until it's perfectly stretched. CLICK HERE for how-to on traditional canvas stretching. As the fabric dries, it will shrink and tighten to the frame. When dry I hammered staples down.
The new color is a very close match to the burlap, now I'm ready to transform this frame into some inspirational wall art.
You could certainly skip all these steps by using a store bought stretched canvas and coloring to match burlap. I only went through all these steps to use/repurpose things I have on hand.
I've got a great quote that will be perfect to keep me motivated in my studio:
“You can’t reach for anything new
if your hands are still full
of yesterday’s junk.”
~ Louise Smith
I cut nine sections of the wired burlap to the frame width, leaving about 3" overhang off the edges. Then I distressed the edges of the burlap using Walnut Stain Ranger Distress Ink. This will give the look and feel of wood beams.
Next I grabbed my magical box of buttons and selected about 50 similar sized buttons to paint to create faux nailheads. It doesn't really matter what color they are since I can paint them to match my project.
on the buttons in Espresso, Silver then black.
**A TIP** I applied small Glue Dots® to the back of each button and stuck them on a recycled sticker backing to hold them in place while painting and when dry, they will be ready to apply to my project.
Using Helmar Fabric Adhesive, I glued each strip to my fabric covered frame, leaving the overhanging edges loose. When the entire canvas was filled, I folded back the overhang and stapled in place to give added dimension for these faux wooden planks.
The finishing touch was to hand stamp my quote. I used Technique Tuesday Big Timber letter stamps and Black Soot Ranger Distress Ink stamped onto a light blue mottled Basic Grey patterned paper. I hand cut each of the letters and applied to the faux palette with Glue Dots®.
I adhered the sticky button nailheads and my new studio inspiration is complete. I was planning to give it a weathered, whitewashed look... but it looks so amazing just like this. In this case - less is more.
My RENEWED studio inspiration...
I hope this project inspires you to create something with ribbons and fiber! Feel free to cut it, ink it, and knot or glue it! The possibilities and uses are endless...and only limited by your imagination.
I'm crossing my fingers that I'll be selected as one of the next May Arts Ribbonistas. Have a great evening and see you tomorrow for Sketch-it Saturday with Unscripted Sketches.
What are you crafting for Christmas in July??? :) Sb







 Posts
Posts


