Translate

**If you have previously subscribed to received my posts via feedburner or Bloglovin, those are inactive now. To receive my creative updates, please subscribe in the right sidebar.**

Monday, January 5, 2015

Molding Mini Masterpieces with AMAZING REMELT... My FAV New Product of 2014 Designer Crafts Connection Bloghop


Hello Everyone and Happy New Year! Today is first Monday which brings a new Designer Crafts Connection Bloghop. This month's theme is Favorite New Product of 2014... and mine is truly AMAZING! A few months ago the new Amazing Remelt hit the shelves of Hobby Lobby Stores and I am in love with this fun and easy twist on moldmaking.


What is 
Amazing Remelt???

Amazing Remelt is a one-part, heat and pour mold making material that can be remelted and poured to create new molds. Molds can then be used with casting resins, clays, soap, wax, and it's even approved for food contact. It is now available in Hobby Lobby Stores and also on the Amazing Crafting Products website.


If you are having trouble viewing... please CLICK HERE to view.

and... Amazing Remelt is Food Safe too!

Amazing Remelt is a Non Toxic, 1-part reusable mold making material for room temperature or low exotherm materials. Amazing Remelt softens at 120°F and becomes liquid at 135°-140°F – melted in the microwave or by traditional double-boiler method. It can be re-melted and re-used to make new molds time and time again. Amazing Remelt is ideal for making molds of smaller items such as jewelry, embellishments, and chocolate molds. Once you create your Amazing Remelt mold you can cast using Amazing Casting ResinAmazing Clear Cast Resin, polymer clay, fondant and other food items such as butter, ice, chocolate... and more!

New to mold making and casting???
Amazing Remelt is for you!

This unique product can be remelted and reused, making it not only economical, but eco-friendly. If you aren't happy with the results, you can melt down and re-pour around your object. Amazing Remelt gives you amazing detail and is great for push molds, texture plates and prototyping too!


A wonderful thing about Amazing Casting Products... that the products work together like peanut butter and jelly! Today I'm getting double duty out of my mini AMAZING No-Gelatin Printing Plate as I use it as a nonstick base for pouring a mold with Amazing Remelt.

This project starts off with my mini Amazing Mold Rubber slab and an embossed metal ATC that I created for a swap many moons ago. I love creating ATCs {artist trading cards} and find creating mini one-of-a-kind masterpieces for trade very rewarding - BUT - these hand embossed metal cards are a lot of work and were a very small batch... only six originals made. I decided I wanted to make a mold of this and it has opened up a world of possibilities for this little piece of art!


Using 3M spray adhesive, I sprayed my mini Amazing Mold Rubber slab, and allowed it to dry a few minutes to tack up. CLICK HERE to view how I created this to use for monoprinting.


Then I gently adhered my embossed metal ATC.


After mounting, I brushed spray cooking oil onto my metal ATC. This ensures the oil {serving as a mold release from the Amazing Remelt} was applied into all the nooks and crannies, and also doesn't leave any large beads of oil to displace the molding material. I also lightly brushed over the edges where the spray adhesive is exposed on the rubber slab.


I placed my mold rubber slab back onto the acrylic block I created it on and wrapped scotch tape around the sides to make my mold box walls to pour the Amazing Remelt into.
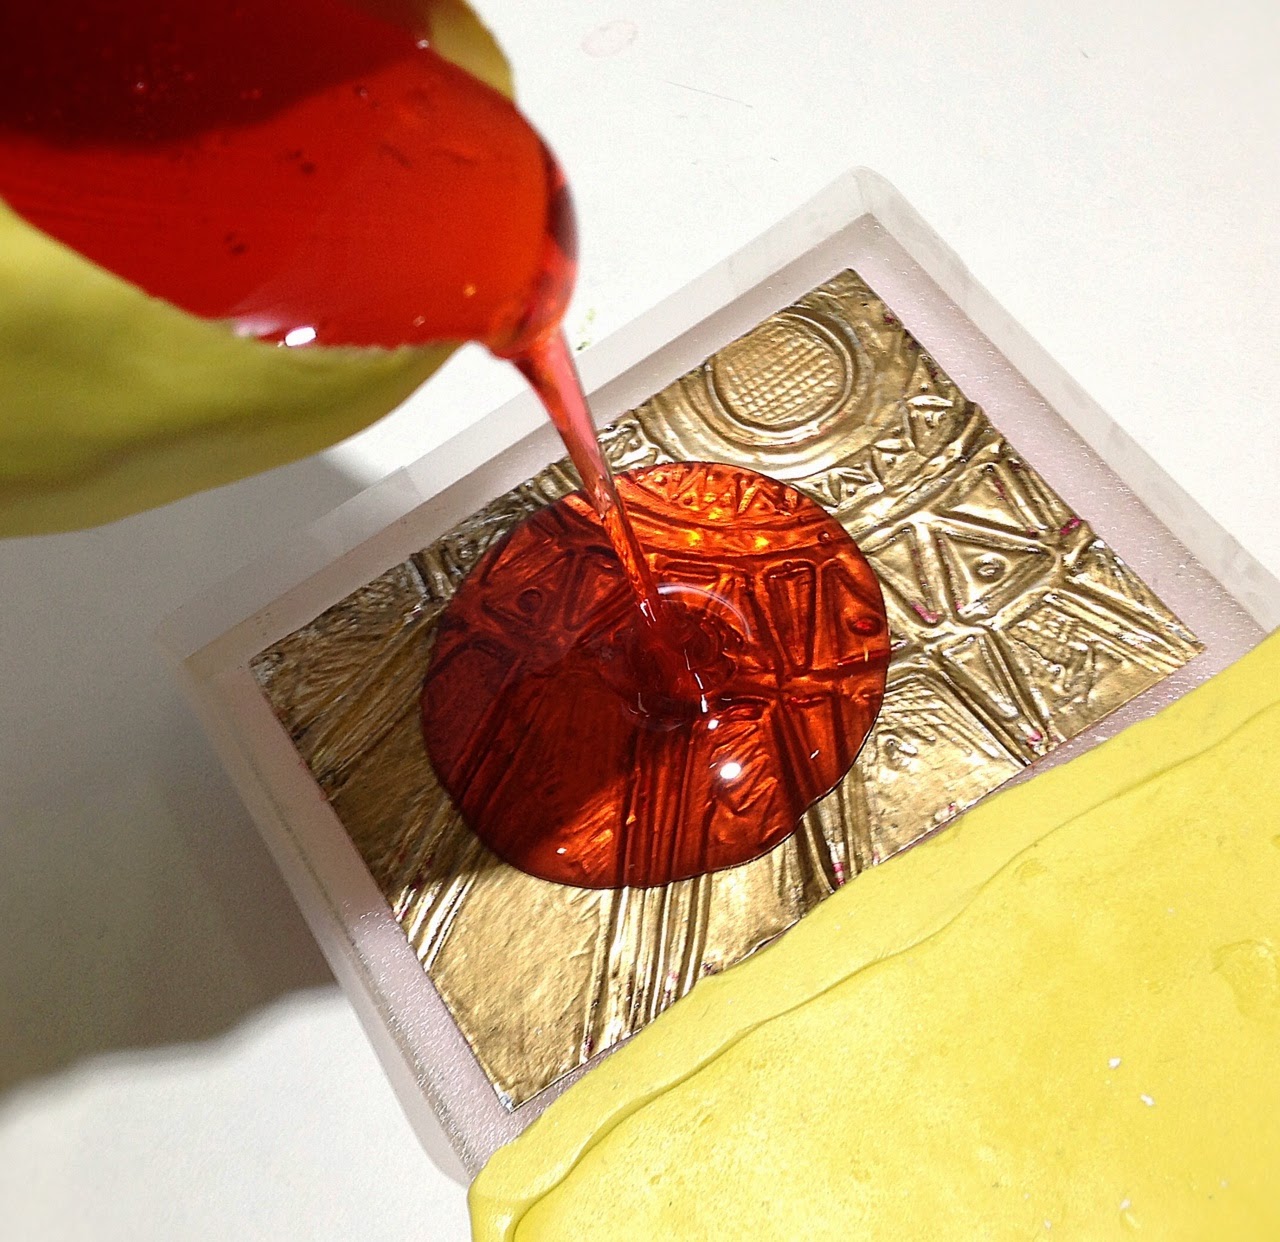

I melted 3-4 one inch cut squares of Amazing Remelt and melted slowly in my microwave in my mold putty cup I created for my cookie espresso cup project {CLICK HERE to view}. Keep in mind each microwave model varies, so you'll want to start out slow and test your melt times - mine happens to be super hot. I melt at 10 second increments on the lowest setting and after 3 cycles, I'm ready to pour. I set my makeshift moldbox up against a large mold putty mold in case the tape bowed out a lot. I usually wrap a strip of cardstock around the outside as extra support.


I popped and pulled away bubbles affecting image surface using a pin {or toothpick}.


I let the Amazing Remelt set to cool and harden for the day as I set off to work. Should only take an hour or so as this is only about 1/4" thick.


Now for the REVEAL!!! I love the amazing detail the Amazing Remelt has captured. This will certainly save me time and money in mold rubber {and space, too} for molding items quick and that I can create a new mold whenever I need... and I can STAMP with it!!!

Keep a lookout for Amazing Remelt at the upcoming CHA Winter 2015 this weekend. I will be attending and demoing mornings at the Amazing Crafting Products/Alumilite Corp. Booth #1427 - come by and meet me and try out these Amazing Casting Products!

+ + + + + + + + + + + +

Thanks so much for visiting! Continue on the Designer Crafts Connection "Favorite New Products of 2014" Bloghop by selecting hop back/forward on the logo below to enjoy all of the wonderful inspiration. Sb :)

Sunday, December 14, 2014

Bursts of Color Light up the #Cre8time Sky


Hello Everyone... WE are just over two weeks until the new year - I cannot believe how fast 2014 has flown by. This month's challenge theme is "FIREWORKS" for the Reader's Art Quest at Unruly Paper Arts and is perfect for getting ready for the shiny new year. I have created a painting using a myriad of supplies that I haven't used in ages and just had fun with the inspiration provided.


The Unruly Paper Arts Reader's Art Quest "FIREWORKS Inspiration photo and color palette, are full of bright bursts of color much like you see when fireworks light up the night sky.


I came across a stash of some old 16x20 illustration boards that were screaming for some attention. I turned on some tunes and just threw some inks and paint and made the colors fly. I added more details with markers and colored pencils.


The brush nibs of the markers and texture of the colored pencil strokes are a nice contrast to the drips and splatters - all reminiscent of a sky aglow with bursts of light.

I hope you enjoyed my project and that you are inspired to join us in this month's Reader's Art Quest. I would love to see what you create. Please leave me a comment with your link.

Happy Creating! Wishing you all a wonderful Sunday too! :) Sb

Monday, December 8, 2014

Wrapping Around a Christmas Tree... Quick and Easy Holiday Decorating with Foamology™


Welcome to another special Designer Crafts Connection Challenge - using products from Fairfield World. We have been challenged to share quick and easy holiday decorating ideas featuring Foamology™ by Fairfield line - peel, wrap, stick, done! I have dreamt up a holiday tree assemblage so easy that even my Scoutie "Elf on the Shelf" sitter could make.

With the holiday season fast approaching, It seems I have less and less time to get ready for the holidays and decorate - especially this year because I'll be traveling for our biannual Christmas trip to visit my grandmother. 

Cold and flu season seems to be hitting early here where I live in South Florida, as I have spent the first week of this holiday season with the cold and flu... and down for the count. Which means nothing has gotten done and this elf is way behind! 

So I have about an hour or so to put up a little bit of festive decorations from the time my husband leaves for work to between the time I have to go to work. And this is going to be quick and easy tree then I'm going to make with Foamology.com Design Foam with Stickybase™ Tiles, a roll of festive wrapping paper left over from last Christmas, and some removable glue dots.


The Foamology.com Design Foam with Stickybase™ Tiles couldn't be easier to decorate with or to create a sculptural wall hanging. 

The lightweight, easy pull-apart soft tile shapes have a sticky backing - you just tear apart, wrap fabric {or paper} around them, then peel off the backing to secure it leaving the center area open to layer or mount onto the wall. Easy Peasy!


Cut!


Peel!


Wrap!


Ready to stick together!

This being a seasonal project and that have a textured painted wall, I'm going to assemble the shape layers using the exposed adhesive, but mount the base pieces to the wall using removable glue dots {lots of them}.

I am combining both the triangular assortment and also the assorted rectangles and squares of Foamology.com Design Foam with Stickybase™ Tiles. I pulled apart the triangles first so I can determine what way I want to organize them before I start covering them. Once I have an idea of the design that I'm going to create with and how I will need to use the varying squares or rectangles for filler. I can use the rest to make faux gift packages using leftovers of old wrapping paper saved for crafting purposes to complete the scene.


I have a small little area between my sofa and TV {once I move a surround-sound speaker stand} that I'm going to stick my assemblage to the wall. It will be perfect! A fun and festive way that we can celebrate Christmas and not have to drag out all the Christmas decorations and trimmings.

I assembled my shapes on the floor to figure out way I like them best. To keep things in order once I start wrapping the shapes, I labeled each shape what layer they were on. And I also took a picture of my design and each layer as I disassembled it to have as a reference when assembling on the wall.


Then I set off work with some Christmas movies on TV and wrap wrap wrap each little shape {this was the most time consuming part as I had to wrap about 40 shapes}. I cut the paper to fit with an extra 2" around to wrap up the sides; peel off the backing... and it's just as easy as that!


The gold shapes are covered with a crinkled section of gold sparkly hologram wrapping that will be my gold star tree topper.


Thanks for visiting! CLICK HERE to jump over to see what other designers made with their Foamology products and be sure to enter the Rafflecopter giveaway below! :) Sb

a Rafflecopter giveaway
