Translate

**If you have previously subscribed to received my posts via feedburner or Bloglovin, those are inactive now. To receive my creative updates, please subscribe in the right sidebar.**

Sunday, August 25, 2013

My Fairy is a Troublemaker... Week Two of Anything But a Card Challenge No. 26


Happy Sunday! Today I am sharing an altered book project that I created last year for my local altered book group. This particular round-robin book had the theme of "Fantasy Fairies" - so I couldn't resist sharing it for week 2 of Anything But a Card Challenges #26 Fairy Tales or Fairy Theme. CLICK HERE to see more fabulous work from my fellow design team members today over at ABAC.


For this book I created a painted/stamped background that goes along with my personal fairy name "Feather Saturnfilter". There is an artist named Emma Davies who makes fabulous handmade Fairy Figurines. She also has a fairy name generator on her site. It's quite fun. CLICK HERE to see. Not only does this give you a name...it also gives you a little description too. I have created my fairy and a background based on the following description:

My Fairy is Feather Saturnfilter.

She is a trouble maker.

She lives in high places where the clouds meet the earth.

She is only seen on midsummer's eve.

She wears pale blue like the sky
and has pale pink wings like a cicada.
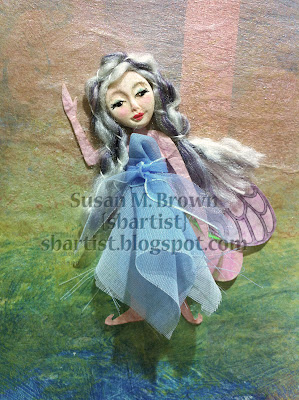

Here's my fairy made out of handmade paper, fabric scraps, two-tone purple yarn and hand-drawn wings. Her face is made using a sculpey face mold and Delight air-dry clay; hand colored with a dusting of chalks and pen detailing.


I painted a rainbow feathered background into an altered book. Then I began stamping the foliage with Hampton Art Dandelion stamp set using black Staz-On ink creating a ground area. This set has dandelions, plants and some butterflies and also a darling dragonfly.

I beautified the Fairy name description with some computer handiwork {shown above}. The finishing touch is the furry fibers down the spine and laced through the tags in pocket accordion. Tags are made using an assortment of Robin's Nest papers - and colors organized like a rainbow [red, orange, yellow, green, blue and purple].


This is the completed altered book spread. Round Robin projects are great because you have to get "out of your box" and work on themes that you wouldn't normally. The book owner was pretty delighted, too.

Thanks for visiting - hope you have a wonderful day! :)  Sb

Please take a moment to subscribe to my posts via email or bloglovin' in the right sidebar since google reader/friend connect will be gone any minute now.

Friday, August 23, 2013

Happy Accidents, DIY Discoveries and Finding
my Muse with Monoprinting


Please take a moment to subscribe to my posts via email or bloglovin' in the right sidebar since google reader/friend connect will be gone any minute now.

What started out as mess on my workdesk... has turned into a daily must have. I wanted to share my discovery on my AMAZING DIY No-Gelatin Rubber Plate and how thinking out of the box with my creative products has helped keep my muse with me throughout a crazy workweek, not just on the weekend.


I'm sharing this over at Tatertots and Jello Link Party Palooza because everyone needs to pack an ARTful Lunchbox and squeeze in just a few moments of creative bliss during a hectic day!


This mess is the result of my newest obsession... I'm finally GELLIN'. A few days ago, I made two (2) of my own No-Gelatin Rubber Plates using the NEW Amazing Mold Rubber {a 2-part silicone mold making kit} and outside of the DAY J.O.B. - this is consuming my waking moments -- AND I had a BRAINSTORM... to pack the little ATC size plate in a travel kit so I can play on my lunch time, or whenever I can sneak a few minutes here and there. So this mess is all the creative goodies I plan to pack into my ARTful Lunchbox.

I made a video to explain my exciting idea...


To see how I made these AMAZING DIY No-Gelatin Printing Plates for monoprinting using the new Amazing Mold Rubber please CLICK HERE or scroll down and read more.


I'm so excited to sneek a little play time during my hectic day and long hours at the busy print shop I work at. I keep adding more creative toys to my ARTful lunchbox and I've had to  shop my stash to upgrade it two times now - LOL! Presently I've settled on a Basic Grey metal box that came with tabbed dividers for making scrapbook pages inside. This one seems to be "JUST RIGHT!" 

***********************


This is ATC No. 1 created. I will be sharing No. 2 and 3 tomorrow. On top of a three color layered monoprint, I overstamped down the side with a pink eraser handcarved stamp. The silhouette man with dog is from Viva Las VegaStamps! standing on top of a torn washi tape boardwalk. I added some ( ) and numbers with plastic letter stencils - ink blotted away before the marker dried to mute the tones.

***********************

As promised - the how-to on how I created my faux gelatin plate. In the process of playing with the brand new product, Amazing Mold Rubber by Amazing Crafting Products;thought about creating a faux gelatin plate. There are loads of DIY tutorials online on how to make one of these with Knox Gelatin, but I thought about it and silicone has similar properties. I mixed up some Amazing Mold Rubber to give it a try... and shazam! The AMAZING DIY No-Gelatin Printing Plate was born!


Amazing Mold Rubber is an easy to use, high strength liquid silicone mold making rubber that is strong, soft and flexible - great for undercut parts and cures in approx. four hours {I timed it for this project - it is 4 hours... YAY}. Amazing Mold Rubber is a two-part liquid rubber used to make extremely elastic molds to produce quick and exact reproductions of your original. Replicas can then be cast in Amazing Casting ResinAmazing Clear Cast Resin for plastic parts - or use other materials such as plaster, wax, clay or polyester... and that's just the beginning to all the fabulous uses just waiting to be discovered!


After four hours my Amazing Mold Rubber was fully cured and my AMAZING DIY No-Gelatin Rubber Plate was ready for a joyride! This second video is a test run on my faux gelatin plate... and my FIRST TRY at Gellin'...


Isn't this totally AMAZING!!! Now I have two plates in different sizes {one 6" x 7" and the other is 3" x 4"} that I can use simultaneously for double the mixed-media fun! I can totally see how this can become addictive. Here is my first three-paint layer monoprint and I can't wait to make more.


I've got my hands on another brayer, and my ARTful Lunchbox is complete. Thanks for dropping by - I hope you are inspired to sneek a few creative moments daily! Have a great day!  Sb :)

Thursday, August 22, 2013

Walk Like An EGYPTIAN... Tag ARTifact for T!m's 12 Tags of 2013 for August


Please take a moment to subscribe to my posts via email or bloglovin' in the right sidebar since google reader/friend connect will be gone any minute now.


I actually was able to squeeze in a little time to play along with T!m Holtz' 12 tags of 2013 for August... except mine is stamped completely with Viva Las VegaStamps! Please CLICK HERE to see the how-to.

Tag ARTifact from the Pyramids...


•••••••••••

Supplies used: STAMPS - "Basket Egyptian Goddess" #6101, "Mummy Case/Female" #5806, "Nile Flower Background" #1657, and "Stylized Dog Border" #9827. Other supplies: #8 manila tag; Staz-On Black ink; Miracle Tape; Ranger Distress Markers; Ranger Distress Stains - Brushed Pewter, Old Paper, and Antique Linen; water brush; brushed gold cardstock; pink pearl gem; and ribbon/trim.

I'm done with my GELLIN' and my paper is painted... sneaking a little here and there to add details on my ARTful lunch ATC No.2. Happy Thursday!!!  Sb
