Translate

**If you have previously subscribed to received my posts via feedburner or Bloglovin, those are inactive now. To receive my creative updates, please subscribe in the right sidebar.**

Monday, October 3, 2016

#PumpkinSpice and Everything Nice... fun DIY #Cre8time Thanksgiving Treats!


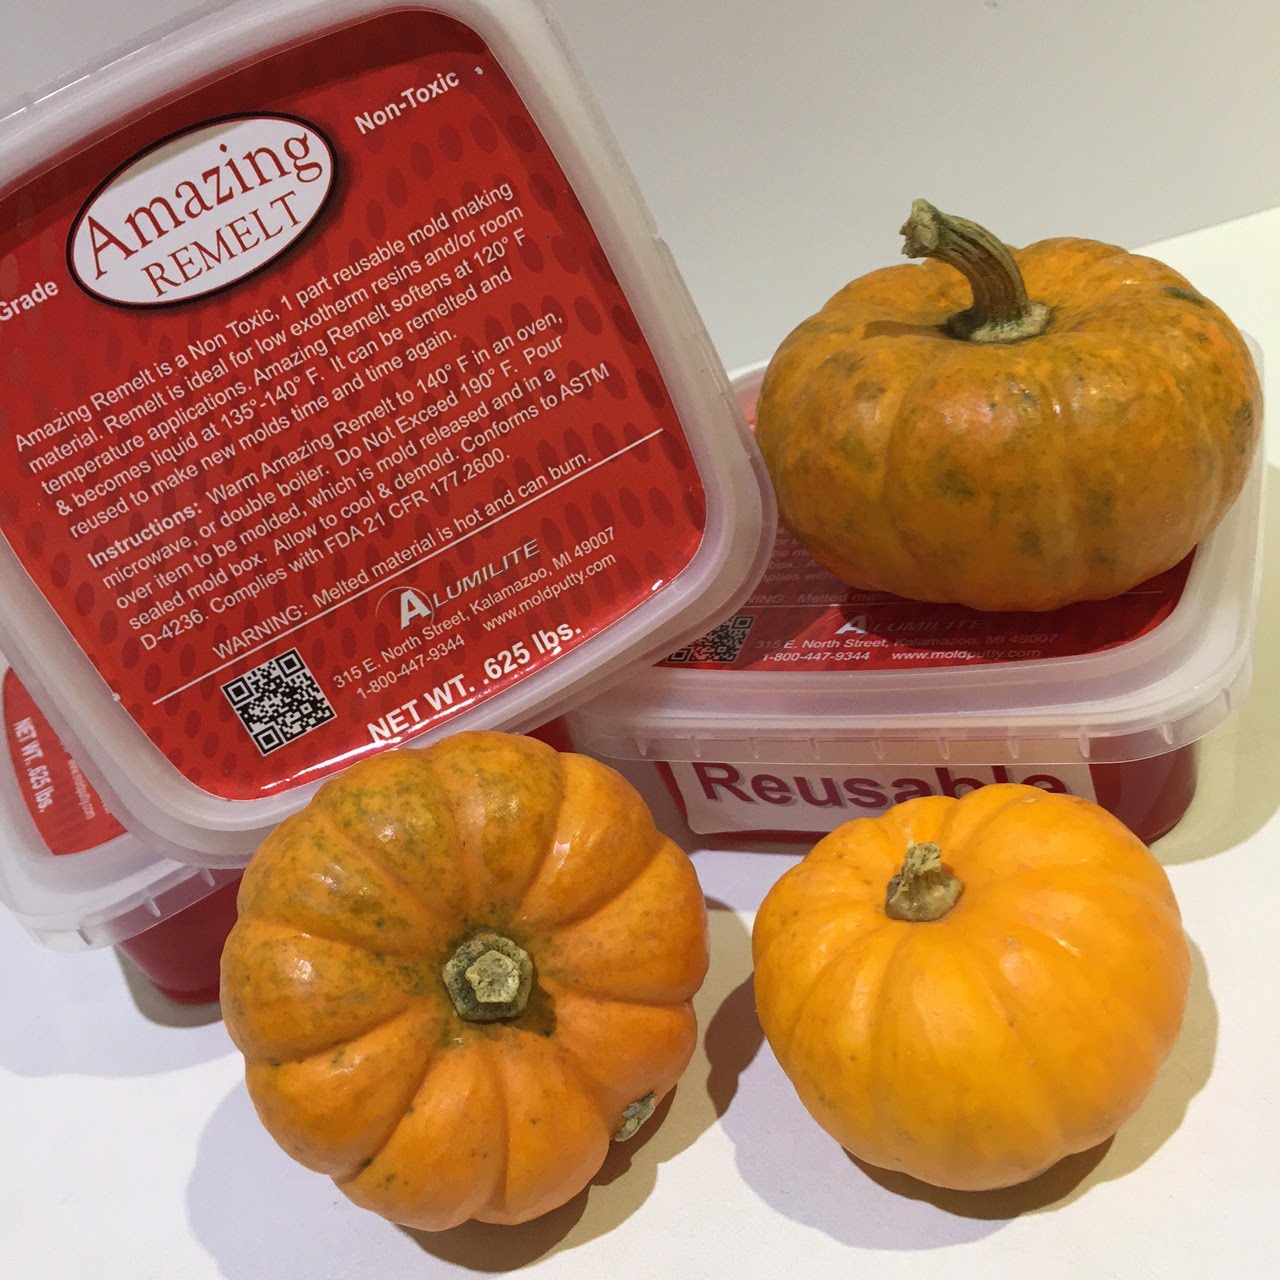
Happy October friends!! It's another first Monday and myself along with the Designer Crafts Connection are sharing fabulous Fall Crafts. Today I'm sharing some fun DIY treats for your Thanksgiving table settings. I admit I'm crazy for pumpkins... especially those adorable mini pumpkins!! I made a couple molds for molding chocolates and other sweet treats using Amazing Remelt, and Amazing Mold Putty {both are food safe}.  


Amazing Remelt and Wilton Candy Melts both melt down in minutes in the microwave making custom sweet treats like a pro quick and easy.

First I selected a tapered glass bowl deep enough to fully cover my pumpkin, then melted down a container of Amazing Remelt using the lowest setting on my microwave in thirty second increments until it was completely liquified.


Please click here if you have trouble viewing video.

**A TIP** I poured a small amount into my bowl and let cool a bit before placing pumpkin in it. ALSO, I dipped the top of the pumpkin into the liquid remelt to coat the stem and let any air bubbles release before fully covering with Amazing Remelt.


After cooling in the refrigerator for a while {I left it all day since I had to go to work}, I removed the mold from the bowl. I gently cut the mold in half using a sharp Xacto knife and released the pumpkin. Now I'm ready to make some chocolate mini pumpkins.

First a solid chocolate pumpkin...


I melt down the Wilton Candy Melts following the directions for microwave in a pourable pyrex measuring cup. I scooped the melted chocolate with a small spatula into both sides of the Amazing Mold Putty mini pumpkin, filling completely.


I placed the top half of the mold onto the bottom, aligned to my marks and placed in refrigerator to chill and harden. Any edges are easily touched up with a light scraping with a spoon or backside of a butter knife.


Now I'll make a chocolate pumpkin box...


I repeated by filling the Amazing Remelt mold with the Wilton Chocolate Melts - spreading chocolate to evenly coat edges and leaving center open. When hardened this pumpkin will be hollow... perfect for desserts or party favors!


The chocolate hardens very quickly – then I gently remove from mold, set aside on a tray in the fridge and make another set. I fill the chocolate box with an assortment of roasted seeds/nuts and mini dark chocolate chips. These lovely white mini pumpkins make a perfect edible favor for the Thanksgiving Day the table settings. These are fun to make and can make well in advance of the event... can you imagine how fun they would be in colored chocolate too??! 

What will you like to
transform into edible art??

If you are pumpkin crazy like me... stay tuned!! This pumpkin baby has more projects in the works. Thanks for visiting! For more Fall and Halloween inspiration pop on over to the Designer Crafts Connection Fall Crafts roundup HERE. :) Sb

Thursday, September 22, 2016

We're all #Cre8time Mad Here... Designer Crafts Connection Gel Press® Bloghop


Hello everyone! Today the Designer Crafts Connection takes on a new challenge featuring monoprinted creations using the Gel Press® reusable gel printing plate. These are easy to use and so much fun for art enthusiasts of all ages.


For this challenge, Gel Press® provided each of the Designer Craft Connection designers with one of the Gel Press reusable gel printing plates. I have tried other variations at workshops, though I haven't tried out the Gel Press. I really love the 5" x 7" size as it's perfect for my smaller size art journal pages.


Along with the Gel Press® plate, I gathered some old book pages, letter and pattern stencils, punchinella, some texture plates made from Amazing Mold Rubber, a prepared cast resin embroidery hoop, Speedball brayer, Mod Podge, a few Ranger Distress Paints and Golden Green Gold fluid acrylic paint. I also need a pencil, scissors, Diamond Glaze, and a couple markers. The resin pumpkins are a separate project, though I need to paint up enough papers for collaging them in the same color scheme.


I set out the Gel Press® plate onto a cutting mat from the Dollar Tree {these work great for a protective work surface}. The Gel Press® plate sticks itself to the surface and stays put while you are moving your paint around with a brayer. I apply some Cracked Pistachio Distress Paint to the plate. I like using the Distress Paints for monoprinting as they are a little bit wetter than regular acrylics which allows me a little more time to work with while creating patterns in the wet paint.


I spread out the color evenly with my brayer then pressed my mold rubber texture plate into the wet paint. I pressed evenly across the plate then peeled back to reveal this beautiful circular pattern taken from a vintage decorative plate. I pressed the paper onto the Gel Plate® to transfer my first painted layer. I repeated this several times to make five sheets of paper that will all be similar when I'm done.


The second layer from the Gel Press® will be Mermaid Lagoon Distress Paint with this awesome punchinella design that I got from Gauche Alchemy. It gives a pattern that is a cross between a floral and an animal print. I am really loving how easy this is and how this is coming along! 


Of course you know I have to have purple... the third layer is Wilted Violet Distress Paint combined with a Tim Holtz mini Damask Stencil {THMST004 mini stencil set 4}. 


With the smaller size of this stencil, I needed to work quickly. I pressed the stencil onto the painted Gel Press® then rubbed a scrap section of paper to remove paint in the negative areas. I removed the stencil, then repeated two more times to completely cover the plate with the damask pattern.


This is the result of the third pull. The colors and variations of layers and texture are so interesting... and my recycled book pages are totally transformed into beautiful art. In about a half an hour, I have 5 finished matching patterns and a whole bunch of starters as a result of cleaning off brayer and leftover paint on the plate and stencils.


I select one of the finished Gel Press® printed papers and prepared my resin frame for mounting to this custom word art. FIRST I need to add some stenciled and hand written words... it's much easier to do this before mounting the frame.


I place the frame over the section of paper I want to use and I trace around the inside and outside edges of the frame with a pencil. This is so I can see where I need to center the lettering going forward.


Since I'm combining my hand writing with stencils - I go ahead and plan it out in pencil on a scrap of paper first. This is just for my piece of mind. For "embrace" I used a Tim Holtz ths011 Schoolhouse layering stencil and for "your" a generic lettering stencil from the art supply aisle at Michaels.


I traced the letters with a Black Sakura Pigma™ FB pen. The nib is a small size brush tip and it fit perfectly through the voids of the stencils. I added my freehand "crazy" then went back building up and filling in the letters with the pen. I also added a little doodling and flourishes. I blended out a bit of Seedless Preserves Distress marker in from the edges to add interest. I cut the circle out following the traced line of the outer edge of the frame.


I wouldn't have normally painted the backside of this resin piece - though I had a bit of a paint craftastrophe with the purple dauber top and had paint all over my hands so I rubbed some off on the frame, some paper and to my resin pumpkins. I ran a line of Diamond Glaze around the edge to adhere to my lovely word art.


I press down gently to adhere edges and let dry for a few minutes. Then I go and back trim any excess with scissors. I think I will add a sheet of self-adhesive magnet to the backside to finish this off so I can also hang it on my fridge.


I tied off a section of hand-dyed sari ribbon. BEA-U-TIFUL!!!


I love how the Amazing Mold Rubber picked up every tiny detail of woodgrain from the vintage embroidery hoop casting.


Embrace Your Crazy!


CLICK HERE to jump over to the beginning of the Gel Press® Bloghop at the Designer Crafts Connection blog and find more ideas of what to do with a gel printing plate!

To learn more about Gel Press®
For even more ideas also check out the Gel Press Facebook page!

+ + + + + + + + + + + +

Thanks so much for visiting! For more +++++ inspiration visit the Designer Crafts Connection "Gel Press®" bloghop HERE. Sb :)

** This is a sponsored post. Gel Press® has provided a Gel Press® reusable gel printing plate in exchange for my creative ideas, views and opinions. My ideas and opinions are my own.

Thursday, August 25, 2016

Fabric + Art + Collage = #Cre8time Harmony... Rebekah Meier Fabric Elements™ Bloghop


Hello everyone! Today the Designer Crafts Connection takes on a new challenge featuring quilted mixed-media creations using Rebekah Meier Fabric Elements™ mini paper quilt kits. If you like to paint, collage and sew... then you are in the right place.


For this challenge, Rebekah Meier provided each of the Designer Craft Connection designers with one of her fabulous mixed-media kits. I received the Fabric Elements™ Mini Paper Quilt Kit with Stitch-N'-Tear Technique. Upon review of the kit, contents and instructions, I decided to make the project and follow instructions as it is. This will be my first attempt a mixed-media art quilt. This project is easy to follow and doesn't require more than basic sewing skills.

Fabric Elements™ is a culmination of Rebekah Meier's experiments, favorite materials, and techniques combined into a collection of her stencil and fabric designs with pre-packaged fiber goods — such as batting, felt, gauze, Lutradur®, and many others.

"The collection is designed to work together with my techniques and instructions, creating endless mixed media and fiber art and projects. I love to take the ordinary — like quilt batting and interfacing — and combine them with paint and inks to elevate them into something extraordinary." ~ Rebekah Meier

Everything you need is included in the Fabric Elements kit except for a few staples: acrylic/fabric paint of your choice; scissors; needle/thread; sewing machine; a favorite photograph; and any additonal trim or ephemera desired. The hardest part here was selecting a photo I wanted to use to make this project. I printed out many photos and decided upon one of my hubs and I taken on a trip to NOLA celebrating my 40th birthday.


I gathered an assortment of acrylic paints - some neutrals and a couple different golds, then set off adding a bit of color to my elements, embroidered trim and tissue fabric. This domino pendant I had in my stash and I wanted to use it with this project. All I need to do is add a bit of color to the bright white engraving of the game piece to tie it in with everything else. After letting paint set a couple minutes, I gently wiped excess away leaving color in the recessed areas.


Included in the kit was this embossed piece of craft foam. With my selected colors, I dry brushed a heart shape onto it and kept building up layers of color until I was happy with how it looked. While that was drying, I dry brushed a scrap section of embossed cardstock with a mini square grid pattern that I happened upon gathering my supplies. It goes nicely with the embossed foam heart and will be used to add an extra frame around my photo.


Lastly, I dry brush the tissue paper with the same colors and set off to cutting out all the fabric sections and layers. I followed the instructions which had all the measurements for all pieces needed for buiding the quilted layers. This made assembly come together really quickly. I ended up deciding not to iron the pieces as instructed because I used acrylic paint and my photo was a color laser print. I layered my tissue fabric with matted photo and tacked down with a bit of glue stick to keep from shifting as I sewed edges down.


I stitched around all the edges of the photo, then repeated around edges of matted frame. Pretty simple, right?! My hands are all painty and now I'm sewing... this is FUN! 


The backside isn't really pretty, but my wonky sewing is adding to the charm of this quilted piece. I took pleasure in not even really being concerned about measuring and such like I normally would be and enjoyed sewing the layers together.


I cut out the heart from the painted embossed foam and rubbed gold paint around the white edges and around the backside. I hand stitched a section of embroidered trim and the pearl beads provided. I'm really loving how this project is coming together!


The other embroidered trim was more white than creme, so I needed to go back and dry brush it to match things and tone down the "brightness" of white. A little OLD PAPER distress paint matched up the color quite nicely. On both the heart trim and this freshly stained lace, I finished off with a light brushing of gold on the high points. These are ready to go.


In my sewing box, I happened upon some self-adhesive velcro dots. These will work in adhering my heart to the finished art quilt and it will give it some dimension too.


To finish off, I punched a hole and set a matching gold eyelet in the bottom of the heart to accept my domino charm. This is ready to adhere once I finish up the sewing. 

I put the layers together: fabric base layer, batting, with quilted tissue fabric and photo on top. I sewed around side to seal the layers together and then went across and down in the leftover space between edge and photo. 


It was nice that steps were included to make a nice framed edge as it came in handy to add stability to the piece and cover up my messy wonkiness on one side since I skipped the step of pinning layers together. Next time I will pin things together and use a photo that I've transferred to fabric so my image will be fabric as well.


I really love the texture and details on this small art quilt I've created. This project was a nice introduction into art quilting and I really enjoyed combining fabric, mixed-media collage and sewing. I plan on getting more of Fabric Elements™ supplies and scaling this project down to make some ornaments with family photos for Christmas.

Artful quilt of LOVE!


CLICK HERE to jump over to the beginning of the Rebekah Meier Fabric Elements™ Bloghop at the Designer Crafts Connection blog. Over there you will also find instructions to enter a giveaway for your chance to win some of these fabulous Products.

To learn more about  Rebekah Meier Fabric Elements™

Visit Rebekah's Etsy store (RebekahMeierDesigns)
to purchase Fabric Elements™ products.

+ + + + + + + + + + + +

Thanks so much for visiting! For more mixed-media quilted inspiration visit Designer Crafts Connection "Rebekah Meier Fabric Elements™" bloghop HERE. Sb :)

** This is a sponsored post. Rebekah Meier has provided product in exchange for my creative ideas, views and opinions. My ideas and opinions are my own.