


Welcome to a special Designer Crafts Connection Bloghop dedicated to all things Burlap. I'm very excited to have an opportunity to create using the wonderful products from BurlapFabric.com. I have so many projects in the works - some being "REPURPOSED". I'm beautifying items for functionality and organization in my studio {a room that is currently getting a much needed overhaul}.

Join us July 13th through 20th for this blog hop promoting Burlap Fabric. Burlap is so popular in crafts and decorating and we will be sharing some wonderful ideas and projects using it... there will also be a giveaway too {scroll down for Rafflecopter entry info}.
Join us July 13th through 20th for this blog hop promoting Burlap Fabric. Burlap is so popular in crafts and decorating and we will be sharing some wonderful ideas and projects using it... there will also be a giveaway too {scroll down for Rafflecopter entry info}.

For my project today, I have altered this generic dry erase board that lives under my craft table... mainly out of sight and out of mind. It would be really nice if it could serve as a dual purpose - the backside being a bulletin board.

When I received the generous assortment of burlap fabrics from BurlapFabric.com for this event... I was thrilled to have received a purple check burlap trim and also some 14" wide burlap fabric!! I knew exactly what to do. Make another faux palette piece for my studio. I have a couple fun projects in the works with the yards of red burlap fabric too.

When I received the generous assortment of burlap fabrics from BurlapFabric.com for this event... I was thrilled to have received a purple check burlap trim and also some 14" wide burlap fabric!! I knew exactly what to do. Make another faux palette piece for my studio. I have a couple fun projects in the works with the yards of red burlap fabric too.

First thing I needed to cut a piece of foam core to mount into the backside of the frame to use as a bulletin board. Since I will be mounting the strips of burlap horizontally like a wooden palette would be, I will be able to use pushpins as well as clips.

Using some 3M Spray Adhesive, I mounted the foam core to the backside of the dry erase board. This just happened to fit the depth perfectly - aligning flush with the edge of the frame. Now I'm ready to alter this in a similar fashion to a 24" x 36" inspiration quote board I made a while back for my studio and was a huge project, because I created the whole thing from scratch {CLICK HERE to view}.

Before I started mounting the burlap strips, I wanted to give a wash of color to the stark white foam core so that I wouldn't notice it through the weave of the burlap fabric.

Using Vintage Photo Ranger Distress Stain, I swiped the dauber to apply color over the entire sheet of foam core. I'm not concerned at how it looks, I just don't want any white showing through the burlap. This did the trick and the large burlap fabric made this project easy to complete in under two hours {including the primping for photos}.

The burlap fabric I'm using is 14" wide by 10 yards. I can make several of these if I want! I cut three sections the length of the board with approximately 3" overhang on each side. Then I cut each of these sections into thirds lengthwise.

To help keep the strips folded in thirds, I applied strips of masking tape. Final step is the stapling. I started along one edge, then on the opposite edge - alternating and working towards the center; adjusting the widths as I filled in.
I laid one strip across the board and wrapped the overhang around the side, setting with a staple gun loaded with 1/2" staples. I folded over the excess and stapled in place giving the faux wood board look {as in photo above}. I flipped over to the opposite edge, pulling the burlap strip taught, and repeated the stapling. To cover this board I used nine strips that are approximately 2 1/4" high. Using a regular stapler, I set some staples across the length which disappear into the burlap texture to help prevent sagging over time. I may go back and add some fabric glue to tack it down permanently later on.
I laid one strip across the board and wrapped the overhang around the side, setting with a staple gun loaded with 1/2" staples. I folded over the excess and stapled in place giving the faux wood board look {as in photo above}. I flipped over to the opposite edge, pulling the burlap strip taught, and repeated the stapling. To cover this board I used nine strips that are approximately 2 1/4" high. Using a regular stapler, I set some staples across the length which disappear into the burlap texture to help prevent sagging over time. I may go back and add some fabric glue to tack it down permanently later on.
Now for the FUN PART... adding all the stuff that's cluttering my desktop that needs to be properly displayed!
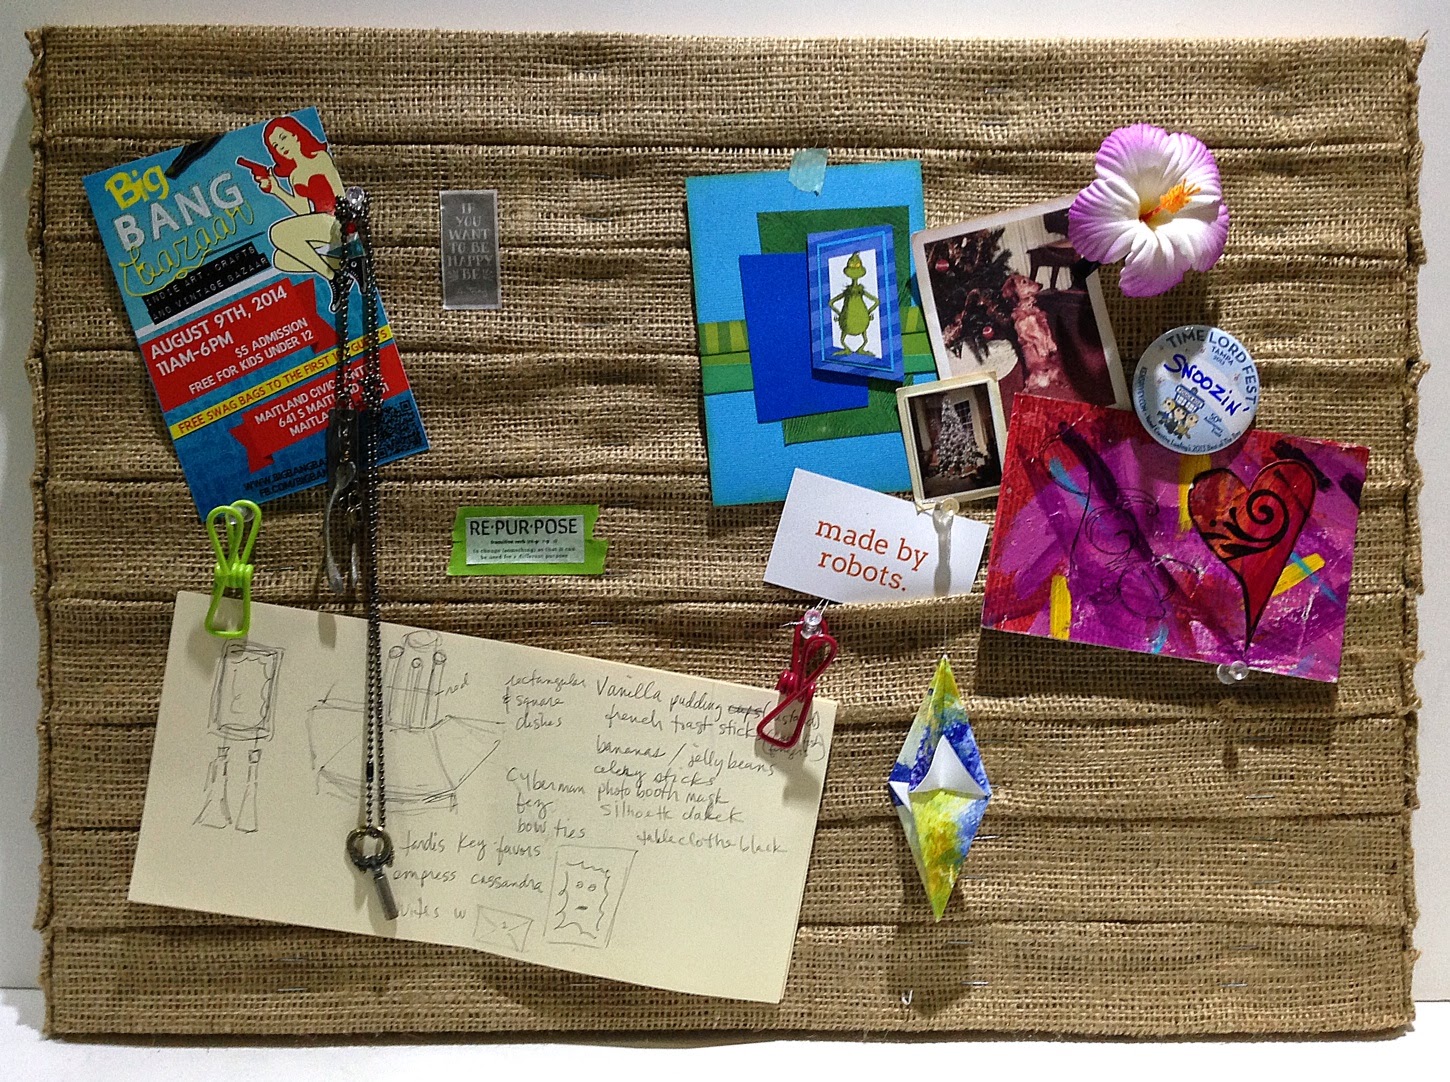
My dry erase board now has a dual function which matches my studio inspiration quote board which is a larger faux palette piece... and will certainly be utilized instead of being stashed under the desk.
+ + + + + + + + + + + +
Don't forget to enter to win the fabulous prize package from BurlapFabric.com valued at $100 that includes a really nice variety of natural and colored burlap yardage, ribbons, embellishments and totes.
http://burlapfabric.com/
http://www.pinterest.com/burlapfabric/
https://www.facebook.com/burlapfabric
https://plus.google.com/+BurlapFabric/about
http://instagram.com/burlapfabric
https://twitter.com/BurlapFabric
https://www.youtube.com/user/BurlapFabric
http://burlapfabric.com/
http://www.pinterest.com/burlapfabric/
https://www.facebook.com/burlapfabric
https://plus.google.com/+BurlapFabric/about
http://instagram.com/burlapfabric
https://twitter.com/BurlapFabric
https://www.youtube.com/user/BurlapFabric
+ + + + + + + + + + + +
Julie McGuffee - juliemcguffee.blogspot.com
Kristi Parker - kristiscreativecafe.blogspot.com
Lisa Fulmer - lisalizalou.com
Madeline Arendt - madelinesthoughts.blogspot.com
Marilyn Gossett - marilyngossett.blogspot.com
Michelle FraeCummings - faeriedustdreams-michelle.blogspot.com
Sue Eldred - sueeldred.com
Susan M. Brown - sbartist.com (you are here!)
Terry Ricioli - terryriciolidesigns.blogspot.com
Angela Holt - www.angelaholtdesigns.com
Anita Scroggins - www.theflamingochronicals.blogspot.com
Beth Watson - bwdesignstudio.blogspot.com
Carmen Flores Tanis - florestanisstudio.com
Cherish Flieder - somethingtocherish.com
Cindi Bisson - fatcatcreations.blogspot.com
Jennifer Priest - hydrangeahippo.com


What a fabulous idea. This is something I for sure want to try
ReplyDeleteSUSAN another great and creative project
ReplyDeletegreat project. Love burlap too!!!
ReplyDeleteI am in LOVE with burlap!! How did I not know about BurlapFabric.com? Hooray!! And your bulletin board project was very well done - nice add with the rolled pieces instead of just one big flat piece.
ReplyDelete