

Great News! I am one of the new additions to the Sakura Hobby Craft Design Team. Yesteraday was my first of many projects I will be sharing the first and third Wednesdays of each month at the Sakura Hobby Crafts Blog {CLICK HERE to visit }.

My post yesterday was first part of a TWO-PART post.
Make sure to come back and see PART-TWO on March 21, 2012.
Being fairly new to Crystal Lacquer and the new Terri Sproul Mixers from Sakura Hobby Crafts, I needed to play. I have many ATCs and two Altered Books from my local swap and altered book club round robins to work on this month - so I decided to work on applying these wonderful products to my altered art projects. As a result, I have a few tips and tricks to share as well.
First thing I did was to mix up a sample of each color of Terri Sproul Mixers and paint them on the top and side of each pot of glittery goodness.

These are the six pots of Shimmers that I have. The colors look different on dark and light colors so I applied some on the dark lid and also a stripe of the color on the side of the white part of the label.

I also painted a swatch of each onto a piece of gloss cardstock labeled with each color and coordinating Sakura Hobby Crafts part number. I realize that my little color cards are not pretty - but they work for me. We would love to see how you make your color cards. Post yours on the Sakura Hobby Crafts Facebook page {CLICK HERE}.

These are the six pots of pearls colors and gold dust labeled on top and sides. Aren't they so lovely???
Meanwhile, since I mixed up about a quarter size of each, I didn't want the all the gorgeous colored Crystal Laquer to go to waste. So I got out some leftover papers from cutting out a drawer in an altered book. These are the perfect size for ATCs.

I put down a paper brushed with a little water and picked up the mixer color and painted it on. For most colors, I painted on both sides. This resulted in an aged paper look which has some translucency to it. I repeated for each color I made - this is how I ended up with all the lovely papers at the top of this post. AN INTERESTING DISCOVERY: Some of the colors {the green, red, pink and yellow pearls} pigment seeped straight through the paper, saving the step of painting both sides. The backside was lighter and not as strong - but an interesting and surprising result that was totally unexpected.

After painting - I set aside to dry on waxed paper - this absorbed
the excess moisture and kept my little colored pages from sticking.
Another experiment: I made a test of just Crystal Lacquer on the book page to see if I could achieve the same look of an oil or resin coated paper. The result is YES!!! I poured about a quarter size of Crystal Lacquer on the page and spread it out on both sides. I let it set for a couple minutes, then dipped the tip of my brush in water {very little} and brushed it over. The Crystal Lacquer soaked through the paper and became translucent with the feel of vellum when dry. This will be a nice starting surface to work on for altered projects.

This piece above is two pieces that I laid on top of each other
and were fused before I could pull them apart. I love how the
translucency of the two papers are visable.
OK - on to the next burning question:
CAN YOU MAKE AN IMAGE TRANSFER
using CRYSTAL LACQUER????
YES!!!
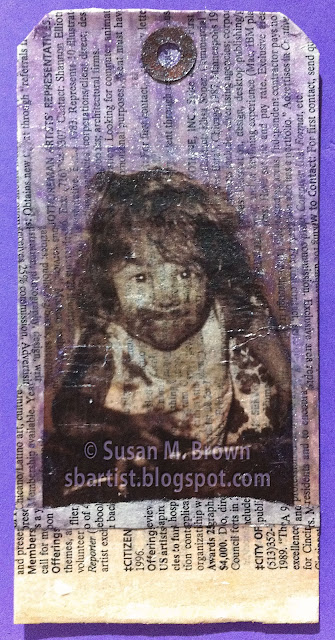
In part two on March 21st, I will go more in depth with a full step-by-step of this process. Basically I followed the same process as you would with an acrylic gel medium. Paint four or five layers in alternating directions {horizontal, then vertical, then horizontal, then vertical, etc.}, letting each layer thoroughly dry before adding next layer. Then after waiting 24 hours to dry, soak in a shallow dish of water and in a circular fashion, rub away the paper fibers from the back side of the image until paper is removed. Then you let dry ANOTHER 24 hours. TOO MUCH waiting to dry! I will say - with Crystal Lacquer - this process is accelerated by not only hours...but days! I love making image transfers, yet the process of it is so dragged out unless you do a box tape transfer {with this you are limited to the width of your tape and you get a super high gloss sheen from the tape}. I will be doing this so much more now! So I made a couple image transfers one of me at about 2 1/2 and the other of a photo of my father and I.

Image transfer being removed from water after paper is rubbed off.
With the painted papers and the completed image transfer I created a tag. All items are adhered down with Crystal Lacquer {you may want to wear gloves for this - its quite sticky}. **A TIP** I use a plastic heavy-duty brush that I purchased at a beauty supply store - the kind that is used to apply hair-coloring at your hair salon. These sturdy plastic brushes don't break down from adhesives and are really durable. If the Crystal Lacquer dries in this brush - no worries - I let it soak in water ovenight, then scrub it with my dishbrush to get the glue fibers off. And no bristles to be picked out of my work in the process.

On a base tag - I glued down three of the painted
papers with Crystal Lacquer.

The Crystal Lacquer dries relatively quickly. I added some white pastel in the area where the face of my image transfer will be placed to mute some of the text. I brushed over with Crystal Lacquer, then after misting lightly with water, I applied the image transfer and gently rubbed into place with Crystal Lacquer on top as well to seal. I mixed up some more Voilet Shimmer Mixers and painted in the background around my adorable self. I learned to paint at a very young age...my first paint being Chocolate Cake!
A couple unexpected BONUSES!!!
The paper towel I had been using to dab off my painted papers dried to be a lovely shimmery pastel modeled gem to be used in the future. This will be lovely as a background in a vintage fairy altered book I will be working on very soon. Nothing goes to waste in this studio.

AND....look at what was left from rising my brush after each color...
a beautiful pearly mixture of Crystal Lacquer, multiple mixer colors
and water...A GIFT!!!!

Introducing my very own HAPPY ACCIDENT...
Terri Sproul MIXERS MIST!!!!


I just poured my paint liquid into an empty spray bottle
and I have a lovely, sheer shimmer spray. YAY!
I hope you enjoyed today's post. I encourage you to take a look around through the projects from the other Sakura Hobby Craft Design Team members for some great tips and ideas! Make sure to come back and see PART-TWO on March 21, 2012.
Have a Crafty Day : )


AWESOME post Susan!! Love the image transfer AND that you can make mists! wahoo!!
ReplyDelete