Translate

**If you have previously subscribed to received my posts via email: Please subscribe to my posts via Bloglovin in the right sidebar.**

Monday, October 25, 2021

I AM... StencilGirl® Affirmation/Tarot Deck Collaborative


Hello friends! It's a new week and I am excited for you to join me today for the reveal of a new StencilGirl® collaborative project, the "StencilGirl® Affirmation and Tarot Card Collaboration"... a project in which we were challenged to create an inspiration/tarot deck of cards using StencilGirl® Stencils.

This project is a bit different... one that is more reflective and introspective. For a while now I have been investing in refilling my creative well by following The Artist's Way and the accompanying work with a group of fellow creatives in an accountability cluster.

A bit about the process: For the cards I started out with a base black metallic cardstock that I stenciled with 2-3 layers of color using different Plaid FolkArt® Color Shift Acrylics. I have previously swatched all the colors on white, black and chipboard surfaces to see the resulting color magic. If you have these, they are really fun and make for some pretty cool unexpected effects.


On the backside I layered over the first layer with a combination of 3-4 colors of my favorite Ranger Distress Acrylic paint daubers, creating an ombre on my Gel-Press plate to stencil onto. The backgrounds are a result of combining the rubbed stencil and papers created from pulling the leftover after removing stencil. Nothing goes to waste! I mounted fronts to backs using spray adhesive and cut sheets down to create cards (cards are sizes to fit into a recycled altoid tin).


I also upcycled an altoid mint tin as a coordinating home for these cards on my desk.


I left adding the inscriptions to the end. I set out stenciling in letters with a liquid silver pen.


As luck would have it... the ink bled like crazy under the stencil.
Interestingly, this mess up actually looks pretty neat with how distressed it looks.


So I carried on... intentionally doing this on all of them.


I think this may have been kismet... a way of just enjoying the process, regardless the twists and turns.


This forced me to work slowly, adding many layers of marker and pen to fill in and make the letters stand out on the cards.


This project turned out to be very personal and emotional one. This project served as several of my artists' dates and was a free time to just "BE" and let each session evolve without any pressures to make an instructional.


Here are all of my cards before adding stenciled text inscriptions. The colored stencil background overlayed with a black stencil design.

I am sharing the first three of inscriptions here as they were part of the StencilGirl® stencil I used and started me off on a journey of what the rest should/would say.


Front and back side-by-side (sorry the scanner doesn't pick up the shimmer and shine of the metallic paint and pens).


"i am enough"


"i am me"


"i am brave"


All of the fronts are the same. To finish off, I created a chipboard template with a corner rounding punch to add a silver outline.


StencilGirl® Stencils Used on Front/Back of 18 cards:


StencilGirl® Stencils Used on Container Lid:


+ + + + +

I hope you enjoyed this project. CLICK HERE to jump over to see the other cards made for the StencilGirl® Affirmation and Tarot Card Collaboration


Thanks for dropping by! Sb

Thursday, October 14, 2021

Shapes for all Seasons... Grafix® Creative Plastic Films Bloghop


Greetings everyone! Today I am joining the Designer Crafts Connection for another bloghop featuring projects made with Grafix® Creative Plastic Films. You might be familar with Grafix® products such as shrink plastic, adhesive sheets or transfer paper... but they have so many other surfaces to delight artists and crafters alike!


Discover your creativity with Grafix®... is your source for specialty plastic films for Arts, Crafts, Graphics, Drafting & Design! For more than 50 years, Grafix® quality plastic films, specialty papers, and Incredible Art Products® have been inspiring artists, crafters, and designers to create the beautiful and innovative.


I was provided the Grafix® Disc Bound Mixed Media Journal and a multi-pack of Grafix® Metallic Foil Board and Paper to create with.


Grafix® Plastic Films are something I have never tried and I am excited that this Mixed Media Journal is a 6" x 9" size with an assortment of 6 surfaces pre-punched for disc-binding... ready to create!


These 6 unique surfaces which are geared toward a variety of mixed media applications. Try inks, stamps, stencils, markers, embossing, painting, drawing, and more! The ideas are whirling around in my head -- I'm not sure where to begin.


Hello bling! The Grafix® Metallic Foil Board and Paper is sure to steal the show! A multi-pack of 5 colors, 2 sheets each in 10" x 13" size.


I knew exactly what I wanted to do. Cut the paper and plastic film with die cuts! I make an effort to support fellow creatives as much as possible. I have a set of Crafty Chica Sizzix® dies that are for celebrating Dia De Los Muertos (from 5 years ago). Where I work we have an annual Community Celebration for this Holiday and I have had these for making projects with kids at the event. I've never really made an entire project - so this is going to be fun with this fabulous metallic paper!


I will also die cut some florals using Crafty Chica Makers Movement® dies that I purchased online. These were released this summer.


All I have done is die cut my papers and plastic film (I chose the .010” Clear Dura-Lar sheets). I am loving all the bling from this metallic paper... it is true mirror card! When assembled and embellished, this sugar skull will be turned into a mini mask by mounting onto a glitter pencil.

After testing my entire bag of pens on scraps of the Dura-Lar to see which took and looked best (happy to report most pens worked fabulous), I set off on drawing and doodling in the details.

I decorated each of my sugar skulls with a few metallic markers and chalk-ink pens. The front is the Dura-Lar mounted over green foil / the reverse is Dura-Lar over gold foil.

The more layers the more personality!

Layer film sugar skull on top of the foil paper... WOW! I finished by adding details in the metallic areas too.


I also die cut a skull shape with the Grafix® Double Tack Mounting Film to mount each side back-to-back.


I aligned the Grafix® Double Tack Mounting Film to the back of one side, place pencil then layer and join surfaces together.


I used some Diamond Glaze to adhere the layered foil pieces and gem accents.


This Catrina is ready for her close-up!


The hand drawn embellishments, marks and doodles to bring these Sugar Skulls to life!


I love the contrast of the front and the back just from varying colors. The pens worked great on the Clear Dura-Lar and dried quicker than expected. I can't wait to share this at our Viva la Vida Altar Celebration this weekend. 

CLICK HERE to jump over to the beginning of the Grafix® Creative Plastic Films Bloghop at the Designer Crafts Connection blog to view more inspiration and projects using Creative Plastic Films.
For more info on Grafix® Productsproject inspiration and purchase these fantastic surfaces visit Grafix® website HERE.


Thanks so much for visiting! I'd love to hear what you would create with Grafix® Creative Plastic Films.  Sb :)

** This is a sponsored post.  Grafix® provided products for use in this project in exchange for my creative ideas, views and opinions. My ideas and opinions are my own.

Friday, October 8, 2021

Color all the Things... Dive into the World of Artesprix® Sublimation Ink

Hello friends! It's finally Friday and I have something new and exciting to share that I have been keeping a secret all Summer. Earlier this year, I responded to the call for Artesprix® Design Team and I was invited to be a Guest Designer for the Artesprix® Blog.

Today I am thrilled to introduce you to the world of Artesprix® and working with Sublimation ink. 


My guest designer project is to feature Artesprix® Bookmarks, and I was sent this assortment of Artesprix® Sublimation Markers, Sublimation Stamp Pad, Blanks and everything I need to dive into the world of sublimation.

For my first project I grabbed a never used stencil from my stash and the Artesprix® Sublimation Markers to create a bright colorful bookmark... and though I tried to get my hubs to play with me, he only chose the colors! Artesprix® bookmark blanks are the perfect canvas to creating personalized art to mark your books.


So... what are Artesprix® Sublimation markers? 

Artesprix® markers have a specially formulated ink that transforms anything colored on plain copy paper into a heat-transferrable iron-on design onto polyester items. With the magical Artesprix® Sublimation Stamp Pad and Sublimation Markers and plain paper and a hand-drawn, stamped or stenciled design, I can customize all the things! What the WHAT?!! The holidays are just around the corner...


Materials needed: Plain Copy Paper; Pencil; Artesprix® Sublimation Markers; Artesprix® Heat Tape; Artesprix® Protective Paper Roll; Artesprix® Project Mat; Artesprix® Bookmarks 4ct; Stencil -- Art by Marlene MASKBM17 from Studio Light B.V.; and a Heat source -- Cricut Easy-Press Mini™ (Artesprix® Heat Press or Home Iron).

Ready to play...


Using a pencil trace Bookmark blank onto plain copy paper. For paper size, plan to leave approximately 2" on all sides to yield for coloring outside the blank shape and applying heat tape. Trace stencil design within bookmark outline and be sure to add about 1/8" to 1/4" of coloring outside the lines.


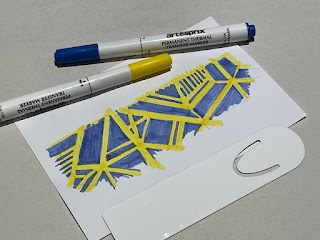
Using the yellow Sublimation Ink Marker I set off to fill in all of the lines.


The pens have a nice chisel tip that makes it easy to draw a thin or wide line.


First layer of color done... next the background.


Using the blue Sublimation Ink Marker, I filled in all the negative spaces.


The tiny areas were tricky but this is why I did the lighter color first.


OK... all colored! I think I want to add some outlines.


Using the Black fine tip Sublimation Ink Marker, I re-traced the stencil design shapes, then added some hand drawn lines and cross-hatching in a few areas to make it a bit more artsy.


I love it! Yes the color looks a bit dull... but not to worry -- it needs some heat to come to life!


Pre-heat Cricut Easy-Press Mini™on the highest temperature setting and prepare bookmark for thermal transfer magic by placing face down within pencil lines secured with Heat Tape. You can see why I colored outside the lines -- there will be no white edges when transferred.


With the Project Mat on bottom, I make a "Sublimation Sandwich” — a piece of Protective Paper at the top and bottom of your bookmark taped face down onto stenciled design. I used two layers of protective paper on top and bottom for good measure.


Now the fun part... apply heat! Starting at one end I press and hold Cricut Easy-Press Mini™for 45 seconds, then move to next unpressed area, slightly overlapping and pressing again. I repeat 3-4 times until entire length of bookmark has been heat pressed. 

I have to admit this is not what I intended to be doing when I purchased this little mini iron... but I love it!


Let cool a bit -- the bookmark is metal... and keeps heat a while. Take a peek check by gently peeling back one section to peek and see if thermal transfer is complete.


If it looks good, let bookmark fully cool then remove Heat Tape.


Wowee!!! Look how bright and vibrant the blue and yellow is!!


The heat transferred bookmark next to the hand-colored stencil design on paper.
This bookmark certainly won't be missed in the pages of a book.

The possibilities are endless with a variety of Artesprix® Blanks that can be customized with hand-drawn art or using my stash of stamps. These custom bookmarks are so easy to make and is a fun project to do with kids (heat part adult supervised of course).

What else did I make??! Hop on over to see my Guest Designer Project on the Artesprix® Blog... and see how my love of stamps meets bookmarks.

Thanks for visiting... I'd love to hear how you would art up your own bookmark using Artesprix® sublimation markers.

Happy creating! Sb

** This is a sponsored post. Artesprix® provided products for use in this project in exchange for my creative ideas, views and opinions. My ideas and opinions are my own.

Blog Widget by LinkWithin