Translate

**If you have previously subscribed to received my posts via feedburner or Bloglovin, those are inactive now. To receive my creative updates, please subscribe in the right sidebar.**
Showing posts with label fun with food. Show all posts

Monday, October 3, 2016

#PumpkinSpice and Everything Nice... fun DIY #Cre8time Thanksgiving Treats!


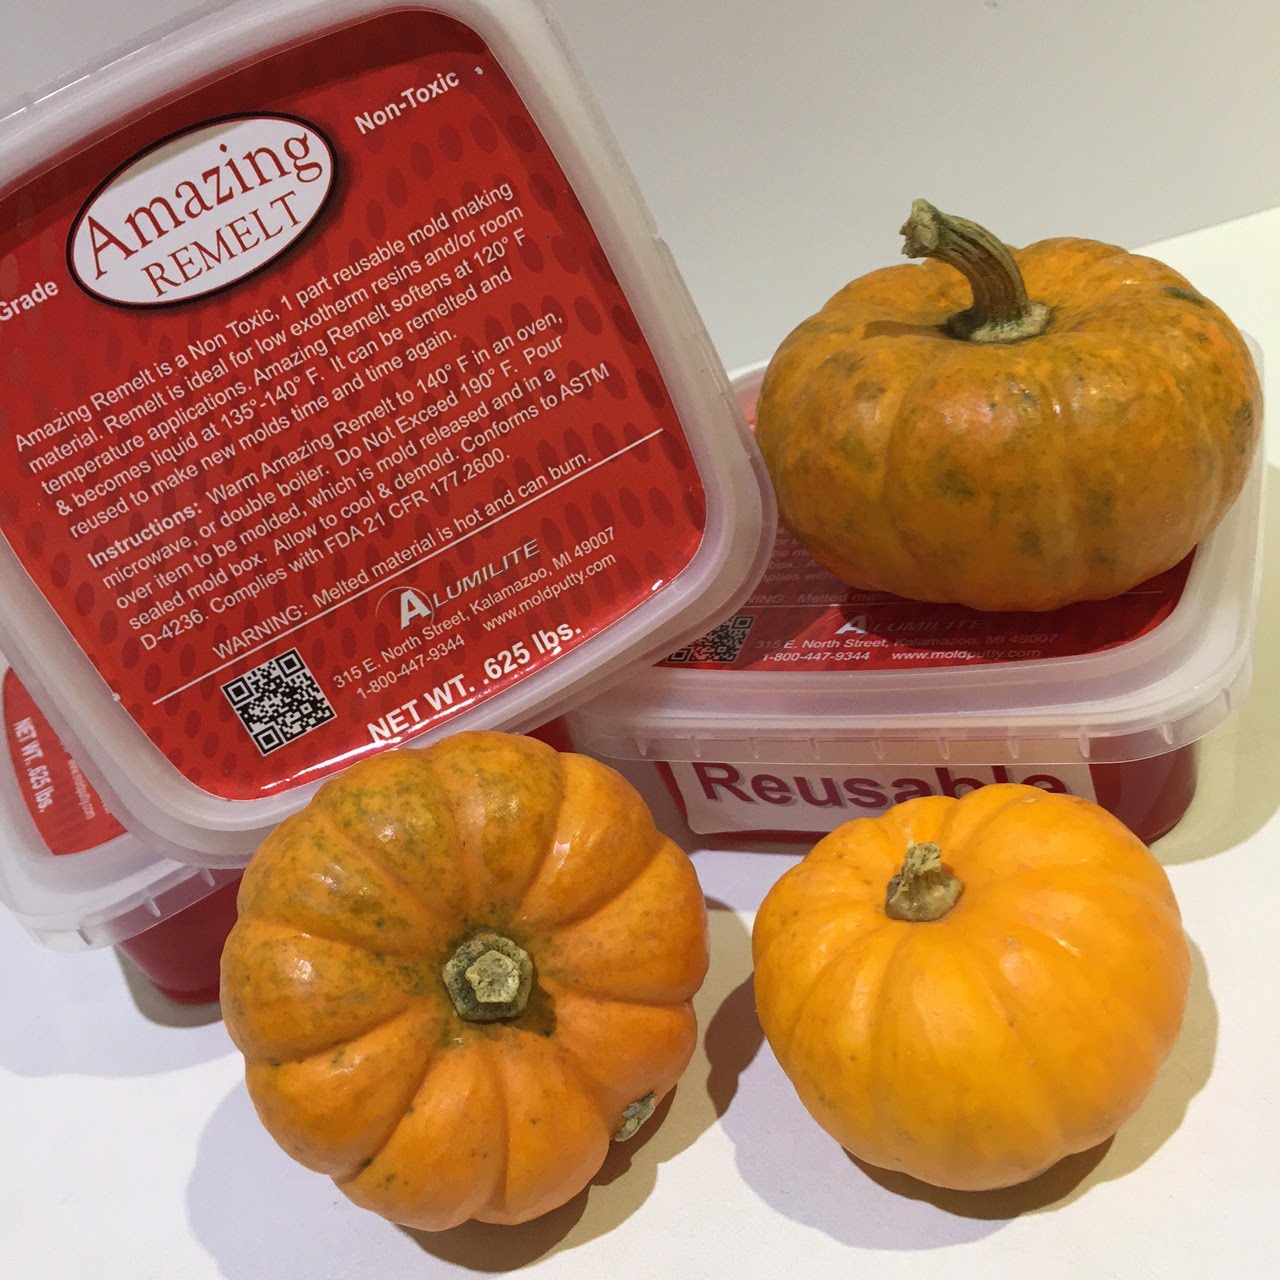
Happy October friends!! It's another first Monday and myself along with the Designer Crafts Connection are sharing fabulous Fall Crafts. Today I'm sharing some fun DIY treats for your Thanksgiving table settings. I admit I'm crazy for pumpkins... especially those adorable mini pumpkins!! I made a couple molds for molding chocolates and other sweet treats using Amazing Remelt, and Amazing Mold Putty {both are food safe}.  


Amazing Remelt and Wilton Candy Melts both melt down in minutes in the microwave making custom sweet treats like a pro quick and easy.

First I selected a tapered glass bowl deep enough to fully cover my pumpkin, then melted down a container of Amazing Remelt using the lowest setting on my microwave in thirty second increments until it was completely liquified.


Please click here if you have trouble viewing video.

**A TIP** I poured a small amount into my bowl and let cool a bit before placing pumpkin in it. ALSO, I dipped the top of the pumpkin into the liquid remelt to coat the stem and let any air bubbles release before fully covering with Amazing Remelt.


After cooling in the refrigerator for a while {I left it all day since I had to go to work}, I removed the mold from the bowl. I gently cut the mold in half using a sharp Xacto knife and released the pumpkin. Now I'm ready to make some chocolate mini pumpkins.

First a solid chocolate pumpkin...


I melt down the Wilton Candy Melts following the directions for microwave in a pourable pyrex measuring cup. I scooped the melted chocolate with a small spatula into both sides of the Amazing Mold Putty mini pumpkin, filling completely.


I placed the top half of the mold onto the bottom, aligned to my marks and placed in refrigerator to chill and harden. Any edges are easily touched up with a light scraping with a spoon or backside of a butter knife.


Now I'll make a chocolate pumpkin box...


I repeated by filling the Amazing Remelt mold with the Wilton Chocolate Melts - spreading chocolate to evenly coat edges and leaving center open. When hardened this pumpkin will be hollow... perfect for desserts or party favors!


The chocolate hardens very quickly – then I gently remove from mold, set aside on a tray in the fridge and make another set. I fill the chocolate box with an assortment of roasted seeds/nuts and mini dark chocolate chips. These lovely white mini pumpkins make a perfect edible favor for the Thanksgiving Day the table settings. These are fun to make and can make well in advance of the event... can you imagine how fun they would be in colored chocolate too??! 

What will you like to
transform into edible art??

If you are pumpkin crazy like me... stay tuned!! This pumpkin baby has more projects in the works. Thanks for visiting! For more Fall and Halloween inspiration pop on over to the Designer Crafts Connection Fall Crafts roundup HERE. :) Sb

Tuesday, February 2, 2016

#Cre8time Love is in the Air... Valentine's Day Projects with Designer Crafts Connection


Hello friends and Happy February... the month of LOVE! This month the Designer Crafts Connection is feeling the Cre8time "Love in the Air" and sharing Valentine's Day projects. CLICK HERE to hop on over to the Designer Crafts Connection blog and be inspired!


Today I'm sharing a super fun and easy way to dress up your morning coffee for your Valentine with some custom shaped sugar cubes... and this is certainly a project that you can do with the kiddos.


Using some heart-shaped chocolates from the Dollar Tree {my favorite guilty pleasure}, I created a mold with Amazing Mold Putty. I hot glued four of them onto my glass craft mat and pressed the mold putty around them. I didn't even bother unwrapping them. I love the texture of the foil on the chocolates. To view how Amazing Mold Putty works... CLICK HERE.


By the way... did I mention
that my new DIY mold
is FOOD SAFE!!!


Next thing I did was rummage around my pantry for my collection of Wilton colored sugars for cake decorating and grabbed a couple recycled wooden coffee stir sticks and mini silicone mixing cups.


Quick and easy indeed! I poured a little bit of each color into a silicone mixing cup, added just a couple drops of water and stirred until the sugar was the consistency of wet sand at the beach.


Then I poured the mixture into the mold and pressed the sugar making a compact cake. This is just like packing wet sand to make a sand-castle... and just as fun – tastes better, too!


A little *TIP* – if you heat your Amazing Mold Putty mold up in the microwave a minute or two {test this first at 15 second increments to see how hot your device heats it and please use oven mitts} before putting sugar mixture into mold, it will help them dry out faster. Do not cook the sugar in the mold... it will melt or burn giving a completely different result.

**PLEASE NOTE** For your safety - please don't use a mold for food items if you have already used it for resin or other art products.


I didn't have any pink sugar... so I easily whipped some up using my natural cane sugar and one drop of red food coloring and a couple drops of water. This project took about half an hour and I made several of each color - and a couple different shapes from other hearts previously molded. My hubs will be quite surprised when I have some of these on the table for Valentine's Day brunch.

Sweetheart Sugar Cubes


How do you take your sugar...
one heart, or two... red, yellow or blue??

Thanks for stopping by and have a great day! CLICK HERE to hop on over to the Designer Crafts Connection blog for more fabulous Valentine's Day projects! :) Sb

Tuesday, August 25, 2015

Lunch Notes with #Cre8time LOVE...


Hello everyone. I'm back to share a little project using the Wet-Erase Chalkboard Signs that are handy, yet so much fun!


The Deflecto Wet-Erase Sign is perfect for adding a sign in a snap! These cute Black signs mounted to a Mahogany easel come in a three pack measuring 5 7/8" x 9 1/2" x 5 1/4".


In a previous post I created this fun Mexican themed sign using the assorted color pack of Deflecto Wet-Erase Markers for a fun taco night we had around the Thanksgiving holiday. I had fun decorating this and I love the border I created. I would like to use this on a daily basis as a menu note board for my husband for the meals I prepare and leave for him. I have to cook on a daily basis now for health reasons and he is really reaping the benefits and bragging about his "gourmet cook" at home - LOL!


I'm going to keep the border here, so using a small paintbrush and water, I apply water and gently rub to remove the chalk ink in the center of this board.


 I blot away the excess water and repeat until most ink is cleared.


Using a paper towel, I mop up the remaining and gently dry the center, careful to not wipe away my border. This is really pretty simple and didn't take more than a few minutes.


The Deflecto Wet-Erase Markers clean up quick and easy with a wet paper towel and water, then followed with a dry cloth - and they leave no ghosting. The ink is opaque and bright and does not require multiple coats - that's a timesaver. **A Little TIP** These markers write on plexi, glass and anything with a durable non-porous surface so you can decorate pretty much anything! I love using these on the Deflecto Craft Plexi frames.


The center of my blackboard is clear for re-decorating with my border in tack. There was a little smudge here and there which was easily touched up. All I have to do is create a new message for today!

Lunch Messages with LOVE!


I placed the sign right where with the water and drinks - a place that is sure to be seen. My husband really gets a kick out of my new daily routine of home cooking... and I have a little creative fun, too!

How would you decorate with Deflecto Wet-Erase Signs?

Thanks for visiting! CLICK HERE to jump over to the Deflecto Craft Facebook Page to see more creations using Deflecto Craft products to inspire you.
 :) Sb


For more information on the Deflecto line of products,

•••••••••••••

Stay tuned this week as I will be sharing more ideas using Deflecto Craft products building up to a Designer Crafts Connection Deflecto Craft Challenge bloghop this THURSDAY - you don't want to miss it! Have a fabulous day :) Sb

Thursday, February 13, 2014

Lips Like SUGAR... SUGAR Kisses...


Happy Thursday Everyone! I have a super fun Valentine's Day project featured today over at the Amazing Mold Putty Blog. I'm re-using my heart-shaped chocolate mold I made last year for my Shamrock Lucky Jar {CLICK HERE to view}.

How do you SHAPE your sugar...
CLICK HERE to see the HOW-TO.


Also - the folks over at Amazing Crafting Products are having a crafting contest... and anyone can play for a chance to win one of each of their products {Amazing Mold Putty, Amazing Mold Rubber, Amazing Casting Resin and Amazing Clear Cast Resin}. Share your "For the LOVE Of..." project here via inLinkz to be entered to win. All the details are here. Hope you enter and WIN!

Have a great afternoon!  Sb :)