Translate

**If you have previously subscribed to received my posts via feedburner or Bloglovin, those are inactive now. To receive my creative updates, please subscribe in the right sidebar.**
Showing posts with label using scraps. Show all posts

Sunday, November 30, 2025

Festive Paper House Decor... 12 Days of Christmas Ornaments Bloghop


Hello creative friends! Welcome to DAY FOUR of the 12 Days of Christmas Ornaments Bloghop. Pop over to Try-It, Like It for the details on all each days ornament tutorial. 
 
 
Today I am sharing how to create this adorable festive birdhouse ornament. This is a fun stash-busting project and can be done using what you have on hand. All you need is a few paper scraps, buttons or metal findings and ribbons & trims, this sweet house is ready to adorn the tree!

I was inspired by the red & white checks on this 1 1/2" wide wired burlap trim - it's perfect for the rooftop of my whimsical little bird house.

PLEASE NOTE: This was put together in a free-form fashion... like one of those recipes that you throw together using a handful of pantry staples. This project came together with ease and the size was determined by the size of my paper scraps & width of ribbon trim that I selected for the roof. No precise measuring! 

Let's get started!

To begin: from my stash I found and cut two matching strips of patterned paper. My paper has a distressed painted texture on both sides and I made width match the wired burlap trim I am using for the roof which is approximately 1 1/2" wide


Overlap the two strips together like a "plus sign", then glue together with white craft glue. Next cut a matching triangular peak to support roof from top and bottom of one strip. This overlapped section will be the base of house. When glue is dry, fold up the sides at edges of the base section. Punch a series of equally spaced holes along each edge. I used six – this may vary depending on your size paper. Keep in mind that an even number of holes are needed to complete stitched X shapes along each side.

 
Using a contrasting yarn, embroidery floss or baker's/burlap twine, stitch house walls together using a cross stitch "X" pattern and and knot off on the inside.


Completed house with all sides stitched – no glue necessary. 


I cut a section of a decorative wired burlap trim, folded in half, then folded edges over twice to add extra dimension. Any kind of ribbon or even decorative paper could be used. Cut a matching size section of patterned cardstock and fold in half. 


For extra stability, adhere the piece of scrap patterned cardstock using double-sided tape. For this step, I opt for a dry adhesive method as some glues may seep into and discolor ribbon. Please use your choice of adhesive based on your materials.


Create a hanger by tying a knot to form a loop with green burlap thread. Poke a small hole in center of roof with a pushpin and feed through keeping knot on the inside. To add extra detail, I strung on a bead cap. 


To create a base, I mount a red cardstock rectangle on the bottom that is slightly larger and added a thin natural burlap twine around the base. I nipped the tips off the corner edges with scissors.

To add a roof overhang, I cut and adhere a piece of red cardstock below that is slightly wider on each size under burlap roof piece. To finish: I glue the roof assembly onto the house structure using white craft glue and set aside to dry.


The finishing touches are a keyhole brad embellishment glued to the front of the house and a beautiful tied bow made of burlap ribbon adhered with a heavy-duty glue-dot. This ornament is so adorable! As you can see it can fit in my hand. Fully embellished this house is about 3 1/2" tall and 2 1/2" wide.


This ornament comes together easily using a minimal amount of supplies. Grab up all the little bits and bobs and make a whole bunch in different colors and sizes! These will be my handmade ornament gifts for family this year.
 
I invite you to join me and subscribe to my YouTube channel where I will share a video process of this ornament in a different color and pattern range on December 8th! While you are there you can view a video on a mixed-media Junque Fairy ornament.

If you have any questions, please leave a comment and your contact information spelled out {ie: youremail at service dot com} and I will be happy to respond. 
 
Thank you for stopping by. Check back for more fun projects!  :) Sb

Trim the Tree with Handmade Holiday Ornaments...

Hello creative friends! Handmade holiday gifts are my jam – especially ornaments. It's a tradition that I share with my Grandmother which has spread to other family members too. I am also into all sorts of art & crafts, sewing and of course, I just can't resist making ALL THE THINGS! 

That being said, 
I am excited that my creative friend Janet invited me to be a part of a special handmade event where each day brings a new craft tutorial to follow along and make some new handmade holiday ornaments... the 12 Days of Christmas Ornaments!


+ + + + +

To visit all the stops for the 12 Days of Christmas Ornaments visit Janet at https://tryit-likeit.com/12-days-of-christmas-ornaments/

Here's the list of all the Ornament Makers in this bloghop:

Day 1 – Janet Trieschman: Fabric Ball Ornament
Day 2 – Donna Wirthlin: Santa Fabric Star
Day 3 – Natalie Shaw: Waterslide Decal Ornaments
** Day 4 – Susan M. Brown {sbartist}: Festive Paper House Ornament ** YOU ARE HERE
Day 5 – Michelle James: Old World Santa Ornaments
Day 6 – Julie Nyanyo: Felt and Button Stars
Day 7 – Christie Troxell: Pinecone Flowers Wood Slice
Day 8 – Gail Griffin: Bejeweled Decorative Ornament
Day 9 – Katie Adams: 3D Laser Cut Reindeer Ornament
Day 10 – Janet Trieschman: Alcohol ink Ornament
Day 11 – Terry Ricioli: Rustic Wood Slice Ornament
Day 12 – Janet Trieschman: Christmas Tree

Thanks for stopping by – I hope you enjoy creating along. Merry Christmas and Happy Making. I'd love to hear about what type of ornaments you like to make. :) Sb

Thursday, March 10, 2022

Pinch Me... I'm ShamROCKin' a DIY Ribbon Rosette #NationalCraftMonth


Hello friends... March is National Crafts Month and St. Patrick's Day is right around the corner! Today I'm sharing a quick and easy ribbon rosette project that is perfect for pinning on the winning float at the annual St. Patrick's Day Parade!


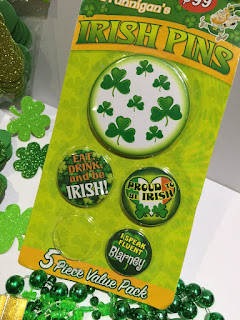
For this project I gather a few supplies: gold oly*fun® metallic fabric, scrap of green cardstock, scissors, paper trimmer, hot glue, Scor-Pal®, double-sided adhesive sheets; and fun Irish themed button flair, embellishments and stickers from my fav dollar store.


I have these pins from the dollar store in my crafty stash that would be perfect to transform into ribbon rosettes using gold metallic oly*fun® -- a fun reflective fabric that adds the perfect amount sparkle & shine to cardmaking and other craft projects!!


To make fabric a bit stiffer to fold and hold shape, I mount to green cardstock.


On a scrap of 6" x 9" green cardstock, I placed a cut-to-size section of double-sided adhesive sheet, removed backing, then mounted piece gold oly*fun® and trimmed back the edges.


Following pattern for making rosettes using my Scor-Pal®, I scored both sides of the paper-backed fabric to create peaks and valleys at 1/2" increments.


I divide this scored sheet into three, 2" sections, With some double sided tape, I joined the three sections together into one long strip. Fold back and forth on score lines to make the accordions. When shaped this will make a large rosette to set off my 3" button!


Now the fun begins! Shape the according into a circle and glue in place. It seems to take about 4 hands to form and hold a rosette down to secure, but once you do it a time or two it's pretty easy. For this I apply a ring of hot glue around the edge in the center and placed a faux gold coin on top... Ta-DA! Hold coin in place until glue cools and it is secure then repeat on other side.


I fashion a ribbon tail out of another section of oly*fun® backed cardstock, a smaller section popped up on chipboard cut on my guillotine paper cutter... easy-peasy! Glue the feature button pinback onto the front of the rosette, and added some fun foamy & glittery shamrock stickers to finish things off. Place a sticky back wall hook on the back upside-down and it's ready to hang on the winning float!


I just love the shimmer and shine of the metallic oly*fun®! I can't wait to be ShamROCKin' this over to award to my favorite float at the St. Patrick's Day Parade!

A ShamROCKin' Award....


What are you creating during National Crafts Month?! I'm enjoying the art of cut paper and glue over at the Collage-Lab SPRING FLING Virtual Retreat... you can still join the fun -- all classes are accessible until December 2022.


Thanks for stopping by and have a great day! Clover on over to the Designer Crafts Connection blog for more fun craft ideas!

Happy creating! :) Sb

Sunday, January 16, 2022

Join me for some #Cre8time Playtime...

Hello creative friends! Monday is MLK Observed Holiday for us here in the US. If you are home for the day and looking for some creative fun – grab some scissors, glue and a pile of your fav paper scraps and join me Monday, January 17th at 1pm CDT (Chicago time) for a FREE Collage-Lab Play Date!


This is held via ZOOM so head over and register here... 
please tell them Susan sent you ;)


See you tomorrow!  Sb :)

Monday, November 15, 2021

Great News!!! I'm TEACHING at the #collagelabspringfling


Keep calm and put the bacon on! Hello friends! The time is finally here and I am so excited and thrilled to tell you the NEWS!! I've kept this post brief, so please read to the end. This is my first EVER announcement of this kind and I am bringing it to YOU, my blog readers first. XOXOXO


It's a rare occurrence that someone catches me in a photo. This one surely speaks for itself! I have a new workshop that I am teaching... and I invite YOU. Grab some scissors, a glue stick and a pile of your paper scraps, magazine clippings & ephemera and join me!


While in-person engagements are still limited, the magic of technology has made it possible for me to teach online -- and I have been invited to teach at Collage-Lab's SPRING FLING Virtual Retreat!


The BEST part is EVERYONE is invited to join the fun!


Join myself and 14 artists from across the globe at
the Collage-Lab SPRING FLING Virtual Retreat!
It all begins March 1st, 2022. 


Get away from the hustle and bustle of everyday and focus on mixed media collage for a bit. For the entire month of March 2022, Collage-Lab will bring you a variety of online classes, Zoom gatherings, and a whole assortment of collage projects and techniques.

Treat yourself to a gift while supporting
your artist community... a WIN-WIN!

SIGN UP TODAY for the low Early Bird Price of $100 and unlock all of the adventures of this unique Mixed Media Collage Retreat from the comfort of your own home or studio.

For all the details CLICK HERE.


Full Disclosure: the Collage-Lab SPRING FLING Virtual Retreat pays its instructors. By using my affiliate linkbit.ly/SpringFling_withSB to sign up, I will receive a small commission which goes towards continuing my efforts to bring creative inspiration to you for FREE here in webland. I am so grateful to all of you for supporting me and my creative adventures.

I hope you will sign up and join me! It will be the best gift ever!

Sending you all many {{ BIG Crafty HUGS }}
:) Sb

Wednesday, October 21, 2020

Bringing JOY to Misfit Socks... Fairfield World's 80th Birthday Celebration


Welcome to the Party! Fairfield World is celebrating it's 80th Birthday with a special online party... 80 Days of Poly-Fil®! I have been so excited to share my project! My new little friend is tooting his horn to keep this party going!

Fairfield World has gone all out for this event and generously provided two 32 oz bags of Poly-fil® to create with... that is a LOT of stuffing! It's been a while since I've made something fun and whimsical. The last thing I made was my very own "Elf on the Shelf" sitter. Since quarantine life, I have been tackling the honey-do list which includes clearing out the drawers and closets. 

I admit I'm a sock-baller. It's just practical. But I have found that I have an endless supply of socks. Mostly ankle socks and a bunch of cute fun patterned ones that never ever have been worn since being banished to the drawer (it's just way too hot for boots here in SoFL). 


In my sock menagerie is a pair of "Original Rockford Red Heel Socks" with a pattern to make the world famous "Sock Monkey" and a super cute elephant. I received these as a Christmas gift with a Sock Monkey t-shirt (which has been artfully altered) many moons ago. The universe has spoken! With this pattern and an abundance of Poly-Fil®, I have everything on hand to bring some JOY to my collection of misfit socks.


In today's project I have used: 1 pair of long socks; scissors, Fairfield World's Poly-fil®; the Original Poly-fil® Stuffing Tool; colored hair elastics; repurposed ribbon; quilters pins; sewing needle; embroidery floss, buttons, yarn & thread in coordinating colors; thimble; sewing machine; felt; parchment paper; permanent marker; and Red Heel instructions.


First thing you want to do is make sure you wash and dry the socks. They will most likely shrink a bit and the final project will be clean and ready for gifting when complete. Turn socks inside out to prepare for pattern cutting.


I am bringing out my sewing machine to help take care of some of the stitching. This project can be done entirely by hand and is a great project for kids. I'm having fun figuring out what critter a pair of socks wants to be.


Flatten out each sock following instructions 
and mark measurements with quilting pins.


First I mark out the legs on each sock.
These will be sewn on the sewing machine.


Each sock size may vary from pattern. I am prepared to alter things with a piece of parchment and a permanent marker. I trace the shape of the sock and sketch out the placement of ears, mouth and trunk.


The first sock will be head, body & legs in one piece. I sew 1/4" to one side of center down to bottom (elastic open edge) of sock. 


Here is the first stitched line. I learned to have patience in sewing an inside out sock. The fuzzies like to jam in the feeder.


I turn around and sew back up 1/4" 
from on the center pinned line. 


Next I stitch along bottom of open end of sock
to close it up forming bottoms of feet.


Legs are sewn, leaving approximately
a 1/2" gap in the center.


Now I can just cut up the center to divide the legs. I cut about an inch up past my stitching to allow for turning rightside out.


Head, body and legs are ready for stuffing with Poly-Fil®.


Now for the second sock! I pin my pattern to the sock and repeat the steps to sew the arms.


After stitching, I cut the arms away from the other patterned pieces.


Two arms ready for stuffing!


In modifying pattern to work with size and shape of my sock, I have also simplified my sewing. I use the same process to sew around and create a matching pair of ears.


I sew a straight line to form one edge, then turn 
and follow along to form a wide "U" shape.


I repeat from the other side resulting in 
two rounded rectangle shapes for ears.


I cut down the middle between the stitched lines to separate both ears. I gently cut unsewn edge to open ear for stuffing and around the edges removing bulk and excess when turned right side out. 


For the trunk, I sew this freeform rather than cutting and sewing a small piece. I mark shape with quilting pins for a line to follow on sewing machine.


After stitching, I cut trunk piece away. I have a section of sock left that I can use for accents at the end if needed.


With all the pieces sewn and ready. 
Turn everything right side out.


I gently turn head/body/leg shape right side out because I purposely left a smaller hole to be hand-sewn closed. I was not sure how much the sock knitting would fray also. The sock is pretty forgiving as it is stretchy and durable.


I start with just turning the legs and feet to prepare for stuffing.


I have all my pieces ready to stuff with Poly-Fil® using the handy Poly-Fil® Stuffing Tool that comes nestled inside the the middle of the package roll.

**A TIP** take out small amounts of Poly-Fil® at a time. It will get everywhere and you will never be able to get it all back into the bag – IT GROWS!


The simple pattern instructions call for circles of cardboard to be placed inside the ends of feet. I'm using felt rounds the same size as my spool of thread. The socks I'm using are thin and the felt will help keep the flat size at the end of feet.


I cut 2 circles for each leg. I will layer two for per leg and secure in place when I stitch on button accents at the bottom of each sole.


I stack two felt rounds and press flat into the bottom of each foot, making the stitched line fall at about the center, then stitch a button onto the outside. When stitching button, I thread up and through the felt circles to tack in place and this will also help secure the button.


Now it's time for the FUN part... STUFFING! First the trunk comes to life. I use the handy Poly-Fil® Stuffing Tool to coax the stuffing down into the tapered point. I found using a swirling motion helped prevent clumping and keeping a smooth surface.


Next the ears.


When stuffing the head/body, I used a light blue 
fabric wrapped hair elastic to mark the neck.


Everything is fully stuffed and ready to assemble. 


I start by sewing closed the base of body and legs with a whipstitch. I'm not the best at hand-stitching, so I did my best turning edges inward as I stitched to conceal the thread. The imperfect stitching adds to the quirkiness.


One ear on. I went around twice with stitching
to get things good and secure. 


Look at the personality with just ears and legs! So CUTE!


I sewed the top of the trunk closed a bit before attaching to head. I also stitch the top of the arms closed. I also added a fun detail by stitching the tip of trunk into a closed curl to give it a bit of whimsy. 


I stitch the trunk onto the head, followed with the mouth. I mark the placement for eyes with quilting pins. He's ALIVE!


I find that finishing touches are the best and my most favorite part. This is where you add all the personality... and you can go on and on adding fun, quirky details. I kept it simple to let the pops of color in the pattern shine. I sew on mismatched shape buttons where I marked the eye placement with pins.


I'm all about the little details. So after stitching to head to secure buttons, I then ran some additional thread between the two eyes to pinch the shape of the head, adding more character. Have fun and add the details as you like.

My handmade sock elephant is complete!


I don't know what to name him but he certainly is FLOPPY in front of the camera! I really enjoyed making this cutie and have a whole menagerie in the works. I hope you enjoy this project and are inspired to create your own sock critters. There are loads of patterns for all kinds in webland. 

What animal would you make with Poly-Fil®? 

Pop over to Fairfield World more more inspiration on their website HERE.
For project ideas visit: fairfieldworld.com/project

Follow the #Fairfield80 on Instagram to see all the creative makes for Fairfield World's 80th Birthday Celebration.

+ + + + + + + + + + + + 

Thanks so much for visiting! Stay tuned... I have a few more sock critters in the works for holiday gifts. Sb :)