Translate

**If you have previously subscribed to received my posts via feedburner or Bloglovin, those are inactive now. To receive my creative updates, please subscribe in the right sidebar.**
Showing posts with label recycled. Show all posts

Thursday, August 12, 2021

Fantastic Foiling with Ann Butler Designs + Designer Crafts Connection!


Greetings everyone -- hoping everyone is having a SPARKLY day! The Designer Crafts Connection is having fantastic fun with Ann Butler Designs and heat transferrable foils... and I am totally addicted! 


CLICK HERE to hop on over to learn more about these fabulous products!


I was provided this sampler pack of 6 Ann Butler Designs Floral Patterned Papers with 6 solid toner papers and 6 sheets of foils and an assortment of sentiments for which to create with. 


Everything is so beautiful... one of the foils is looks like clouds!
I'll be using that one on another project.


I need a gift box for this weekend and I have the perfect item to upcycle. This gourmet tea came was given to me as a Christmas gift and the box is a lovely quilted embossed paper with tags that have gold foil accents. 


I'm going to use the Ann Butler Designs floral patterned paper foiled in gold to cover up the product labels and use this for a beautiful silk scarf. I will also foil the "thinking of you" sentiment in the green foil to serve as a gift tag.


I was so excited to be able to use my Minc machine which has been sitting on the shelf unused since I got it about 5 years ago (totally forgot I even had it). WOW! I have been missing out! I also tested out foil transfer process using my Cricut mini iron which worked also (though you do need to test to figure out process with your materials first). I'm using my Minc on setting 3.


With gold foil layered on top of floral vine patterned paper placed inside of transfer folder made of copy paper, I sent it through the Minc. I repeated twice for good measure since I'm new to this process and machine.


Ready for the magic!


The black vine design is now GOLD!


A close-up! So luxurious and easy to do! Having worked in the printing industry for over 30 years - this is an expensive, labour intensive process that is not done this way. 


I am in love and it gets BETTER! The waste is usable too! Place the remaining gold foil waste on top of the solid black toner cardstock and run it through the Minc... you get another piece for another project! YIPPEE!


Here are the papers I foiled and the reverse. Stay tuned... I have another project in the works for the blue versions.


**A TIP** I gently cut the foil with my mini guillotine cutter. The foil is really delicate -- next time I will just use scissors as it nearly tore in the process.


I prepared and sent these two sentiments together through my Minc.


The hardest part is measuring and back-trimming the pieces to fit within the existing gold-foil line on the packaging. 


I made each of the sections slightly larger and trimmed off a sliver at a time to get it just right.


I didn't need to do this, but I am all about the tiny details. I used a Gelly Roll metallic pen to touch-up about a 1/2" section of the original gold foil line that was missing from storing tasty teas. Voila!


Now with all my pieces cut, its time for the FUN part... embellishing!


I add glue and gently press into place.


Then repeat with the other sides.


Repeated the steps to mat the sentiment onto a piece of DCWV green glitter cardstock.


Add a few REMOVABLE Glue Dots® to the matted sentiment...


And apply to the front of the box. Smart of me to use removable adhesive -- I put the sentiment on the wrong side of the box LOL! 


Recipient can remove easily and use box again.


Save those gorgeous scraps! There's plenty of pieces left to use on a card.


Look at that! A perfect match. Nobody will ever know that this is a recycled tea box.


A Recycled Gift Box Redux

This gift is ready to grab and go! What pretty packaging do you have waiting to upcycle. 

These fabulous papers embellished with heat transferrable foils are quick, easy and luxurious!

CLICK HERE to jump over to the beginning of the Ann Butler Designs Foil Bloghop at the Designer Crafts Connection blog to view more inspiration and projects using heat transfer foils. 


Products on her Website HERE


Thanks so much for visiting! Sb :)


** This is a sponsored post. Ann Butler Designs provided paper products for use in this project in exchange for my creative ideas, views and opinions. My ideas and opinions are my own.

Wednesday, March 18, 2020

So Many Favorites - So Little Time... Designer Crafts Connection celebrates National Craft Month


Hello Friends! Its been a while since I've done some arting -- and since it's National Craft Month I'm joining the Designer Craft Connection to bring you some inspiration using our favorites. It's been a whirlwind since attending Creativation in January and when I have time to play I like to get back to something that got me started in papercrafting... making ATCs {artist trading cards}. 


ATC's are small little masterpieces. One of my favorite ways to squeeze in some arting, try out some new products and using up scraps of this and that. Today I'm sharing this quick little project I made just for myself... an upcycled mini book that is a little bit steampunk and a little bit purple!


I love to create with recycled items and reinvent them by using up items items on my craft table. This project can be made in any colors or theme and is great for the kiddos, too!

This project began with this piece of distressed aluminum tape covered cardstock on my table. This tape is already self adhesive and is wonderful to use in creating steampunk projects and altering items with metal. I use it to make large sheets of distressed cardstock for use on all sorts of altered projects... and ATCs!


It's pretty easy to make a sheet of metal paper. You take a sheet of cardstock or recycled chipboard, then cut strips of the aluminum tape; adhering pieces in an overlapped fashion to cover the sheet. You can be as creative as you want doing this. Use a bone folder to burnish down and press out any air bubbles. Sand and distress surface as desired. Then you are ready to paint, emboss and stamp for a multitude of uses.

My sheet above has a pink smudgy coloring because my roll of aluminum tape happened to have red words printed on it and I removed by rubbing with nail polish remover. I liked the look of it with some red, so I didn't rub it all completely clean.


I have loads of recycled toilet paper tubes set aside for projects. The brand I get is now glue-less to the roll – which makes it that much easier to prep for crafty goodness.


I press the tubes flat and make a nice folded edge with my bone folder.


Using some Ranger Distress Paints, I quickly add some distressing and color to the edges. I just love the dauber tops on the bottles -- they make painting quick and easy. This can be done with chalk inks or regular ink pads also.


I went around the edges of seven (7) flattened tubes with Seedless Preserves and Tarnished Brass Ranger Distress Paints. A touch of color adds a little "POP" of color to the kraft color of the recycled tubes that will be the structure of my ATC holder.


I stack all of the tubes together and one by one added a line of tacky glue down the center and press another on top. You can create these type of pockets in a variety of shapes/sizes with envelopes or paper bags also. These tubes are the perfect size and shape to hold artist trading cards {ATCs}.

I align the tubes and clamp the stack together with some binder clips to dry. When dry this will be a sturdy pocket honeycomb booklet.


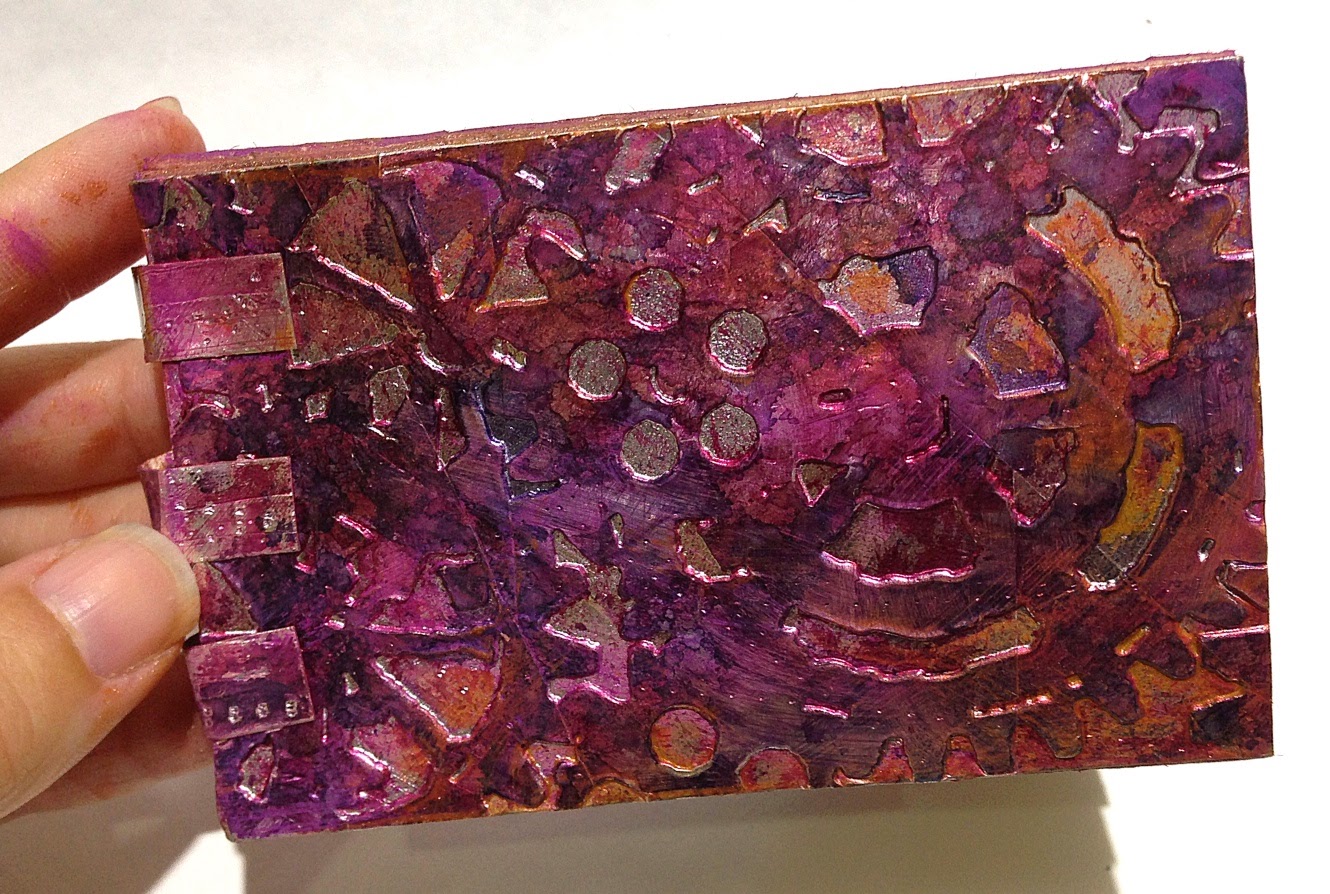
I use one of my favorite embossing folders in my Cuttlebug machine and dab with a variety of reds and purple Ranger Adirondack Alcohol Inks to add color and depth to my distressed aluminum cardstock.

I cut the sheet to size making a front and back covers for my mini honeycomb ATC cardholder. I had a thin strip leftover of the metal paper, so I cut into thirds and used it to add some detail to the spine area {nothing goes to waste}.


I add some embellishments -- a swatch of plum lace which looks lovely layered on top of the metal embossed cover, then some scraps of ribbons, fibers, lace, buttons, bling, found objects and goodies from my favorite stash of metal hardware. I inked some pale pink ribbon trim to match the color palette and altered a strand of pearls with alcohol inks to match too! Voila!

"STEAMPUNK" ATC Traveller


I hope this fun upcycled project inspires you to create. How you create your own? For more inspiration CLICK HERE to jump over to the beginning of the National Craft Month Foil Bloghop with the Designer Crafts Connection!


Thanks so much for visiting! Sb :)


Friday, March 22, 2019

#Cre8time Spray-time... Designer Crafts Connection Plaid® Mod Podge Ultra Challenge

Hello creative friends! Are you ready for something NEW that will knock your Cre8time socks off?! In celebration of March is National Craft Month, the Designer Crafts Connection Bloghop designers are creating with something brand NEW... Plaid® Mod Podge Ultra!


YASS!!!! Mod Podge Ultra comes in a SPRAY bottle!!!
NO-BRUSHES NEEDED!!!


For this challenge I was provided an 8 oz bottle of Plaid® Mod Podge Ultra in a matte finish; an artist variety set of Folkart ® Brushes; a Plaid ® Art Materials - Brush Basin; and a 2 oz bottle of Brush Plus™ brush cleaner. The rest of the supplies I am using are from my crafty stash: Folk Art Apple Red Multi Surface paint; gold brocade trim; red satin beaded trim; recycled gold gift tissue paper; StazOn Ink; Asian chop background stamp; LED mini candle; and some wood findings. I also need a pair of scissors, my paper trimmer and 1/8" double sided tape {for adhering trims}.


For today's project I am transforming this empty liquor box.


I have reinvented a couple of these boxes into lamps previously and I am so excited to finally make this Asian inspired version based off of this altered puzzle piece design I created for a swap many moons ago {2007}.


I will be honest I have started this collage project before, but never finished. It's quite time consuming to brush and apply each individual square of paper with traditional Mod Podge to complete this home decor project. So I am so excited to try out the BRAND NEW Plaid® Mod Podge Ultra which is a SPRAY formula and I'm sure it will speed up the process.


The box is a nice sturdy paper but has some lettering to cover, so I paint the box red using Folk Art Multi-Surface paint in apple red. This paint is buttery like a heavy body acrylic and covers nicely. I apply in a dry-brush fashion so it can dry quickly and I can build up layers of color where needed.


I quickly covered all sides and the lid. I like the distressed texture that has resulted. Now I'm ready to start the decoupage process.


I crumple up and flatten out the sheet of recycled gift tissue, fold over and cut into 1" strips with my photo trimmer {this can also be accomplished with scissors}.


I stack the strips and cut into approx. 1" squares. I cut some into 1/2" and thinner sections for edges. These squares will be decoupaged to create a faux mosaic background.


Now the FUN begins! There are a few steps to get the Plaid® Mod Podge Ultra ready to go. STEP 1 – shake the product for 15 seconds. STEP 2 – Prime the sprayer by spraying a few times to make sure the nozzle is clear and you get an even mist. STEP 3 – wipe the nozzle with a damp cloth to clear nozzle after spraying, as you work on you project. 

These 3 steps need to be repeated every time you are going to spray Plaid® Mod Podge Ultra to ensure your nozzle doesn't get clogged.


I spread out my tissue squares on a protected surface and SPRAYED-AWAY! I sprayed a nice layer and made them pretty saturated so they didn't dry too quickly.


Then I sprayed an even coating of Plaid® Mod Podge Ultra to my painted surface.


**PLEASE NOTE** treat Plaid® Mod Podge Ultra as you would a paint brush. The Mod Podge Ultra Spray top needs to be cleaned after EVERY use. This product dries pretty quick and will clog nozzle and become unusable. So after several times of spraying and wiping, I just rubber banded my wet sponge to the nozzle. EASY-PEASY!


I apply the squares in a wonky mosaic pattern, smooshing them up and leaving some red peeking through here and there. This is so easy, messy and fun! The Plaid® Mod Podge Ultra dries quicker than I expected, so as I sprayed more as I worked across the surface.


When completing the mosaic on surface, I sprayed a sealing coat of the Plaid® Mod Podge Ultra. I'm not concerned with the beading – the product is self-leveling. While the lid dries, I continue onto the sides of the box.


I'm LOVING this new Plaid® Mod Podge Ultra! It has sped up this process ten-fold! I have all this papered in about an hour. Using a brush and traditional Mod Podge this takes soooo much longer. 


I let the sealing layer of Plaid® Mod Podge Ultra dry completely for a couple hours and the surface is beautiful, textured and a lovely matte finish ready for some inky-goodness.


I apply a good amount of StazOn ink to my asian chop background stamp...


and apply to the mosaic surfaces.


I continue stamping to cover all sides.
This really makes the gold and red POP!


Now for finishing touches. I cut a square of the same tissue and mounted into the bottom of the box and added a distressed gold LED candle from Dollar Tree.


I used some double-sided adhesive tape to add trim to edge of open sides.


I added my painted wooden finial layered on a painted, dried up ink pad container. When it comes to embellishing, I use whatever shape works!

Illuminated with Asian Flair...


The pale gold metallic paper that comes in the box reflects the candlelight nicely.


I love how this turned out and I can't wait to decoupage ALL THE THINGS with this new Plaid® Mod Podge Ultra... the first thing being some composition books!

+ + + + + + + + + + + +

For more information on Plaid® Mod Podge Ultra or to where you can purchase this product please visit website HERE and find more projects and inspiration on the Plaid® Online Blog HERE.

What would you collage with
Mod Podge Ultra?!

+ + + + + + + + + + + +

Thanks so much for visiting! CLICK HERE to POP over to the DCC BLOG for to see all the fantastic ways the Designers have put the NEW Plaid® Mod Podge Ultra to use! Sb :)

** This is a sponsored post. Plaid® has provided Plaid® Mod Podge Ultra, and Folk Art® supplies for use in this project in exchange for my creative ideas, views and opinions. My ideas and opinions are my own.