Translate

**If you have previously subscribed to received my posts via feedburner or Bloglovin, those are inactive now. To receive my creative updates, please subscribe in the right sidebar.**
Showing posts with label embossing folders. Show all posts

Thursday, September 16, 2021

Create Mini Albums that Grow... with i-crafter + Designer Crafts Connection


Greetings everyone! Today I am joining the Designer Crafts Connection for another fun bloghop... making mini albums with die cuts from i-crafter -- products inspired by crafters, for crafters. If you have been following me for a while you know that I love making mini books in all shapes and sizes.


If you love papercrafting and making MINI projects... i-crafter.com is a crafters candy-land! CLICK HERE to hop on over to learn more about these fabulous products!


I was provided these i-crafter die-cut items to create with: 222113 Mini Album accordion; 222171 Mini Album Divider #1222712 Mini Album Divider #2, and 222173 Mini Album Divider #3 {each of which come with assortment of die-cut embellishments including florals, leafs and sentiments}; Water Lily, 3D Dimensional Embossing Folder By Lynda Kanase; Tiny Home 3D By Lynda Kanase die{this I will be using in another project}.
 

Included in the package is all pages pre-cut, ready for assembly. 

The i-crafter Mini Album, Accordion die set allows you to create a multi-page, mini album without needing to glue or stitch the binding. HELLO... no glue or stitching! This is a quick and simple way to create a 4” x 5 ¼” mini album using a paper accordion binding system that is expandable depending how many pages you desire.


With everything cut, I select a distress paint to add some shabby chic color to the edges of all the pages. I just rubbed around the edges, front and back of all the pieces, the accordions, and the page interlocking sticks.


Just a small amount of color to compliment the floral embellishments and sentiments. 


Adhere the five sections of die cut accordion using some quick-setting glue {or double-sided adhesive tape}.


Fully assembled accordion ready to add pages.


Slide the slit in the center of large page onto the first full accordion spine.


Make sure spine is fully pulled through page. Ready for some magic?! 


Slide a stick into the accordion spine and push through to opposite end. First page is attached! YES -- it is that easy! No glue needed. Makes life easy if you want to move pages around later on.


I repeat the process alternating 2-page sheets with tab divider pages.


The book grows as you add pages.


There ends up being a couple places where accordion spine meets up with tab from divider pages. 


Add a line of adhesive runner and sandwich edge of acetate page in place. Voila!


The completed book base after inserting pages and locking onto accordion spine. I am new to this type of binding and I love it!


The two remaining accordion flaps are for adhering the cover, or for adding on pages by joining on more accordion sections.


I cut two pieces of creamy white cardstock to size of other pages in preparation for embossing with the Water Lily, 3D Dimensional Embossing Folder. I quickly swiped two colors of distress paint daubers onto the folder surface, misted lightly with water and placed paper into folder.


I send the embossing folder through my Cuttlebug die cutting machine. I repeat this process to create papers for the front and back cover and extras to collage onto a recycled holiday card box.


The result is a subtle, faux watercolor texture. This pairs nicely with the colors of patterned paper accents, including i-crafter die-cut tags, pockets and envelope.


For the front cover, I glue the accordion tab to the cover base.


Glue a ribbon for a book closure that will be sandwiched within cover, then add more glue to adhere embossed painted paper. Repeat on back cover.


I add a few embellishments and its time to move on to the interior pages. I will be gifting this to a co-worker who just had a baby so I am leaving things open for her to fill in.


I am in love with the dimension of the cover and the subtle blue and green color.


The papers provided for the cover I used as lining for the inside front and inside back cover.


More i-crafter die cut accents. Tag with pocket and a paper floral paper clip, with die cut foilage on opposite page.


Close-up of the paper floral paper clip... use of metallic paper add bling while keeping things flat.


I love these monstera leaves!


This mini album has plenty of room and special places to hold things.


I added a layered butterfly as a closure for the envelope.


Shabby Chic Garden Accordion Mini Album

I am quite surprised how quick and easy this book came together. This mini album is perfect for use as a planner on the go or as a pocket brag book... a wonderful gift for a new mom. To complete this gift, I will enclose book in a coordinating upcycled box, paired with an adhesive runner, stickers and some clear photo corners. 

CLICK HERE to jump over to the beginning of the i-crafter Bloghop at the Designer Crafts Connection blog to view more inspiration and projects using heat transfer foils. 

For more i-crafter inspiration visit Blog HERE


Thanks so much for visiting! Sb :)


** This is a sponsored post. I-crafter provided paper products for use in this project in exchange for my creative ideas, views and opinions. My ideas and opinions are my own.

Wednesday, March 18, 2020

So Many Favorites - So Little Time... Designer Crafts Connection celebrates National Craft Month


Hello Friends! Its been a while since I've done some arting -- and since it's National Craft Month I'm joining the Designer Craft Connection to bring you some inspiration using our favorites. It's been a whirlwind since attending Creativation in January and when I have time to play I like to get back to something that got me started in papercrafting... making ATCs {artist trading cards}. 


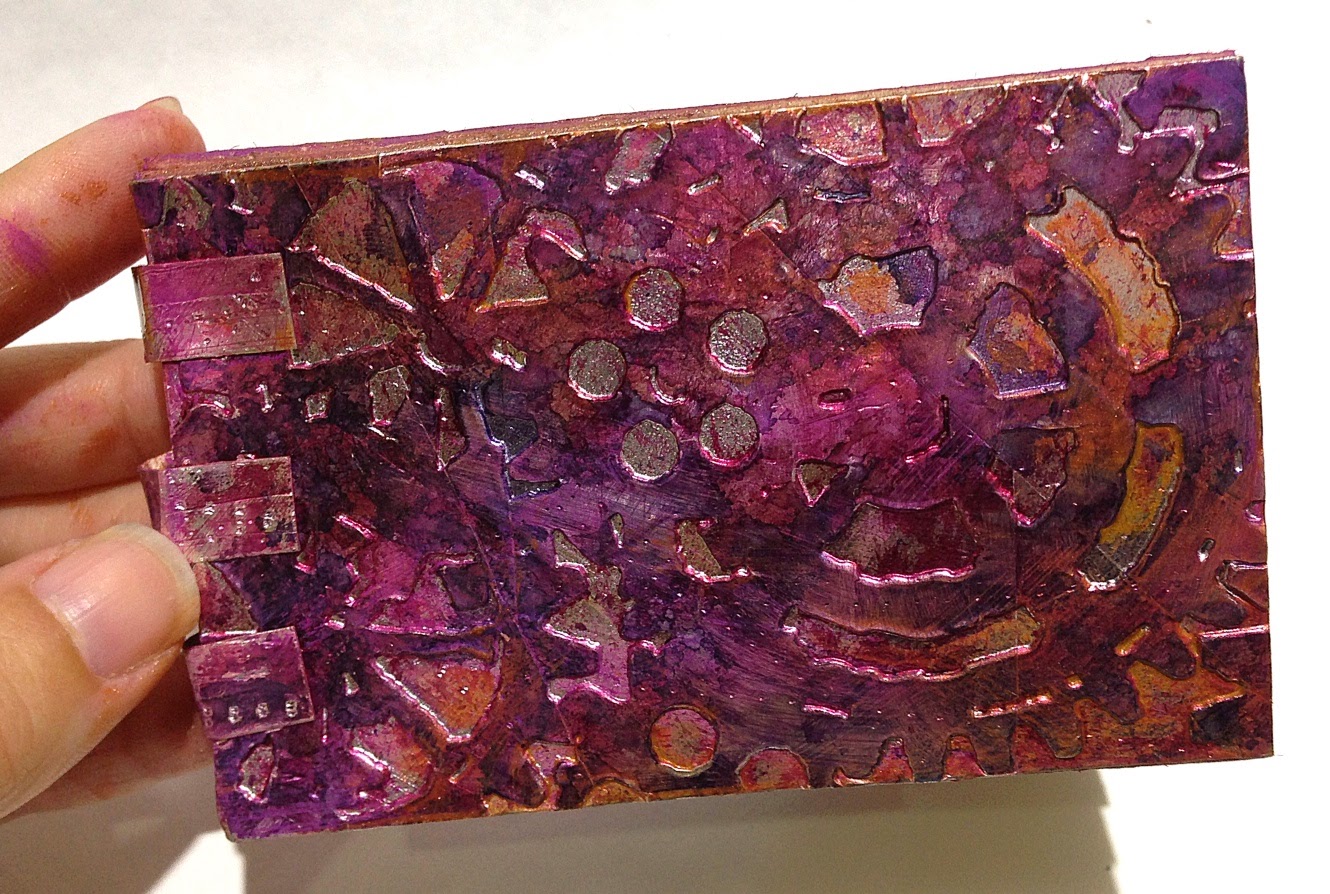
ATC's are small little masterpieces. One of my favorite ways to squeeze in some arting, try out some new products and using up scraps of this and that. Today I'm sharing this quick little project I made just for myself... an upcycled mini book that is a little bit steampunk and a little bit purple!


I love to create with recycled items and reinvent them by using up items items on my craft table. This project can be made in any colors or theme and is great for the kiddos, too!

This project began with this piece of distressed aluminum tape covered cardstock on my table. This tape is already self adhesive and is wonderful to use in creating steampunk projects and altering items with metal. I use it to make large sheets of distressed cardstock for use on all sorts of altered projects... and ATCs!


It's pretty easy to make a sheet of metal paper. You take a sheet of cardstock or recycled chipboard, then cut strips of the aluminum tape; adhering pieces in an overlapped fashion to cover the sheet. You can be as creative as you want doing this. Use a bone folder to burnish down and press out any air bubbles. Sand and distress surface as desired. Then you are ready to paint, emboss and stamp for a multitude of uses.

My sheet above has a pink smudgy coloring because my roll of aluminum tape happened to have red words printed on it and I removed by rubbing with nail polish remover. I liked the look of it with some red, so I didn't rub it all completely clean.


I have loads of recycled toilet paper tubes set aside for projects. The brand I get is now glue-less to the roll – which makes it that much easier to prep for crafty goodness.


I press the tubes flat and make a nice folded edge with my bone folder.


Using some Ranger Distress Paints, I quickly add some distressing and color to the edges. I just love the dauber tops on the bottles -- they make painting quick and easy. This can be done with chalk inks or regular ink pads also.


I went around the edges of seven (7) flattened tubes with Seedless Preserves and Tarnished Brass Ranger Distress Paints. A touch of color adds a little "POP" of color to the kraft color of the recycled tubes that will be the structure of my ATC holder.


I stack all of the tubes together and one by one added a line of tacky glue down the center and press another on top. You can create these type of pockets in a variety of shapes/sizes with envelopes or paper bags also. These tubes are the perfect size and shape to hold artist trading cards {ATCs}.

I align the tubes and clamp the stack together with some binder clips to dry. When dry this will be a sturdy pocket honeycomb booklet.


I use one of my favorite embossing folders in my Cuttlebug machine and dab with a variety of reds and purple Ranger Adirondack Alcohol Inks to add color and depth to my distressed aluminum cardstock.

I cut the sheet to size making a front and back covers for my mini honeycomb ATC cardholder. I had a thin strip leftover of the metal paper, so I cut into thirds and used it to add some detail to the spine area {nothing goes to waste}.


I add some embellishments -- a swatch of plum lace which looks lovely layered on top of the metal embossed cover, then some scraps of ribbons, fibers, lace, buttons, bling, found objects and goodies from my favorite stash of metal hardware. I inked some pale pink ribbon trim to match the color palette and altered a strand of pearls with alcohol inks to match too! Voila!

"STEAMPUNK" ATC Traveller


I hope this fun upcycled project inspires you to create. How you create your own? For more inspiration CLICK HERE to jump over to the beginning of the National Craft Month Foil Bloghop with the Designer Crafts Connection!


Thanks so much for visiting! Sb :)


Monday, October 6, 2014

Fabulous Florals and a Creative Blog Hop


Hello everyone! It's Monday and today you'll be getting two posts from me. First, I have been invited to join the Creative Blog Hop. I am honored to have been invited by my creative friend from the Anything But a Card Challenges team Lisette Baker {aka Mrs Beez}. Thank you so much for your kind words and praise! Lisette and I share a passion for paper, texture and dimensional projects - especially her attention to the little details!


I particularly love her holiday makes like this altered Christmas spool ornament {click here}. So today I will continue this by answering the following questions and introducing a couple artists too.

• • • • • • •

My project I'm sharing today is a recent creation resulting from a workshop taken with Eileen Hull learning all about her ATB {artist trading block} dies, and techniques making dimensional projects using embossing folders and dies {I have a lot of these, both which have been pretty neglected lately}. If the #PaprTrail3 tour is coming to your area - I highly recommend taking a workshop with Eileen!


With the holiday season approaching, I want to be putting them to use in making some fabulous dimensional gifts... like this embossed metal ATB box used as a faux planter box holding die cut metal flowers. Embossing and layering metal die cut flowers... I never considered it and I've got loads of floral dies and punches!!! I colored the leaves and bow with alcohol ink markers, but left the flowers silver - they are just so pretty and whimsical... and will never wilt - LOL!

Now for the questions...

1. What are you working on at the moment?

I am most at home with paper crafting, but I find I'm always stamping, molding and casting something. I am the creative team lead for Amazing Crafting Products and most projects scream for something 3-Dimensional. I just returned from a weeks vacation in Jamaica and I strategically snuck a bit of Amazing Mold Putty in my carry on so I could mold something special from my travels. 


Here's a peek of my mold I captured. Its flat now, but I'm adding on a border so I can fill with resin and transform this into a special keepsake.

I'm also working on some projects that are outside of my passion for papercrafting - bringing me back to my love of sewing and handcrafted holiday creations.

2. How does your work differ from others in your genre?

I'm a junkie for any and all media - which could really send me off in a tangent in any direction. I'm always striving to include repurposed items into my creations. Reinventing something ordinary or discarded into something lovely is truly rewarding.

3. Why do you create?

I create because I have a muse that never stops. Creating is a necessary to me as eating or breathing... running a close second to my favorite pastime sleeping. I have been creatively inclined since a very young age, and now as an adult I have the privilege of sharing my knowledge as well as arting for sheer enjoyment.

4. How does your creative process work?

What a tough question... hmmm! Sometimes I've got a vision that I've scribbled down that will come to fruition through mixed media exploration. But I also love a challenge... give me a constrained set of supplies or a prompt and I'm off and running by the seat of my pants. 

Now I will pass the baton and introduce a couple of my creative friends to you!

Please give a warm welcome to Tracy Alden, who blogs at Art Resurrected. She is a creative friend of mine who is talented in so many media - though she really shines with her hand crafted unique jewelry creations. One of my favorites is this custom spilled cocktail necklace that was mold/cast in resin and is certainly one-of-a-kind! She also creates amazing dimensional mixed-media pieces too like this altered papier maché book box... the contents just spill out so beautifully.

Next is my the super imaginative Sandra Strait of Life Imitates Doodles! We share a love of creatively experimenting... and the patience to see a project to fruition. Sandra is an expert with pencil, pen and brush as an illustrator and her zentangled inspired works are a must see. I was inspired instantly by her creative stylings and have enjoyed watching her work evolve from the page into a 3-Dimensional reality. I have so many favorite work of hers I couldn't even choose just one - but I will point out that even a resin spill will be transformed into a one of her creative characters!

• • • • • • •

Tracy and Sandra... please continue "The Creative Bloghop" by answering the above questions in a blog post published next Monday (October 13th) and inviting a couple of other artists/crafters to continue the following week.

Lisette’s post you can find at the following link; and you can visit Ruth Levy {aka Lerusho} who tapped Mrs. Beez for THE CREATIVE BLOGHOP by clicking here.

Have a happy Monday everyone! Sb :)

Wednesday, September 3, 2014

Preserving Memories like a ROCK STAR for the September Designer Crafts Connection Bloghop


Welcome! It's a new month... September which marks a new monthly Designer Crafts Connection Bloghop. This month's theme is all about "Preserving Memories". I'll admit I don't do a whole lot of traditional scrapbooking. Though from time to time, I do make little commemorative mini books or shadowboxes to document a special occasion or vacation... and today's make is a labor of L-O-V-E!!!


In July we took a weekend getaway to go see my favorite band on tour in North Carolina {I think the photos speak for themselves}. They did make a stop in South Florida - but on a Tuesday night... we are too old to stay up that late on a school work nite LOL! So we took a little getaway to have much needed downtime and adult fun. I printed out a bunch of photos on my Zink® hAppy™ right from my phone {and hubs also} and now I've got a bunch of adhesive back photos ready to go!


We are pretty much homebodies and don't to too much going out and stuff {thanks to technology and onDemand} - but we do go all out for a great concert. Our ticket package included a meet and greet and photo with the band, and an autographed photo to take with us. If you are a fan of Def Leppard - its common knowledge that they don't do a whole lot of signings because of the frauds being peddled on eBay. When I received this Deflecto 12 x 12 Craft Frame, I knew this would be perfect to showcase one of these signed pix {and the other I will have traditionally matted/framed for my hubs office at work}. The modern frame goes perfectly with my modern furnishings and gives me the ability to protect my keepsake and add more layers and dimension to the outside, too!


I got started matting and layering with glue dots my photo, black and silver cardstock and the blue Rowlux and gently slid into the frame. This looks pretty great as is... but there's more! With my photos {and some taken by a super talented Rock Star Wife}, some ephemera from the trip and some supplies on hand I have transformed this into an interactive display.

Supplies used: Deflecto 12x12 Craft Frame and three Deflecto Mini Craft Frames; 12x12 sheet of Dark Blue Sea Glass patterned Rowlux Illusion Film; Zink® hAppy™ photo printer; coordinating cardstock for matting; paper trimmer; Grafix Double Tack Mounting Film, silver shiny metallic school folder; recycled imaging film acetate {black}; Cuttlebug; Darice Filmstrip 12" Embossing Folder; Autographed photo and ephemera from vacation; washi tape; chalk inks; Glue Dots and Glue Lines adhesive products; and scissors.


The photo had a nice 1/4" white border so I accented with super skinny mattes in black and silver to balance with the signatures. I centered and left margins equal on the three sides and more on the bottom leaving space for all my extras.

I don't know why I only have one postcard from this particular trip - I usually buy more. I love to pick up postcards when I visit somewhere for a short visit and I don't have a lot of time to take my own photos. Anyway I've improvised to make a postcard accordion book. I love making little mini books and the front/back covers are actual postcards. I join cut sections of cardstock together to make it as long as needed {these were approximately 4 x 12 folded in half}.


For this project I needed a little GLAM and shine so I cut up a shiny metallic school folder pieced together with sections of double-sided adhesive sheets. I reinforced the folds with washi tape and rubbed the white edges with blue chalk ink. Now I have a place to put all those mini photos I printed! I folded over and mounted the back panel to one of the mini Deflecto Craft Frames which I will mount to the larger frame. I will be able to remove if needed by just sliding it off the frame and there's another place to add a photo, too.


Here's the opening spread a collage of loads of pix and the real guitar picks I scored from being in the third row. Thanks to Gene Simmons for flicking one straight at my head otherwise I wouldn't have seen it coming - LOL!


I have some black acetate that is recycled light exposed film from my imagesetter at work. I cut some to size and embossed with this fun 12" Darice filmstrip embossing folder to mount some of the mini photos on. My project has seemingly taken on a life of it's own - but since I don't have to put adhesive on my photos... I'm so excited to continue!


After cropping and mounting photos to the faux film, I bent and mounted to one of the mini Deflecto Craft Frames with a couple strategically placed super strength Glue Lines.


I mounted the smallest Deflecto Craft Frame upside down to the backside as a hook to suspend my meet and greet pass lanyards... again Glue Dots to the rescue!


I am so happy at how this turned out and that it's bright and colorful - the Rowlux Illusion Film makes everything "POP". This will be the centerpiece our shared computer desk in my studio where I have an assortment of framed photos from other trips and adventures {that might also be needing a Cre8time makeover now}.

Thanks for visiting. Please drop by on Sunday, September 7th as the Designer Crafts Connection get creative with buttons, felt and glue for the "Kunin/Beacon/Buttons Galore" Bloghop - you don't want to miss it! Sb :)

Continue on the Designer Crafts Connection "Preserving Memories" Bloghop by selecting hop back/forward on the logo below.