Translate

**If you have previously subscribed to received my posts via email: Please subscribe to my posts via Bloglovin in the right sidebar.**

Saturday, December 28, 2013

Winter Wonderland Snow Dome... Wintery Sparkle to Enjoy Through the Season


Hello everyone! I have been spending the month taking care of my health as January is going to take off from zero to the moon for me. I woke up this am realizing its December 28th {yikes} and I haven't shared a couple things I have done this month.


This project served as my Christmas Tree and my hubs found a cute little train to match at CVS. Spending the holidays at home this year in hot and sunny South Florida doesn't really feel like Christmas... a trip home to Chi-town is on the TO-DO list soon!


For this project I combine Amazing Crafting Products and items from the December Frog Dog Studio kit... to create this wintery wonderland dome created using a recycled seltzer bottle, wine cork and tape spool... and my DIY AMAZING No-Gelatin Printing Plate, too!


I applied Pearl Viva Colour Modeling Creme on my AMAZING No-Gelatin Printing Plate to make some fabulous monoprint texture resembling snowbanks. 


I will tear this paper into sections and layer to create some some snowy layers...


Working quickly - I dipped the tree directly into the resin, rotating to hit all the tips of the tree branches. As the Amazing Casting Resin Cures - it becomes an opaque white. You have to work quickly - the Amazing Casting Resin has about a 5 minute open time before it cures {especially when you mix a small batch}.

To see how I put glistening snow on my tree... CLICK HERE.


With a scraps of patterned paper a, ribbon, some tulle and a pretty button - my recycled bottle and tape spool are transformed into a "Winter Wonderland" dome.


I want to take a moment to say thanks to all of you for following my adventures through another year. I slowed things down a bit these past few months, but I promise... 2014 is going to DARE to be an awesome adventure. I wish you all a healthy, merry and bright and shiny new year in 2014!  Sb :)

Monday, December 23, 2013

Was it April... or CHRISTMAS in Paris??? Art Journaling in my Christmas Holiday Travelogue

Please take a moment to subscribe to my posts via email or bloglovin' in the
right sidebar since google reader/friend connect will be gone any minute now.


Good Morning! I can't believe Christmas is just two days away. This holiday season has flown past as this elf has been committed to a lot of bedrest recovering from this year's round of cold/flu. I haven't done very much creating - no handmade cards either. But I have made a new page in my Christmas Holiday Travelogue that I started last year {CLICK HERE to see the post}.

Many years back my hubs and I traveled to Europe and visited Paris in April. That year I photoshopped a wreath and some festive hats and I had some Christmas postcards printed. One of these has been posted on the side of my fridge so I snagged it and gave it a permanent home with stamped goodness!

Please CLICK HERE to see the full HOW-TO
that was featured over at Viva Las VegaStamps!

"We'll Always Have Paris..." It only took 13+ years - but now this trip is properly documented with a perfect painted sky to tie it all together :)


• • • • • • • • • • • • •

Viva Las VegaStamps used: "Paris Address" #17539; "We'll Always Have Paris" #17529; "Bonjour" #17525; Holly Leaf 3760; "Parisien #17541; Polaroid Print Standard Size #17543; Polaroid Print Small #17544; Grunge 1787 Writing Background #17545; Pretty Lady Stamp/Cancellation #17538; Jingle Bells Sheet Music #10686; Washi Reverse Grid Background #19075; "Paris Skyline" #10995; Dotted line from the December Daily Plate #1430; and Checkerboard Border #7952. Supplies used: Vellum Cardstock; Recycled planner calendar; Stone Grey Staz-On Ink; 1/4" Miracle Tape; various colors of Ranger Distress Paints; Snow Cap Ranger Adirondack Acrylic Paint; and various Cat's Eye Chalk Inks. Background page painted using my AMAZING No-Gelatin Printing Plate.

I wish all of you a very Happy Monday... this elf is off to try and get some last minute packages off!! Sb

Sunday, December 15, 2013

A Vintage "Holly Greetings" Tag for Week 3 of Anything But a Card Challenges No. 30


Good Morning Everyone! Today begins week three of Challenge Number 30 at Anything But a Card Challenges. CLICK HERE to jump over to the challenge intro and where to LINK UP your creations. Today my work is featured with a few of the other designers... CLICK HERE to check out the other design team projects today for some amazing inspiration!


The current Challenge... Anything But a Card Challenge #30 - Anything Goes... With a Holiday Twist! This challenge is an open theme – but we love the holidays too and can't wait to see what everyone is creating! Please share any current project you have created, and if it's Holiday themed that's perfectly OK, too! JUST REMEMBER... create anything EXCEPT a card for this challenge AND please mention and LINK BACK to this challenge. ALSO - Please new projects only {no-backlinking}. :)

**A REMINDER** This Challenge will go through midnight Dec. 21st...so you have one week left  to play along and ENJOY the creative process! I hope you a chance to squeeze in some Cre8tive playtime and join the fun.


Today I'm sharing my take on T!m Holtz' December installment of the 12 tags of 2013. If you missed my tag for November... you can click here to view {I promise it's worth a peek}. I took some liberties with creating this month's tag. Using my stash of Viva Las Vegastamps! and other crafty bits already on hand, I experimented and created my own dimensional frosted plastic. I had a bit of fun with this and the result is STUNNING!


Using a section of a recycled #6 take out container, a scrap of vellum cardstock and a section of Miracle Sheet {double sided super sticky tape in sheet form} - I fashioned my own faux frosted plastic by adhering the two together. If you have made your own DIY shrink plastic using a recycled #6 plastic container - you know that the plastic will warp and bend when heated. If you heat it a lot - it will shrivel up into a shrinky dink.


I stamped Holly Large #18930 repeatedly onto the vellum cardstock side using Timber Brown StazOn and then fussy cut out all of my pieces. This vellum is cardstock weight so it's not as translucent as regular weight vellum. I have both - yet the lighter weight remains illusive so I used what I found first.


I started out this month's tag painting the base tag background by dragging tag through smattering of Old Paper, Antique Linen, Antique Bronze and Picket Fence Distress Stains. I distressed the edges with Gathered Twigs Distress Ink. 


Then I began adding my stamped images (Holly Small #18929Holly Leaf 3760Leafy Border #6292; and Ornate Corner Left #18928) creating a border using Timber Brown StazOn Ink. I wanted to keep with the vintage feel so the dark brown ink really compliments the background and will make my colorful holly "POP". I added pattern to the background using an ink blending tool with the Harlequin Mask from UmWowStudio; first using Frayed Burlap Distress Ink. Then I shifted stencil over to hit reverse areas with Iced Spruce Distress Ink. It was a little bright now, so I toned the background down by brayering on a layer of Picket Fence Distress Stain. I finished off with some splatter dots of Picket Fence Distress Stain - the splatter is subtle, yet gives the snowy effect.


Now it's time to color my holly leafs. They all got a quick douse of color with Peeled Paint, Brick Red and Vintage Photo Distress Stains. When dry, I added more detail and color with various Distress Inks and an ink blending tool.


I know it's hard to see here in the photo - but these are my heated and curled dimensional holly leaves. Holding with heatsafe tweezers, I gently heated and shaped each leaf to my liking. In a couple areas I heated the leaves a little too much and the plastic began to shrink a little, but it just added to the charm of the shaped leaves. It's clear and on the backside - so it's not really noticeable.

For the final assembly - I added some Diamond Glaze to add some "POP" to the holly berries and to accent details of the holly leaves (here and there). I layered the sections of holly to my liking and added a piece of black 3-D pop dots to anchor leaves down as they lay naturally. I finished off with adding some pink sticky back crystals and pearls for berries that I colored red with a permanent marker (now they match perfectly). 

Happy Holly Greetings!


This tag is complete... all tied off with a shimmery gold/red satin ribbon. I'm pretty happy the way that it is at this point, but I may go back and add the white splatter for snow. I'm feeling in this case "less is more".

• • • • • • • • • • • • •

Viva Las VegaStamps used: "Holly Greetings" #6043Holly Large #18930Holly Small #18929Holly Leaf 3760Leafy Border #6292; and Ornate Corner Left #18928. Supplies used: Vellum Cardstock; Recycled #6 plastic take out container; Timber Brown Staz-On Ink; various Ranger Distress Distress Stains; various Ranger Distress Inks; Versafine Black Ink; Miracle Sheets, Harlequin Mask from UmWowStudio; Diamond Glaze Dimensional adhesive; Red permanent marker; sticky back pearls and gems; black 3-D pop dots; and ribbon from stash.

• • • • • • • • • • • • •

Thanks for stopping by today! I hope you find a little time to do some creating amongst all the holiday hustle and bustle. I look forward to seeing what you create {CLICK HERE to LINK UP your projects}.  :) Sb

Sunday, December 1, 2013

The Holiday Season is Here... and a New Anything But a Card Challenge - No. 30


Good Morning Everyone! It's a new month and a new challenge Number 30 beginning at Anything But a Card Challenges. CLICK HERE to jump over to the challenge intro and where to LINK UP your creations. CLICK HERE to check out the other design team projects today for some amazing inspiration!


The new Challenge... Anything But a Card Challenge #30 - Anything Goes... With a Holiday Twist! This challenge is an open theme – but we love the holidays too and can't wait to see what everyone is creating! Please share any current project you have created, and if it's Holiday themed that's perfectly OK, too! JUST REMEMBER... create anything EXCEPT a card for this challenge AND please mention and LINK BACK to this challenge. ALSO - Please new projects only {no-backlinking}. :)

**A REMINDER** This Challenge will go through midnight Dec. 21st... giving you 3 weeks to play along and ENJOY the creative process! I hope you a chance to squeeze in some Cre8tive playtime and join the fun.


Earlier this week I shared a birthday with my husband's niece and she just turned 17 and we celebrated at the family Thanksgiving gathering. I love making personalized gifts and this was a perfect occasion to make a star book journal for her using 7 Dots Studio Papers and my Viva Las VegaStamps!


To see how I created this book please CLICK HERE. Our niece loved the gift and really appreciated the handmade keepsake that she can fill with photos and mementos. Everyone at Thanksgiving dinner thought it was pretty special, too.


A 'STAR' of a GIFT is Born...


The cover is collaged background using several of Viva Las VegaStamps! images; finished off with glittery We R Memory Keepers Sticker lettersand sticky-back bling colored to match with a green permanent marker.

Thanks for stopping by and have a fantastic day! Only 24 days until Christmas and this elf needs to hop to it!  :) Sb

Sunday, November 24, 2013

Today I'm the Spotlight Artist at Anything But a Card Challenges


Good afternoon all! What a jam-packed weekend it's been. Yesterday was a very long day indeed and this girl needed to sleep in and let the muse rest. Today I am featured as "spotlight artist" at the Anything But a Card Challenges Blog {CLICK HERE to jump over to ABAC}. I sort of hit a wall going about this - I apolgize for the rambling. SO here it goes...

In all of the celebration and nostalgia encircling the 50 Years of Doctor Who... it seems I find myself writing this today finding peculiar, yet striking similarities. I'm finding it quite a challenge of putting pen to paper and what to share. I'm a somewhat private person for the most part, and also a workaholic - and it's unclear if my best friend and husband (whom I've known for nearly 24 years) or my creative friends know me best. Time might never tell...


So I did what any person might do who operates on a sense of logic... I went and rummaged around my old creations – altered books, paintings, ATCs and stuff. WOW! There is a lot and it's like looking through old photo albums... timey wimey indeed! I found that my ATCs are sort of a snippet of time and mindful space, capturing my creative spirit in one mini piece of art by one.

This is the long roundabout version (to jump to the short version at ABAC CLICK HERE)...

I'm a mixed media artist and graphic designer : Dabbling in photography, assemblage, collage and whatever strikes my fancy. My blog is entitled sbartist : painting in the dark – pretty self explanatory. I lurk around in the dark creating art while all in the world are asleep. I spend my days working in a busy print shop doing my computer wizardry producing printed materials.


http://sbartist.blogspot.com/2012/02/tutorial-making-permanent-wish-using.html

Creatively speaking... Not only am I one of the designers and the Den Mother at the Anything But a Card Challenges Blog... but also I’m Creative Team Coordinator and a Senior Designer for Alumilite Corp. a.k.a. Amazing Crafting Products Design Team {I'm the queen of Amazing Mold Putty}; Designer on the Viva Las VegaStamps! Design Team; and designer and co-admin of the Unscripted Sketches Design Team. I also previously served a couple of other teams including the Sakura Hobby Craft Design Team. ABAC is a labor of love and gives me a sense of joy and accomplishment each week as we collectively share our love for creating.

First a little bit of business to be sorted out for those WHO aren't sure of where I stand...


My Doctor: No. 10 - DOCTOR TENnant

Favorite Episode: "Vincent and the Doctor"... simply because how could you not love a SCI-FI tale that can include one of the most ODD painters of all time.

My Favorite Companion: Capt. Jack Harkness ... I found Doctor Who because of Capt. Jack via Torchwood and I'm still trying to put this puzzle together. I'm more confused than ever!


I LOVE... my husband {yes he comes first without question}, Travel {I don't do this as much as I'd like}, Painting and drawing - OK let's just lump ALL THINGS art related together here {including Amazing Mold Putty}; Def Leppard; ALL things PURPLE; found objects {i'm always picking up stuff off the ground}; Salvador DALI {now that would make a fun Doctor Who episode}; RECYCLING and repurposing things; artistic challenges; SWAP art; throwing paint; BBQ Pork; chocolate mint ice cream; Bubble baths and afternoon naps; street painting; Twizzlers and Lemonheads; GOOGLIE eyes; my MINI Cooper {now in it's 4th regeneration}; going to Art Museums; and painting in the dark...


A few ODD things... I'm a lizard lady {for about 15 years we had iguanas and turtles for pets}; I have this crazy "one touch rule" {whereas if I picked something up to get at something else for a project... it's getting used in the project}; obsessed with using every little scrap for something purposeful; I'm ambidextrous {and my left index finger wishes the right hand wasn't allowed to use cutting devices}; I'm a MAC - but also equally fluent in the mess called PC {I can tear apart and rebuild both}; I got my first iPhone about 10pm the very first day they were available and have never looked back; I was born at 3:05 in the AM just hours after thankgiving dinner {so I'm pretty sure my first meal was turkey dinner with the trimmings and pumpkin pie} so pumpkin pie is my official BIRTHDAY CAKE; I don't consider myself a stamper but hoard thousands of stamps and I can teach you anything and everything about scrapbooking – but I myself am a lazy scrapper {I'm so far behind in this department there's no catching up}...

During the daylight hours...I am graphic artist working the fast-paced printing industry at a family-run printing company where I have worked for the past 12 years. I am a native of Chicago, but I have lived in Florida most of my life – and though I only lived in Chi-town for brief spurts as a kid... when I return it's like I've been there my whole life. I currently reside in Fort Lauderdale, Florida with my husband of 21 years (this tuesday we'll have been together half of my life plus 3 and so odd years)... this is one of my finest accomplishments. As being a creative spontaneous spirit – in my experience this has made for some amazing and sometimes tumultuous adventures...


For as long as I can remember I loved making things and this is still true today. This altered book page features a photo of me age two that I've devilishly painted myself with chocolate cake... So I think I started my creative journey really young {and I'm still not very fond of chocolate cake}. I'm lucky to have been born with the creative gene - both my mother and father are artisans of their own sort and my grandmother taught me to paint in oils when I was 14. So I am a painter at heart. I love to learn new things. Always exploring - I am passionately curious about creating. I've found over the years mixed-media fuses all of my interests - my style can best be described as altered, collage-like and experimental. I totally “embrace the unexpected" and love giving creative new life to ordinary things that normally would be thrown away.

My dream job was working at an Advertising Agency and at 24 I accomplished that dream {I worked there for over 8 years}. If it wasn't for the economy I'd still be there. Lucky for me I'm a tradeswoman. I was smart to learn a trade, one which I've had to constantly keep up with the NOW – learning to adapt to new software and technology - while still leaving one foot in the past for that one project turns up on mechanical boards. Its so amazing to go back and think about how printing was 20 years ago, and compare to how it's nearly completely digital now. One wonders why this girl is always so tired. My brain is crammed with so much computer software mumbo jumbo - how to make this and that printable - it's surprising that my muse is ever home. My brain must be a T.A.R.D.I.S. - LOL!


My very first design team was Unscripted Sketches {which now I am Co-Admin} which I joined in April of 2011 - and my first project was of all things a scrapbook page including recycled bottle caps. Even this project captures me in time and reflects on days that I wouldn't change in a hearbeat.


   http://sbartist.blogspot.com/2013/08/woyww-how-to-pack-artful-lunch.html

My style is varied and unique - ranging from cardmaking, tags, and mixed-media - to altered art, mini-albums and off-the-page whimsies. In observing my creations one thing was strikingly clear - RECYCLING. Recently I have made a more conscious effort of it - but looking back... I was always doing it. More often than not I have included all sorts things that others would discard and this made me SMILE!


So for MY mini challenge posed to readers at ABAC {I found this so easy to decide}... I challenge you to RECYCLE IT!!! Try greencrafting – repurpose items destined for the bin into something beautiful, useful and new again. Go rummage your recycling bin - or your crafty stash - and create something wonderful out of something most take for granted. GO GREEN!!!


I do hope you'll play along this week with the
"RECYCLE IT" Challenge
and can't wait to see how you THINK GREEN.

Wishing you all a wonderful Thanksgiving and Chanukkah! Have a great week! Sb

Wednesday, November 20, 2013

Call the DOCTOR to #SaveTheDAY... November's Installment of Tim Holtz 12 Tags of 2013


Happy Wednesday! I am so excited to share my take on November's T!m Holtz 12 Tags of 2013 that I need to call a DOCTOR!!! In celebration of the 50th Anniversary of Doctor Who which has a marathon all week on BBC America - I am in FULL WHOVIAN mindset. I think I might even catch the Anniversary Episode in the theatres.


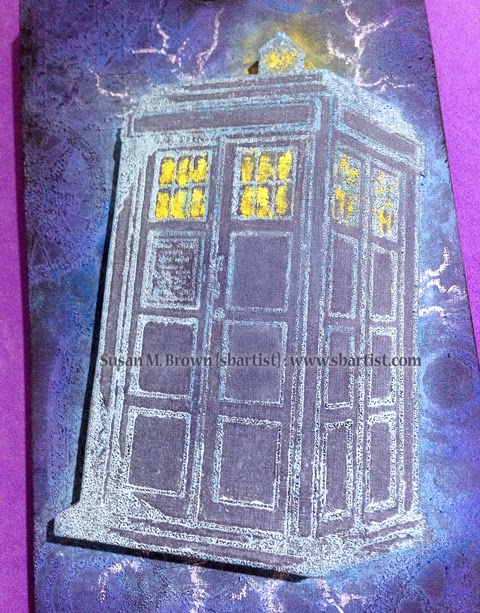
My Blue Police Box #19054 stamp available at Viva Las VegaStamps! was the perfect image to use for this month's faux chalkboard technique. I started off with a navy blue cardstock and stamped several other VLVS! images, including the police box following each step of T!m's technique.


Instead of black and white, I used a variety of blue and purple chalks with a pop of yellow; and used white for lightning. Where did I get all the fabulous colors of chalk??? From my street painting festival roll-a-round... it houses an abundance of chalk in every color of the rainbow.


I'm so thrilled with how this came out and I have a little memento to go along with my weekend WHOvian adventure I took a couple weeks ago with my Mom to the 1st Annual Time Lord Fest in Tampa, FL. It was BRILLIANT fun!


Thanks for dropping by. I hope you have a fantastic day! :) Sb

Sunday, November 17, 2013

Santa's Walking in a Winter Wonderland for Week 3 of Anything But a Card Challenges #29


Good Morning Everyone! It's week 3 of our current challenge number 29 - the third and final week to create and share. CLICK HERE to jump over to the challenge intro and where to LINK UP your creations. CLICK HERE to check out the other design team projects today for some amazing inspiration!


The current Challenge... Anything But a Card Challenge #29 - Fall into Fall! School is in Full Swing and Indian Summer has faded - this challenge is open theme - Please share any current project you have created, and if it's FALL themed that's perfectly OK, too! JUST REMEMBER... create anything EXCEPT a card for this challenge. ALSO - Please new projects only {no-backlinking}. :)

**A REMINDER** This Challenge will go through midnight Nov. 23rd... giving you 3 weeks to play along and ENJOY the creative process! There's still a week left on this challenge – I hope you a chance to squeeze in some Cre8tive playtime.

I created this winter wonderland tag using the same techniques as my Halloween Tag from a few weeks ago... just using a different a color scheme and elements... and of course I had to use some Amazing Mold Putty too! Below you can see how I molded this frame using one of my Viva Las VegaStamps!


I needed a frame I didn't have one on hand... BUT... I do have a Viva Las VegaStamps! lacy oval frame stamp (Doily #18849) that would be perfect. So I'm got out my Amazing Mold Putty and made a border mold with my stamp.


**WARNING**

You need to thoroughly cover your stamp with petroleum jelly to protect your stamp - the rubber of the stamps and Amazing Mold Putty touching are reactive with each other. Watch closely and limit the time of stamp in contact with mold putty and remove it as soon as curing is completed.


As you can see here with stamp removed from mold. Some of the Amazing Mold Putty has stuck to stamp, which I cleaned off with soap and water immediately so the detail of my stamp is not clogged up and to stop any reaction the two compounds may have.


Now with a mold of my decorative border stamp - I filled it with Creative Paperclay® and let it cure. When paperclay is dried I inked and covered with Ranger Embossing Ink and heat embossable glue powder; then dredged in Antique Linen Distress Glitter. I went back with Vintage Photo and Broken China Distress Inks to add some depth and color to the edges.


Welcome to a Winter Wonderland...


Layered on a collaged background using several of Viva Las VegaStamps! images; stamped glittered snowflakes and matching icicle chipboard... all tied off on top with a sheer organza ribbon hanger! I really love mixing up the monthly T!m Tags with my own stash of goodies - the possibilities are endless and LOVELY!

Thanks for stopping by and have a fantastic day! :) Sb

Thursday, November 14, 2013

Viva Las VegaStamps! DT Tryout


It's that time again... Six months can certainly fly by in the blink of an eye and it's time to reapply to the Viva Las Vegastamps! Design Team! This team holds a special place in my creative heART and I can't imagine not being a part of these talented stamp-artists.

The BEST PART... You can apply, too!

http://vivalas.blogspot.com/2013/11/design-team-call.html

November 30th is the DEADLINE to apply to the Viva Las VegaStamps! Design Team Call!! They're looking for all types of artists and welcome anyone who has a passion for rubber stamping are invited to apply! Bring on the Mixed Media Artists, the Card Makers, the Scrapbookers, the Altered Artists, the Scene Stampers… this MEAN YOU!! International inkers are welcome to apply, too! CLICK HERE for DETAILS. Step out of your comfort zone - throw your hat into the ring, too!

http://sbartist.blogspot.com/2013/09/you-do-not-have-to-art-journal-play.html

Today I'm sharing a few of my recent favorite stamped projects that I think best represent me and my style. This mixed media page in my quote art journal really brings together all the media I love - ink, paint and stamping. CLICK HERE to see entire post.


This ATC features this little gem of a stamp {man with dog} that I picked up when I visited VLVS! last April and a hand-carved eraser stamp that I made back in high school. CLICK HERE to read all about it. I've recently joined the Monoprinting Craze and I'm really loving the mystery you get in a monoprint.


http://sbartist.blogspot.com/2013/07/steampunk-pigs-can-fly-especially-for.html

I can't possibly leave out my love of Steampunk... my Flying Steampunk Button Fairy Pig is so adorable... and fun to make, too! CLICK HERE to see post.


http://sbartist.blogspot.com/2013/06/embracing-new-challenges-dreams-and-new.html

This last piece is very symbolic as I have spent a lot of time this year learning and focusing inward on my creative journey. CLICK HERE to read about these Dyan Reaveley inspired pages. I have come a long way since I first joined VLVS! and I think that this adventure has stories that have yet to be told. Wish me luck! 

Thanks for stopping by and have a fabulous day! Sb :)
Blog Widget by LinkWithin