Translate

**If you have previously subscribed to received my posts via feedburner or Bloglovin, those are inactive now. To receive my creative updates, please subscribe in the right sidebar.**
Showing posts with label Steampunk. Show all posts

Wednesday, March 18, 2020

So Many Favorites - So Little Time... Designer Crafts Connection celebrates National Craft Month


Hello Friends! Its been a while since I've done some arting -- and since it's National Craft Month I'm joining the Designer Craft Connection to bring you some inspiration using our favorites. It's been a whirlwind since attending Creativation in January and when I have time to play I like to get back to something that got me started in papercrafting... making ATCs {artist trading cards}. 


ATC's are small little masterpieces. One of my favorite ways to squeeze in some arting, try out some new products and using up scraps of this and that. Today I'm sharing this quick little project I made just for myself... an upcycled mini book that is a little bit steampunk and a little bit purple!


I love to create with recycled items and reinvent them by using up items items on my craft table. This project can be made in any colors or theme and is great for the kiddos, too!

This project began with this piece of distressed aluminum tape covered cardstock on my table. This tape is already self adhesive and is wonderful to use in creating steampunk projects and altering items with metal. I use it to make large sheets of distressed cardstock for use on all sorts of altered projects... and ATCs!


It's pretty easy to make a sheet of metal paper. You take a sheet of cardstock or recycled chipboard, then cut strips of the aluminum tape; adhering pieces in an overlapped fashion to cover the sheet. You can be as creative as you want doing this. Use a bone folder to burnish down and press out any air bubbles. Sand and distress surface as desired. Then you are ready to paint, emboss and stamp for a multitude of uses.

My sheet above has a pink smudgy coloring because my roll of aluminum tape happened to have red words printed on it and I removed by rubbing with nail polish remover. I liked the look of it with some red, so I didn't rub it all completely clean.


I have loads of recycled toilet paper tubes set aside for projects. The brand I get is now glue-less to the roll – which makes it that much easier to prep for crafty goodness.


I press the tubes flat and make a nice folded edge with my bone folder.


Using some Ranger Distress Paints, I quickly add some distressing and color to the edges. I just love the dauber tops on the bottles -- they make painting quick and easy. This can be done with chalk inks or regular ink pads also.


I went around the edges of seven (7) flattened tubes with Seedless Preserves and Tarnished Brass Ranger Distress Paints. A touch of color adds a little "POP" of color to the kraft color of the recycled tubes that will be the structure of my ATC holder.


I stack all of the tubes together and one by one added a line of tacky glue down the center and press another on top. You can create these type of pockets in a variety of shapes/sizes with envelopes or paper bags also. These tubes are the perfect size and shape to hold artist trading cards {ATCs}.

I align the tubes and clamp the stack together with some binder clips to dry. When dry this will be a sturdy pocket honeycomb booklet.
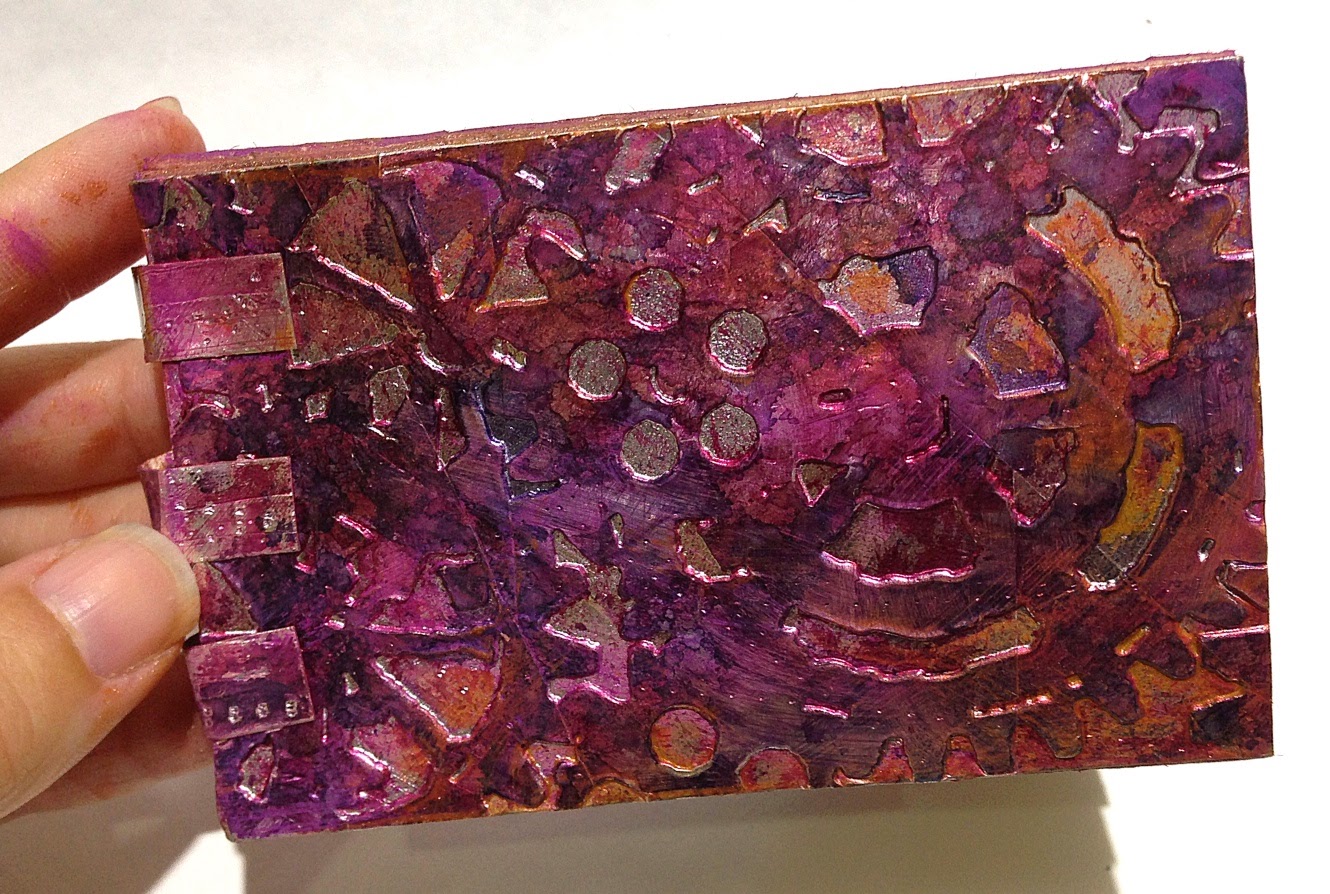

I use one of my favorite embossing folders in my Cuttlebug machine and dab with a variety of reds and purple Ranger Adirondack Alcohol Inks to add color and depth to my distressed aluminum cardstock.

I cut the sheet to size making a front and back covers for my mini honeycomb ATC cardholder. I had a thin strip leftover of the metal paper, so I cut into thirds and used it to add some detail to the spine area {nothing goes to waste}.


I add some embellishments -- a swatch of plum lace which looks lovely layered on top of the metal embossed cover, then some scraps of ribbons, fibers, lace, buttons, bling, found objects and goodies from my favorite stash of metal hardware. I inked some pale pink ribbon trim to match the color palette and altered a strand of pearls with alcohol inks to match too! Voila!

"STEAMPUNK" ATC Traveller


I hope this fun upcycled project inspires you to create. How you create your own? For more inspiration CLICK HERE to jump over to the beginning of the National Craft Month Foil Bloghop with the Designer Crafts Connection!


Thanks so much for visiting! Sb :)


Monday, June 6, 2016

Super Gifts for Him... with Designer Crafts Connection


Hello Everyone! Need a fabulous DIY project for Father's Day or for the GUY who has it all... join the Designer Crafts Connection today for a new first Monday bloghop... Gifts for Him! CLICK HERE to pop over and see all the MANly makes.


Do you repurpose empty tape spools to use for crafty projects? Well I do and they are so versatile. My Cre8time led me to an ingenious idea for the perfect gift for Dad... with a steampunk twist. This was quick and easy to make using aluminum tape, a few crafty stash items and some magnetic craft sheets. 


Dad will love it... no more tiny metal brads or nails all over the place - someplace to keep them within reach.


I cut a section out of the tape spool and rounded the edges, then covered the entire thing with sections of aluminum tape - a good manly base. I burnished everything down real good with a bone folder then set off adding hardware. I cut a section of magnetic sheet to fit and ran through a Cuttlebug diamondplate embossing folder {yes - it works}. I wrapped around metal tape bangle and tacked down with some double-sided tape. 


To reinforce and add more detail, I punched some holes with my Crop-a-Dile, set eyelets and affixed some gears and swirly paperclips with screw brads. I covered up the exposed brad wings on the inside with more aluminum tape to secure and to finish it off.

A super gift for a SUPER DAD!!!


Thanks for visiting! CLICK HERE to jump over to the Designer Crafts Connection Blog to see more fantastic handmade "GIFTS for HIM".  :) Sb

Thursday, June 25, 2015

#Cre8time brings Superpowers... Steampunk Magneto Bangle


Hello Everyone! Today I have a new upcycled tape spool project to share... and this one is not only FUNctional - but it's totally Steampunk, too!


I'm forever squirreling away empty tape spools to use for crafty projects, and my Cre8time led me to my latest, and possibly greatest bangle. Made of a few stash items and magnetic craft sheets... this came together in a snap and it's not only fashionable, it's MAGNETIC. 


No more tiny metal brads or pins all over
the place - they will now stay put.


This was quick and easy to make. I cut a section out of the tape spool and rounded the edges, then covered the entire thing with sections of aluminum tape. I burnished everything down real good with a bone folder then set off embellishing. I cut a section of magnetic sheet to fit and ran through a Cuttlebug diamondplate embossing folder {yes - I squealed with joy}. I wrapped around metal tape bangle and tacked down with some double-sided tape. 


Using my Crop-a-Dile I punched some holes, set eyelets and affixed some gears and swirly paperclips with screw brads. I covered up the exposed brad wings on the inside with more aluminum tape to secure and to finish it off.


I'm ready to create... with my new magneto superpowers!!!


The Deflecto Craft Magnetic Sheets couldn't be more fun! They come in a package of three 8" x 15" sheets, with a white backing. These white magnetic sheets can be painted or papered, embellished or customized to any project. Thin enough to cuts easily with scissors, craft knives and die cuts... even emboss. Let your Cre8time get magnetically charged! 


How would you create with Deflecto Craft Magnetic Sheets?

Thanks for visiting! CLICK HERE to jump over to the Deflecto Craft Facebook Page or Deflecto on Pinterest to see more of the teams creations.  :) Sb


For more information on the Deflecto line of products,

Sunday, March 29, 2015

Winding Things Up for Inspiration at the #Altered Pinewood Derby!

Hello everyone! Today I'm sharing a special little project that was totally just for fun... between friends - and I'm totally in love with this creation!


A while back, Tina Walker announced she was hosting a Pine Wood Derby Challenge and gathered some creative friends to join in the fun. The idea was to all start with the same blank Pine Wood Derby car, and alter it however we were inspired and everyone's resulting cars are so amazing!

This is the blank Pinewood Derby kit we all started with... 


A wedge of wood, four wheels and four nails for axles... so full of potential!


I gathered a bunch of items from my stash of embellishments, leftovers from other projects, watch parts, recycled bits and found objects to alter my dream racer. The base of my car is collaged with a monoprinted deli paper, one of many that I made in a Nathalie Kalbach workshop a few months back.


I used Mod Podge to collage it to the car, wrapping around like a present. I love how it blends from black, to blue to purple - with all the painterly effects and none of the mess, so I can get to embellishing all the faster!


I had loads of potential items to junque up my car... but once I mounted the SIMPLIFY tag on the back bumper as license plate... my muse waived the flag "less is more". Two resin cast bolt caps are the lights flanking the simplify plate. An assortment of embellishments and watch parts clustered into a gear mechanism formation to meet up to the horizontal gears on top.


This was so fun to create. I'm quite pleased with my whimsical racer topped with a vintage winder key... enjoy all the details!


The rims of the wheels are capped off with recycled watch parts.


The front fender is half of a hinge clasp from a cigar box accented with mini adhesive pearls and a recycled watch gear cluster for hood ornament.


The large gears holding the winder are an assortment of recycled gears from adhesive runners, metal craft gears, and found recycled rusty metal pieces all stacked and fitted together. I can acutally spin and turn these around... too FUN!!!


This section is one piece I knew right off the bat would be the feature... this recycled mini square watch face with a leftover stamped eye inside; mounted on top of a partially altered mah jong tile received in a goodie box from a creative friend long ago.


A section of chain that was in with my stash of recycled watch bits and an "INSPIRE" tops off this car. My vintage key came with this purple string tied to it... I left it as it is my tiny scarf tied for good luck!


Thanks for dropping by! Please click on the boxes below to jump over and see the other fantastic creations for the Altered Pinewood Derby. If you are inspired to create your own, please leave me a comment and share your link for us to see - we would totally love it! Have a fabulously creative day! Sb  :)


Monday, April 14, 2014

Monday is Shaping up to be all Sorts of AMAZING!


Happy Monday... I have a project featured over at the Amazing Mold Putty Blog for Mold Rubber Monday straight out of the book of fairy tales. I am so in love with Amazing Mold Rubber and its ability to pick up every little detail. Just wait until you see the painted and embellished end result.


CLICK HERE to jump over to the Amazing Mold Putty Blog. I hope you enjoy my project - it's one tall tale! Have a great day! :) Sb


Saturday, April 12, 2014

Saturday Night is Date Night with my PRINCE!

Good Evening All... yes you are seeing this correctly! A double post today. I just wanted to let you know about something real quick. I have a special guest feature post over at Frog Dog Studio today and you don't want to miss it. It is Steampunk and I will give you a little sneak peek though.


CLICK HERE to jump over to the Frog Dog Studio Blog. If you love all things mixed media - it's a blog you should be following, too!


Have a great night! :) Sb

Sunday, April 6, 2014

The Bells are Chiming! It's TIME for Anything But a Card Challenges No. 34

If you arrived here from Unruly Paper Arts...
CLICK HERE to jump to my "Teacups and Tiaras" Reader's Art Quest Inspiration


Good Morning! It's time for a new Challenge at Anything But a Card Challenges and I have a SPRINGTIME STEAMPUNK project to share that I created combining the Frog Dog Studio March Kit and Amazing Crafting Products. I am totally Cuckoo for all things "Steampunk" and I also have an extreme sweet tooth of the marshmallow Peeps® variety. I have created an amazing whimsical timepiece combining both... and repurposing a glitter tray too!


The new Challenge... Anything But a Card Challenge #34 - "SPRING Forward"!! We know Spring is dragging it's feet in arriving as ol' man winter keeps his heels dug in the snow and ice... so we are celebrating the new season with an OPEN THEME!!! Feel free to break out the bright colors and create along with Spring and Easter, or create whatever your muse desires... as long as it's anything but a card!


Please share any current project you have created and JUST REMEMBER... create anything EXCEPT a card for this challenge. Please mention and LINK BACK to this challenge. ALSO - Please new projects only {no-backlinking}. :)


* * * * * * * * * * * *


This is a sampling of most of the supplies I used to create this masterpiece. Yes there is a glitter tray here. WHAT!!?? Not to leave you in suspense – the glitter tray will be repurposed to be transformed into the faux birdhouse backdrop for my Steampunk Cuckoo Clock.


This project was a labor of love - involving loads of steps and preparing WAY more items to adhere than can possibly fit... and a Tim Gunn "editing eye" was in order. Please CLICK HERE to jump over to see the entire HOW-TO and process.


The resin layered gear assemblies and one bolt finishes the top. I might add more to the other side after this grows on me a bit.


RUSTY found furniture protectors are perfect escutcheons for my clock. I also used ball chain to hang some findings from the bottom.


On one side is a rusty found wrench and the other item, my cast resin wishbone cluster from my favorite handmade necklace... I can always make another... and I will!


Steampunk Cuckoo Clock!


I am going to permanently display this in my studio where it can inspire me daily!

• • • • • • • • • • • • •

Thanks for stopping by today! I hope you find a little time to do some creating. I look forward to seeing what you create {CLICK HERE to LINK UP your projects}.  :) Sb
