Translate

**If you have previously subscribed to received my posts via feedburner or Bloglovin, those are inactive now. To receive my creative updates, please subscribe in the right sidebar.**
Showing posts with label crafting with kids. Show all posts

Thursday, March 10, 2022

Pinch Me... I'm ShamROCKin' a DIY Ribbon Rosette #NationalCraftMonth


Hello friends... March is National Crafts Month and St. Patrick's Day is right around the corner! Today I'm sharing a quick and easy ribbon rosette project that is perfect for pinning on the winning float at the annual St. Patrick's Day Parade!


For this project I gather a few supplies: gold oly*fun® metallic fabric, scrap of green cardstock, scissors, paper trimmer, hot glue, Scor-Pal®, double-sided adhesive sheets; and fun Irish themed button flair, embellishments and stickers from my fav dollar store.
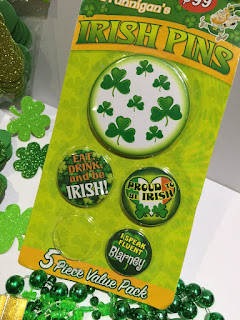

I have these pins from the dollar store in my crafty stash that would be perfect to transform into ribbon rosettes using gold metallic oly*fun® -- a fun reflective fabric that adds the perfect amount sparkle & shine to cardmaking and other craft projects!!


To make fabric a bit stiffer to fold and hold shape, I mount to green cardstock.


On a scrap of 6" x 9" green cardstock, I placed a cut-to-size section of double-sided adhesive sheet, removed backing, then mounted piece gold oly*fun® and trimmed back the edges.


Following pattern for making rosettes using my Scor-Pal®, I scored both sides of the paper-backed fabric to create peaks and valleys at 1/2" increments.


I divide this scored sheet into three, 2" sections, With some double sided tape, I joined the three sections together into one long strip. Fold back and forth on score lines to make the accordions. When shaped this will make a large rosette to set off my 3" button!


Now the fun begins! Shape the according into a circle and glue in place. It seems to take about 4 hands to form and hold a rosette down to secure, but once you do it a time or two it's pretty easy. For this I apply a ring of hot glue around the edge in the center and placed a faux gold coin on top... Ta-DA! Hold coin in place until glue cools and it is secure then repeat on other side.


I fashion a ribbon tail out of another section of oly*fun® backed cardstock, a smaller section popped up on chipboard cut on my guillotine paper cutter... easy-peasy! Glue the feature button pinback onto the front of the rosette, and added some fun foamy & glittery shamrock stickers to finish things off. Place a sticky back wall hook on the back upside-down and it's ready to hang on the winning float!


I just love the shimmer and shine of the metallic oly*fun®! I can't wait to be ShamROCKin' this over to award to my favorite float at the St. Patrick's Day Parade!

A ShamROCKin' Award....


What are you creating during National Crafts Month?! I'm enjoying the art of cut paper and glue over at the Collage-Lab SPRING FLING Virtual Retreat... you can still join the fun -- all classes are accessible until December 2022.


Thanks for stopping by and have a great day! Clover on over to the Designer Crafts Connection blog for more fun craft ideas!

Happy creating! :) Sb

Friday, October 8, 2021

Color all the Things... Dive into the World of Artesprix® Sublimation Ink

Hello friends! It's finally Friday and I have something new and exciting to share that I have been keeping a secret all Summer. Earlier this year, I responded to the call for Artesprix® Design Team and I was invited to be a Guest Designer for the Artesprix® Blog.

Today I am thrilled to introduce you to the world of Artesprix® and working with Sublimation ink. 


My guest designer project is to feature Artesprix® Bookmarks, and I was sent this assortment of Artesprix® Sublimation Markers, Sublimation Stamp Pad, Blanks and everything I need to dive into the world of sublimation.

For my first project I grabbed a never used stencil from my stash and the Artesprix® Sublimation Markers to create a bright colorful bookmark... and though I tried to get my hubs to play with me, he only chose the colors! Artesprix® bookmark blanks are the perfect canvas to creating personalized art to mark your books.


So... what are Artesprix® Sublimation markers? 

Artesprix® markers have a specially formulated ink that transforms anything colored on plain copy paper into a heat-transferrable iron-on design onto polyester items. With the magical Artesprix® Sublimation Stamp Pad and Sublimation Markers and plain paper and a hand-drawn, stamped or stenciled design, I can customize all the things! What the WHAT?!! The holidays are just around the corner...


Materials needed: Plain Copy Paper; Pencil; Artesprix® Sublimation Markers; Artesprix® Heat Tape; Artesprix® Protective Paper Roll; Artesprix® Project Mat; Artesprix® Bookmarks 4ct; Stencil -- Art by Marlene MASKBM17 from Studio Light B.V.; and a Heat source -- Cricut Easy-Press Mini™ (Artesprix® Heat Press or Home Iron).

Ready to play...


Using a pencil trace Bookmark blank onto plain copy paper. For paper size, plan to leave approximately 2" on all sides to yield for coloring outside the blank shape and applying heat tape. Trace stencil design within bookmark outline and be sure to add about 1/8" to 1/4" of coloring outside the lines.


Using the yellow Sublimation Ink Marker I set off to fill in all of the lines.


The pens have a nice chisel tip that makes it easy to draw a thin or wide line.


First layer of color done... next the background.


Using the blue Sublimation Ink Marker, I filled in all the negative spaces.


The tiny areas were tricky but this is why I did the lighter color first.


OK... all colored! I think I want to add some outlines.


Using the Black fine tip Sublimation Ink Marker, I re-traced the stencil design shapes, then added some hand drawn lines and cross-hatching in a few areas to make it a bit more artsy.


I love it! Yes the color looks a bit dull... but not to worry -- it needs some heat to come to life!


Pre-heat Cricut Easy-Press Mini™on the highest temperature setting and prepare bookmark for thermal transfer magic by placing face down within pencil lines secured with Heat Tape. You can see why I colored outside the lines -- there will be no white edges when transferred.


With the Project Mat on bottom, I make a "Sublimation Sandwich” — a piece of Protective Paper at the top and bottom of your bookmark taped face down onto stenciled design. I used two layers of protective paper on top and bottom for good measure.


Now the fun part... apply heat! Starting at one end I press and hold Cricut Easy-Press Mini™for 45 seconds, then move to next unpressed area, slightly overlapping and pressing again. I repeat 3-4 times until entire length of bookmark has been heat pressed. 

I have to admit this is not what I intended to be doing when I purchased this little mini iron... but I love it!


Let cool a bit -- the bookmark is metal... and keeps heat a while. Take a peek check by gently peeling back one section to peek and see if thermal transfer is complete.


If it looks good, let bookmark fully cool then remove Heat Tape.


Wowee!!! Look how bright and vibrant the blue and yellow is!!


The heat transferred bookmark next to the hand-colored stencil design on paper.
This bookmark certainly won't be missed in the pages of a book.

The possibilities are endless with a variety of Artesprix® Blanks that can be customized with hand-drawn art or using my stash of stamps. These custom bookmarks are so easy to make and is a fun project to do with kids (heat part adult supervised of course).

What else did I make??! Hop on over to see my Guest Designer Project on the Artesprix® Blog... and see how my love of stamps meets bookmarks.

Thanks for visiting... I'd love to hear how you would art up your own bookmark using Artesprix® sublimation markers.

Happy creating! Sb

** This is a sponsored post. Artesprix® provided products for use in this project in exchange for my creative ideas, views and opinions. My ideas and opinions are my own.

Wednesday, September 9, 2020

Bats in the Ribbon Stash... SpOoKy Cute DIY Ribbon Ornaments


Hello creative friends! I'm excited to be part of the Creative Halloween Crafts being shared this week! Halloween is one of my favorite holidays for making goodies. Gather around the kids because this project is super easy and fun for all ages! 


When did Fall arrive?! Here in South Florida SUMMER is pretty much year round – nevertheless Halloween is just around the corner. What do you do with all of your leftovers from Halloween's Past that didn't see the light of day??! You alter them into something fun! 


I'm transforming this fun dollar bin find into some super SpOoky Cute cookie cutter ornaments by wrapping them up in colorful seasonal ribbons. The hardest part is selecting the ribbon! 

For this project you need: ribbons/trim in seasonal colors; an adhesive runner* (or double-sided tape); scissors; a black permanent marker; and some holiday spirit!

*I have used my favorite Herma Dotto adhesive (an old school dry adhesive runner) that I reserve for applying ribbon to things. For this project, you can use whatever adhesive you have on hand: glue dots, double-stick tape... even craft glue works. 


PUMPKIN: For base I'm using a beautiful variegated orange ribbon. I add a stripe of Herma Dotto adhesive to the end to tack in place at the top of stem, then begin winding ribbon around to cover metal. Continue wrapping, slightly overlapping the previous wrap and continue all the way around the cookie cutter. When back at the beginning, add another stripe of Dotto adhesive to secure the end. Easy Peasy!


I select an orange, gold and green check pattern, then wind around outer edge of pumpkin shape to measure and cut to size. I apply adhesive along the entire length and press into place. I leave about a 2" overhang and looped this back over onto itself to form a leaf shape. 


Next step is to add a hanger - for this I'm using a sheer green ribbon. I cut a piece about 10" long and tie to the top of the stem, knotting in place with the two loose ends meeting at the top. Place two ends over each other and tie in a knot closed loop to form hanger. The finishing touch is the stem. For this I cut another small section of green ribbon, add some adhesive to the end and wrap around the entire stem (like the first step). Then I back trimmed and tacked down the loose end to complete. This ornament is so adorable and totally full of Pumpkin Spice! 


Now to embellish the bat cookie cutter. I have chose a two-tone silver/grey ribbon that is lighter on one side and slightly darker on the other. I applied Dotto adhesive down the length of this ribbon and applied around the outer edge of the cookie cutter. 


I repeat by layering a contrasting patterned ribbon centered right on top – a quick and easy transformation! 


This ornament needs a hanger but I don't have anything black on hand... no worries! I grabbed a black Sharpie marker and quickly color a section of natural burlap string. 


These are so fun and great project for the kids! Fill them with wrapped candies and a gift card and these would make a fantastic seasonal teachers' gift with a handmade touch.

I'd love to hear how you are
decorating with cooking utensils!

For more fun Creative Halloween Craft ideas,
pop over HERE to see what my creative friends are making. 

Stay tuned - On FRIDAY I will share what becomes of Frankenstein's head! Thanks for visiting.  Sb :)

Tuesday, April 16, 2019

OH the SPARK-ling Possibilities... with Rinea® and Designer Crafts Connection


Greetings everyone! Today the Designer Crafts Connection is creating with the beautiful, SPARK-ling Rinea® Double-sided Paper Foil... are you ready to SPARK your creativity?! Where I live, summer has arrived and I'm getting a jumpstart for family picnics and BBQ's. 

If you are not quite ready to think about 4th of July, tempt your cre8time muse checkout these cute Easter Baskets using Rinea®... and for the fashionistas folded Rinea® bangles.


For this challenge, the maker of Rinea® has provided each of the Designer Craft Connection designers with product to use for creating. When you are done visiting here, be sure to pop over to the beginning of the hop HERE to see more inspiration using Rinea® Double-sided Paper Foil!!!

The star embossed pattern into the Rinea® foil is so lovely.
 
Rinea® Double-sided Paper Foil is a specialty craft paper imported from Germany. It is made up of a thin sheet of paper sandwiched between two layers of thin aluminum foil - the paper gives it sturdiness and stiffness while the foil gives it the shininess and the malleability to maintain the shape however you bend or fold it. It is more than just origami paper due to the specific thickness and the quality of the foil used, making it ideal for many interesting crafting ideas. The paper does not wrinkle like foil and does not cause painful cuts like thick sharp foil can. 

The paper is as popular in Germany and parts of Europe as construction paper is in the US. In Germany it is known as Alu-Bastlefolie which means Aluminum Handicraft Foil Paper. It is very difficult to find this paper in the US and those that want it have to import it from Germany. Our goal is to introduce you to unique and interesting crafting ideas popular in other parts of the world made possible only using this paper and, at the same time, make it easily available in the U.S. The paper comes in many interesting colors with shiny, matte, and embossed surfaces giving you lots of options to play with and combine.


This wonderful SPARK-ling Rinea® paper makes dimensional ornaments and whimsies from folded paper OH-so much better! Rinea® Double-sided Paper Foil solves this issue while providing a metallic {solid or textured} finish in a variety of colors that lends itself to folding and holds it's shape. For my project I have used the Magic Star/Frisbee origami pattern found in "The Origami Handbook" by Rick Beech.


I take the time to always make a sample out of scrap paper first to test the process, sizing and to figure out the final segment assembly.


First I begin by cutting all of my squares needed.


These stars are will be so wonderful made
from red, silver and blue Rinea® foil!


Following the steps from the book,
I begin folding all cut squares in half.


I follow along the steps and complete folds for each color. This pattern calls for 8 squares that are folded down to a parallelogram, then nested together and linked into final shape. The royal blue star is completed and assembled.... using NO GLUE!


Did I mention it has a fun twist... it's kinetic!


When pieced together, this is not only a star... it is a spinner.
You can open the star into an open octagon.


The star shape closed.


When you slide the points pushing outward,
the shape changes to this open octagon.


When complete you not only have a fabulous patriotic star coasters... they make a fun party favors too!


This is a fun project that can be sized up or down depending on the use. These can be smaller and strung on string to make a garland, or larger and attached to dowel rods for yard decor. This is a great project for the kids too!

What festive party decor
will you create with Rinea®?

CLICK HERE to jump over to the beginning of the Rinea® Double-Sided Paper Foil Bloghop at the Designer Crafts Connection blog and find more SPARK-ling inspiration and projects using this gorgeous foil paper!

You can find more info on Rinea® Foils
at their website www.rinea.com

Find lots of creative inspiration on the Rinea® Foil BLOG


Thanks so much for visiting!  Sb :)

** This is a sponsored post. Rinea has provided products for use in this project in exchange for my creative ideas, views and opinions. My ideas and opinions are my own.
