Translate

**If you have previously subscribed to received my posts via feedburner or Bloglovin, those are inactive now. To receive my creative updates, please subscribe in the right sidebar.**
Showing posts with label AMAZING No Gelatin Rubber Plate. Show all posts

Saturday, August 24, 2019

Our Favorites Mixed Media YouTube Hop - #ArtJournaling Edition


Hello friends! Where has summer gone?! I have just returned from a getaway with my hubs and I am part of an artful adventure... and all are invited to join me! 


It's been awhile and I'm so excited that I am participating in another YouTube hop -- "Our Favorites Mixed Media YouTube Hop - Art Journaling Edition", featuring twenty-two artists from around the world! If you missed my first adventure via YouTube CLICK HERE.


For the "Our Favorites Mixed Media YouTube Hop – Art Journaling Edition" I create an art journal page inspired by a quote from David Tennant of Doctor Who. This page is full of color, texture and timey-wimey techniques - I hope you enjoy! 


This hop would not be complete without prizes from our fabulous sponsors! See below for hop list and prize details! Don't wait to get hopping... The Our Favorites YouTube Hop Giveaway will have winners drawn on August 26th and announced on August 31st. Each video's description box will contain the list of artists and a link to your next stop... sit back, grab a snack and enjoy the Hop as you watch the videos! 

🔹️🔹️ To enter to win one of our amazing prizes you must  🔹️🔹️ 
1 - subscribe to each YouTube Channel 
2 -  like and leave a comment on each video (note: some have location restrictions for shipping, so please leave your country in your comments).

Spend the weekend on a creative binge and enter to win -- just view, subscribe, LIKE and comment on the each of the videos as you hop along!

 ** HOP LIST **
Laura Dame - Laura Mixed Media: https://youtu.be/QWyYaIl7rS8 
Susan M. Brown {sbartist}: https://youtu.be/ZG9MO5f5CR4 
Heather at the Kraaft Shaak: https://youtu.be/EJkjA5bfdXQ 
Aleksandra Mihelič: https://youtu.be/s2NTOmpO9IY 
Susana Magenheimer aka Randomartist222: https://youtu.be/X5MptcmXxds 
Ilse Kleijer - IKmetliefde: https://youtu.be/qTY2hkDfMZs 
Melina Dahl - Minas kreativa: https://youtu.be/705vm6hbZAM 
Danielle Mack at A Painted Page: https://youtu.be/0iVyqK9g-iA 
Kristin Van Valkenburgh: https://youtu.be/h0anDeLe7Tg 
Alexa Doebler - Blue Woods Design: https://youtu.be/eAIPmKyopjQ 
Erin DeCoste - Happily We Go:https://youtu.be/9GilUrW1sxI 
Michelle Liptak-Mickelnay: https://youtu.be/ILRe3cVp7Q0 
Connie Shaw - Sparksgirl Mixed Media: https://youtu.be/--KKbtZp6xY 
Studio Marielle Stolp: https://youtu.be/UbVV7aZmW0c 

** Our Favorites YouTube Hop Sponsors and Prizes ** 
 Blue Woods Design/That's Crafty UK - 2 sets of stamps designed by Blue Woods Design for That's Crafty UK 
 Joggles- 1 $25 gift certificate Grafix - 1 pack of clear and 1 pack of matte computer Grafix paper 
 Retro Cafe Art - $75 gift certificate 
 Susana Magenheimer - prize package ($25 value) 
 TCW - Stencil gift pack of (10) 6x6 NEW stencils retails for $60. 
 Pronty Crafts - A set of foam stamps and stencils by Dutch artist Julia Woning 
 Rubber Dance Stamps - €25 Grabbag of Stamps 
 Shawn Petite - 5 stencils of winners choice ($50 value) 
 Marabu Creative - prize pack 
 Michelle Liptak-Mickelnay - journal DecoArt - 2 prize packs 
 Kristin Van Valkenburgh - prize package 
 Kraaft Shaak - Mixed Media creation bundle - US only 
 Gelli Arts - $50 gift certificate 
 Nicole Watson - prize pack 
 Ilse Kleijer - prize pack (includes 2 AB studio stamps) 
 AB Studio - 3 stencil pack designed by Nuneka 
 Little Birdie - $25 gift voucher + shipping 
 TandiArt - DIY Fairy Art Kit 
 Susan M. Brown {sbartist} - prize package 
 ArtFoamies - 2 VOUCHERS FOR $50 EACH 
 Red Lead Paperworks - 3 prize packages - stamps, stencils, collage sheets 
 iStencils - $25 gift card to website 
 Brush Magazine - 2 winners: two ’bundles’ of 5 issues of the magazine - digital copies 
• 7 Dots Studio - prize pack 

SUPPLIES USED in my project for the "Our Favorites Mixed Media YouTube Hop - Art Journaling Edition": art journal • vintage book paper or color copy of book page • gesso/acrylic paint/glazing medium mixture • sticker letters • Stabilo Woody pencils {black, white, gold, silver, & purple} • Stabilo aqua pencils {black, white, red, yellow, blue} • Stencil Girl Stencils • The Crafter's Workshop stencil {Rebekkah Meier Designs} • Clear embossing powder • Blue Pigment ink • Faber Castell Black Pitt Brush pen • White Gelly Roll pen • EK Success Cutterbee scissors • Police Box Stamp {from vlvstamps.com} • glue stick • Punchinella {from Gauche Alchemy} • Ranger Distress Paints {Salty ocean, cracked pistachio, wilted violet, twisted citron, tarnished brass & salty ocean} • Golden Fluid Acrylic & High Flow Acrylic Paints {Green Gold & Indigo} • makeup sponge • pencils {black, white, red, yellow, blue • EK Success Honey Bee scissors • Ranger Dina Wakley White gesso with detail tip • paper towel • DIY mono printing plate made of Amazing Mold Rubber • water brush. 

**Giveaway is not endorsed by or affiliated with YouTube. All prizes are provided by individual artists or companies. No purchase necessary to win.

I hope you have a creative weekend and enjoy my WHOvian adventure in art journaling! :) Sb

Friday, April 24, 2015

Recycled Notebook meets #MixedMedia with Viva Las VegaStamps! + Art Anthology


Hello friends! All week Viva Las VegaStamps! has teamed up with Art Anthology to bring you tons of inspiration with mixed-media stamped creations. Today I have a special project over at the Viva Las VegaStamps! Blog... a recycled notebook RE-Imagined!


So you don't miss anything please be sure you check out these links:


Art Anthology's Website: www.artanthologyinc.com


I have altered this journal that came to my husband as a goodie from the car dealership. It's a blank book, with lined pages – perfect for jotting down ideas and things to remember... BUT it's not me. Enter Art Anthology Gemstones ~ Dimensional Paint and Colorations Spray along with my stash of Viva Las VegaStamps! to decorate this journal in my favorite color PURPLE and also to disguise it from the hubs {so he doesn't realize I swiped this out of the recycling bin - LOL}.


In creating, I discovered the Art Anthology Gemstones ~ Dimensional Paint works great for monoprinting on my Amazing DIY No-Gelatin Printing Plate, and also for the resist technique.
Please CLICK HERE to jump over to Viva Las VegaStamps! Blog for see my tutorial and journal transformation.

• • • • • • • • • • • • •

SUPPLIES: From Viva Las VegaStamps"Harlequin Diamond Background" #18920"Pure Imagination" #19041"Ferris Wheel" #16038"Bee Hung Up" #19164"London Skyline" #10597"Triangle Banner" #19043"Chevron Banner" #19042Miracle Sheets; and StazOn Jet Black InkFrom Art AnthologyGemstones ~ Dimensional Paint in Emerald and Flourite; Colorations Spray in Wild Orchid. Other Supplies: white cardstock; recycled notebook; scissors; paper trimmer; small paintbrush; Sakura of America Gelly Roll® Stardust® Pen; and pencil.

• • • • • • • • • • • • •

Thanks so much for dropping by! Don't forget to check out the other works for this week of inspiration from VLVS! and Art Anthology... there is blog candy to be won. Happy Friday!  :) Sb

Sunday, April 19, 2015

#Cre8time Paint Play brings #MixedMedia Variety...


Join me today for another installment of my "Thoughtful Abstractions" column at Unruly PaperArts. The theme for April is Gelli® Plates and Monoprinting... focusing on the mixed-media painting technique that virtually ANYONE can do – anywhere! This is one of my favorite techniques and is a source of Cre8time inspiration.

CLICK HERE to jump over to Unruly Paper Arts to read my latest column that includes a monoprinting tutorial.

Monoprints are so versatile and can be a starter for all sorts of projects. Here are a few examples of projects I've made using different techniques.


My "Faux Van Gogh" stamped collage is a fusion of three layers: the base a painted sheet of white cardstock; a monoprint created with Liquitex Soft Body Acrylic paints {Cadmium Orange Hue and Cerulean Blue} and deli paper on a Gelli Arts® Gel Printing Plate {yes, I do actually own one}; and a stamped image on deli paper. This is a fun way to use your monoprints. This blue and orange was acutally a clean-up sheet that I was rolling my paint filled brayer on. CLICK HERE to view tutorial on how I created this.


How about using a monoprint to découpage onto a dimensional project? Oh yes! This made painting so quick and easy and my whimsical steampunk pinewood derby car came to life in minutes. CLICK HERE to see the entire project.


Round monoprinting plates are the lastest craze and it dawned on me that I also have loads of round shapes lying around, too! A whole pile of them!!! Several of my mold rubber molds sitting in pretty little stacks like crafty pancakes.

First I applied some colors to one of my rectangular plates with a brayer, then pressed my nut and bolt mold into the paint – this leaves a beautiful circle with hexagons in the negative space. Then I can stamp off the color from the MOLD onto another print or blank paper. Gorgeous!!! CLICK HERE to view more variations of applying color.

Thanks for visiting and I hope you are inspired to try some painterly play during your Cre8time! Have a wonderful Sunday. :) Sb

Monday, January 5, 2015

Molding Mini Masterpieces with AMAZING REMELT... My FAV New Product of 2014 Designer Crafts Connection Bloghop


Hello Everyone and Happy New Year! Today is first Monday which brings a new Designer Crafts Connection Bloghop. This month's theme is Favorite New Product of 2014... and mine is truly AMAZING! A few months ago the new Amazing Remelt hit the shelves of Hobby Lobby Stores and I am in love with this fun and easy twist on moldmaking.


What is 
Amazing Remelt???

Amazing Remelt is a one-part, heat and pour mold making material that can be remelted and poured to create new molds. Molds can then be used with casting resins, clays, soap, wax, and it's even approved for food contact. It is now available in Hobby Lobby Stores and also on the Amazing Crafting Products website.


If you are having trouble viewing... please CLICK HERE to view.

and... Amazing Remelt is Food Safe too!

Amazing Remelt is a Non Toxic, 1-part reusable mold making material for room temperature or low exotherm materials. Amazing Remelt softens at 120°F and becomes liquid at 135°-140°F – melted in the microwave or by traditional double-boiler method. It can be re-melted and re-used to make new molds time and time again. Amazing Remelt is ideal for making molds of smaller items such as jewelry, embellishments, and chocolate molds. Once you create your Amazing Remelt mold you can cast using Amazing Casting ResinAmazing Clear Cast Resin, polymer clay, fondant and other food items such as butter, ice, chocolate... and more!

New to mold making and casting???
Amazing Remelt is for you!

This unique product can be remelted and reused, making it not only economical, but eco-friendly. If you aren't happy with the results, you can melt down and re-pour around your object. Amazing Remelt gives you amazing detail and is great for push molds, texture plates and prototyping too!


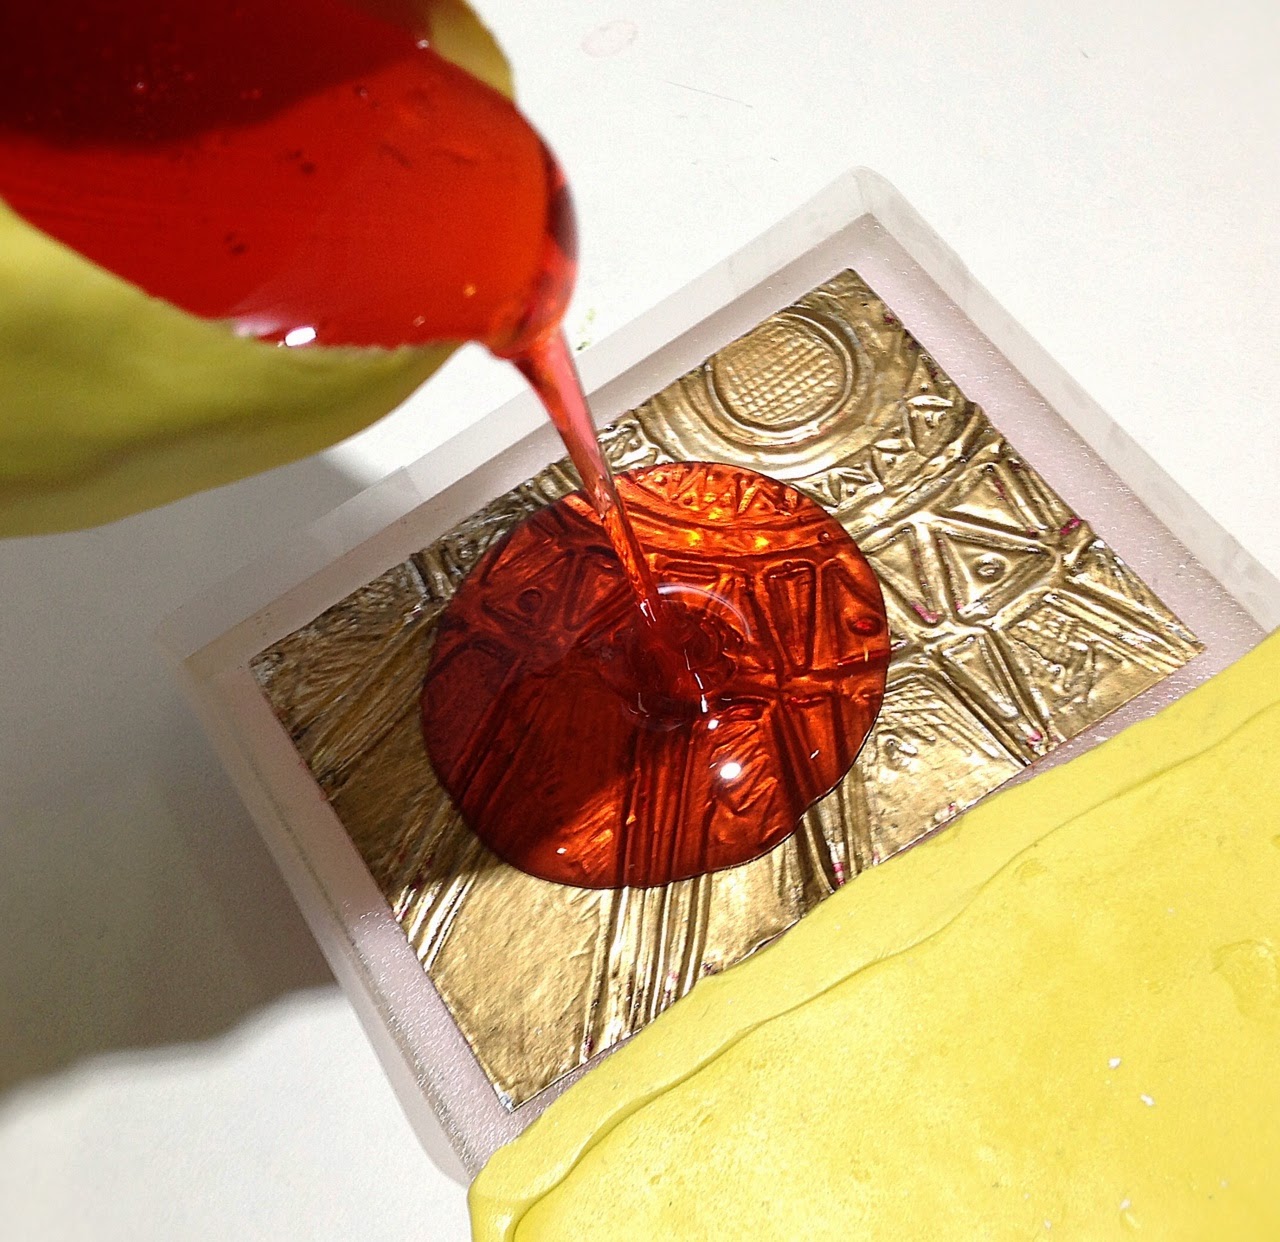
A wonderful thing about Amazing Casting Products... that the products work together like peanut butter and jelly! Today I'm getting double duty out of my mini AMAZING No-Gelatin Printing Plate as I use it as a nonstick base for pouring a mold with Amazing Remelt.

This project starts off with my mini Amazing Mold Rubber slab and an embossed metal ATC that I created for a swap many moons ago. I love creating ATCs {artist trading cards} and find creating mini one-of-a-kind masterpieces for trade very rewarding - BUT - these hand embossed metal cards are a lot of work and were a very small batch... only six originals made. I decided I wanted to make a mold of this and it has opened up a world of possibilities for this little piece of art!


Using 3M spray adhesive, I sprayed my mini Amazing Mold Rubber slab, and allowed it to dry a few minutes to tack up. CLICK HERE to view how I created this to use for monoprinting.


Then I gently adhered my embossed metal ATC.


After mounting, I brushed spray cooking oil onto my metal ATC. This ensures the oil {serving as a mold release from the Amazing Remelt} was applied into all the nooks and crannies, and also doesn't leave any large beads of oil to displace the molding material. I also lightly brushed over the edges where the spray adhesive is exposed on the rubber slab.


I placed my mold rubber slab back onto the acrylic block I created it on and wrapped scotch tape around the sides to make my mold box walls to pour the Amazing Remelt into.


I melted 3-4 one inch cut squares of Amazing Remelt and melted slowly in my microwave in my mold putty cup I created for my cookie espresso cup project {CLICK HERE to view}. Keep in mind each microwave model varies, so you'll want to start out slow and test your melt times - mine happens to be super hot. I melt at 10 second increments on the lowest setting and after 3 cycles, I'm ready to pour. I set my makeshift moldbox up against a large mold putty mold in case the tape bowed out a lot. I usually wrap a strip of cardstock around the outside as extra support.


I popped and pulled away bubbles affecting image surface using a pin {or toothpick}.


I let the Amazing Remelt set to cool and harden for the day as I set off to work. Should only take an hour or so as this is only about 1/4" thick.


Now for the REVEAL!!! I love the amazing detail the Amazing Remelt has captured. This will certainly save me time and money in mold rubber {and space, too} for molding items quick and that I can create a new mold whenever I need... and I can STAMP with it!!!

Keep a lookout for Amazing Remelt at the upcoming CHA Winter 2015 this weekend. I will be attending and demoing mornings at the Amazing Crafting Products/Alumilite Corp. Booth #1427 - come by and meet me and try out these Amazing Casting Products!

+ + + + + + + + + + + +

Thanks so much for visiting! Continue on the Designer Crafts Connection "Favorite New Products of 2014" Bloghop by selecting hop back/forward on the logo below to enjoy all of the wonderful inspiration. Sb :)

Sunday, July 20, 2014

Gone #Cre8time Fishin' for Anything But a Card Challenges No. 37


Good Morning! I'm traveling this weekend... but I still manage to squeeze in a little creative time here and there. Today for the current Anything But a Card Challenge No. 37, I have a fun Summertime tag to share that I made for a tag swap at Viva Las VegaStamps! Please CLICK HERE to jump over to see the other creations by our fantastic design team at ABAC.


The current Challenge... Anything But a Card Challenge #37 - "ANYTHING GOES"!! With the summer season in full swing full of vacations, days at the beach and summer camp – we thought we'd go with an OPEN THEME!!! Feel free to break out some supplies you haven't used in a while, try something new or create whatever your muse desires... as long as it's anything but a card!


* * * * * * * * * * * *

Please share any current project you have created and JUST REMEMBER... create anything EXCEPT a card for this challenge. Please mention and LINK BACK to this challenge. ALSO - Please new projects only {no-backlinking}. :)

**A REMINDER** This Challenge will go through midnight July 26th giving you one week to play along and ENJOY the creative process! Look forward to another Artist Spotlight + Mini Challenge next Sunday to keep you inspired.


* * * * * * * * * * * *


Now for a little more about my tag...

I'm sharing some creative magic today combining stamping with Amazing Mold Rubber along with my favorite new friends... my Faber-Castell Gelatos®

I joined a summer themed tag swap at Viva Las VegaStamps! and I wanted to have a painterly background to showcase my stamped images. Faber-Castell Gelatos® are my current favorite go with me everywhere tool and this was a perfect occasion to do a little Cre8time experimentation with monoprinting on my AMAZING No-Gelatin Rubber Plate

**To view mixing and preparation of Amazing Mold Rubber and how I created my AMAZING No-Gelatin Rubber Plate CLICK HERE! To view a second video which is a test run on my faux gelatin plate... and my FIRST TRY at Gellin' – CLICK HERE.


Using an assortment of yellow, green and blue Gelatos®, I colored directly to my AMAZING No-Gelatin Rubber Plate. I added a few spritzes of water and then pressed a natural color cardstock onto the top, rubbed and pulled off the monoprint.


The yellow is pretty strong and still has some color left after the first print. I added a little more blue and green, spritzed again and repeated to create a half dozen prints with similar color... each with it's own painterly personality.


Here's what two of my collection of Gelatos®
monoprints looked like before stamping.


The completed tag comes to life after adding some stamped and inky goodness! I trimmed my papers to tag shape, added some VLVS! stamp images and added touches of color with Faber-Castell PITT Artist Pens applied like watercolors using a water brush. I added some shimmer the airstream using my Gelly Stardust Hologram pen and topped off with some colorful ribbons and fibers. It's total summer fun!!!


Now it's time for project cleanup {boo-hoo}. Despite my best efforts, the Gelatos stained my AMAZING No-Gelatin Rubber Plate and wouldn't wash off very easily {they do have a bit of a waxy composition to them}. No worries! I have a crafty fix-it... pour resin on it and peel it off! I rubbed a sheet of blank cardstock over to make sure it was completely DRY and FREE of water/moisture before proceeding with resin.

My apologies I didn't get a photo of the resin mixing/pouring step {CLICK HERE for mixing/preparation of Amazing Casting Resin}. I prepared a small batch of Amazing Casting Resin and poured directly on top of Gelatos – spreading around with stir stick evenly to edges. For added stability and to help speed up curing of thin layer of Amazing Casting Resin, I gently pressed a crumpled sheet of deli paper into the liquid resin – careful not to press so hard to squeeze the resin out off the edges of the rubber plate. Just enough to get a bond of resin to paper.


When cured after about 20 minutes, I gently peeled the resin back from the rubber plate which completely removes all of the Gelatos®. It's so AMAZING!


Side-by-side the clean rubber plate and my paper-backed resin pull.


My plate is clean now and I also have a wonderful painted resin base for other mixed-media arting on another day.

I hope you find some time to have some creative play today and I look forward to seeing what you create. Happy Sunday! Sb :)

Thursday, May 1, 2014

Springtime is #Cre8time at HOME with Unruly Paper Arts May Reader's Art Quest


Hello Everyone... welcome to May! It's a new month and I'm happy to share a brand new upcycled mixed media project for the new Reader's Art Quest at Unruly Paper Arts. This month's challenge theme is "HOME" and you know how I love a good challenge!

I really enjoyed created something new - and at the same time giving a proper home for bits of this and that on my craft room table. It's springtime and I've been doing some much needed sorting and purging of my studio - along with finishing countless UFOs {unfinished objects} which are cluttering my desk... and MIND!


Following the Unruly Paper Arts Reader's Art Quest "Home" Inspiration photo and color palette, I set out to collect some items for creating. I have a few Amazing Casting Resin house pieces created from an embroidery kit frame molded using Amazing Mold Putty. I had one of these in a baggy with some scraps of Bo-Bunny papers, embellishments and ribbon - such a good starting point. This month's issue is "Fabric Frenzy" so I also added some muslin to the mix.


Then my "ONE TOUCH RULE" started taking effect. In gathering other supplies - I happened upon this mini kraft tote that had the label removed. Hmmm! Perhaps this will make a lovely base for a mixed media piece.


I selected this section of muslin fabric monoprinted using my Amazing No-Gelatin Rubber Plate {my DIY version of a gellie plate}. When I'm playing and monoprinting I use extra papers, fabric swatches and other items to pick-up second/third print pulls. For this pattern, I had been impressing large bubble wrap into the paint to make texture and it will make a nice sky background for my "home" scene.


My selection of vintage lace, ribbon and knotted twine in the color palette. I might cut up this large loopy lace for clouds... we'll see how things progress.


I set off to work preparing my kraft tote to be a base for hanging art. I cut off the paper handles {which will be reused in another crafty project} and glued the sides and flap and a piece of cardstock inside to make a sturdy flat piece.


I try to be conscious in the beginning of how I'm going to display/house a creation. One thing I love using for upcycled projects is soda can pulls! With a decorative brad - they make a quick and easy hanger.


The whole is poked through the base bag and buried into the glued layers of my finished project. This is ready to hang!


View from the back with tab/hanger bent slightly for easy hanging on a pushpin.


I built up the layers on the front with a couple layered pieces of white cardstock with torn edges - slightly larger than my base bag.


Using a pale yellow acrylic paint I brushed some color around the border. I trimmed the monoprinted muslin to size and frayed the edges. I adhered another piece of white cardstock to the back of the fabric using a Miracle Sheet {sheets of double sided adhesive that can be cut to size} for stability and added strength. Before adhering - I added a little painterly details...


Faber-Castell Gelatos are my new obsession that are now a staple in my daily travel tote! I've found storage boxes that are the perfect size and I have two bins so far. I've even added color names to each of them with my P-Touch labeler {yes I have a little creative OCD}!


Using my new Nathalie Kalbach Stampendous stamps, and a variety of Faber Castell Gelatos - I applied color directly to the faux burlap stamp to simulate grass and pops of pink for flowers.


I spritzed the Gelatos with water and then pressed onto the fabric. I didn't use an acrylic block to ensure I pressed into the texture and cracks of the painted fabric. I let this dry completely and then peel the backing off the Miracle Sheet and adhere to my prepared base.


I stamped across the bottom edge of the fabric and I filled in the remaining 1/2" at the bottom using a water brush picking up color from the green gelatos used. I love the subtle watercolor effect and it complements the monoprinted bubble wrap background. I have a dark green pom-pom trim that I will add for additional dimension and as a horizon line for my scene. This will be layered upon a lace ribbon colored with green Gelatos blended with water to match my stamped garden. I placed my assembled house complete with resin domino door and mini bicycle onto the scene and filled in a faux fence with the knotted twine and cut apart section of May Arts wooded trim. I painted vertical stripes in with waterbrush and chocolate gelato to finish the fence... creating a nice contrast of dimension and color.


The base Bo-Bunny Paper that I trimmed to fit behind my Amazing Casting Resin house was a bit bright and blue. So I gently applied a gesso wash over it to mute the colors down, then applied a mix of pinks and yellow gelatos to marry this to the Unruly Paper Arts May Reader's Art Quest "Home" color palette challenge.


I also smudged some yellow and pink gelatos to the doily I was placing behind this house. I had already adhered these together, so mini Post-Its make masking quick and easy. I placed the Bo-Bunny flower as a "sun". As I started assembling the pieces to the fabric background, I decided to remove the flower. I wanted to give the scene balance and place the sun in front of some sparkly rays.


Using Post-its - I quickly masked around my white paper border to prepare for some misting. Then using T!m Holtz "RAYS" Stampers Anonymous layering stencil and Tattered Angels Glimmer Mist, I created some shimmering yellow rays for my floral sun.


This did the trick and gives balance to the house on the opposite side of my piece to complete the sky scene. Now it's time for those little finishing touches... a bronze colored dragonfly covers the gluedot residue I couldn't remove from the doily; and some Sakura of America Gelly Stardust Holgram hand-drawn details.


With addition of some adhesive gems for window on an Amazing Casting Resin domino door; and flower shapes and round gems to fill in this blossoming garden... this scene is complete! This scene just makes me smile.


I hope you enjoyed my project and that you are inspired to join us in this month's Reader's Art Quest. My "thoughtful abstractions" column for the May "Fabric Frenzy" issue of Unruly Paper Arts will be coming up on the 21st... you certainly want to SAVE the DATE. I would love to see what you create. Please leave me a comment with your link.

Happy Creating! :) Sb