Translate

**If you have previously subscribed to received my posts via feedburner or Bloglovin, those are inactive now. To receive my creative updates, please subscribe in the right sidebar.**
Showing posts with label frames. Show all posts

Thursday, November 16, 2017

Deck the #Cre8time Halls with ColoriQue...


Hello Friends! Are you ready for some holiday inspiration?! Today I am part of a Designer Crafts Connection Bloghop featuring ColorBox® ColoriQue paints and U-Paint metal Blanks... and we have been challenged to create holiday decor! 


For this challenge I was provided two U-Paint Acanthus Leaf Ornaments (6″ W x 1 1/4″ H) along with three colors of ColorBox® ColoriQue: Moss Landing, Ruby Slippers, and Verdigris.


ColoriQue brings artistic color to metal and more!

ColoriQue is an ink based product developed by Clearsnap® and jewelry artist Lisa Marie Jimenez. Colors are blendable and can be layered for unique effects. Easily applies to a variety of metals, working on both raw and plated. Not just for metal, ColoriQue can also be used on clay, ceramic, glass, wood and leather. Dries quickly and is studio safe. 


I love recycling and repurposing items and I have a box of "alterables" containing items from around the house and thrift store finds. I have grabbed some ribbon, Glue Dots® and holiday floral picks from my stash to accompany the U-Paint Leaf Ornament embellishments and ColoriQue paints. 


For today's project I selected a three-panel curved frame that was a thrift store score for 75 cents. With some paint, embellishments and some photos... I can transform this into some lovely holiday decor that will make a perfect keepsake gift too! I remove the backing and glass and give frame a rub-down with a damp towel to clean off any dust and dirt to prepare for it's transformation.


Using a cosmetic sponge, I daub on "Ruby Slippers" ColoriQue. I am more interested in quick coverage and getting color into all the nooks and crannies, and the sponge does the job and gives a streak-free finish.


The ColoriQue goes on bright with a slight shimmer that is a bit translucent. As the color dries, the red color dulls back. If the base of this frame was white instead of black, I would have a totally different look -- very bright. I don't know if this frame is wood or particle-pressed, but I love how with only one layer of color, it now looks like mahoghany.


When dry the "Ruby Slippers" ColoriQue looks like a deep cranberry over the matte black wood frame. I sponge along, daubing on the color, completely covering all edges. I wait a few minutes to let layer dry before applying a second coat to build up richness of color. I didn't have to wait long. I was painting in sections, so where I began was dry by the time I got all the way around the frame.


Now to paint the U-Paint Acanthus Leaf Ornaments. Using a cosmetic sponge I applied a layer of "Ruby Slippers" ColoriQue, then followed with "Verdigris", and finally with the "Moss Landing".


I repeated each color a second time, this time just on the high points -- building up depth and interest of colors in the intricate details.


I went back and lightly rubbed the high points with a little more "Ruby Slippers" to marry the color with the matching painted frame. I love how the color and sheen of the ColoriQue has quickly and easily transformed both of these items... and it dries in a snap! 


I gently bent the painted Leaf Ornament back and forth in the center to break apart into two sections. I trimmed away one sharp edge with heavy duty scissors. I'll be covering up these with some faux floral items, so I'm not concerned about the edges matching.


The detail is equally beautiful on both sides of the U-Paint Leaf Ornament. I took an extra step of adding color to the largest portion of the backside as portions will be overhanging the frame edges.


After bending each piece slightly to match arch of the frame, I used 3/16" multi-use Glue Dots® squares to attach in place flanking the outer squares and leaving space between to add some faux foilage.


I finished off the center with sections of holiday floral picks - reassembling bits and pieces to make a garland-like swag and join the center of the flanked painted Leaf Ornaments

So Merry and Bright!


This 75 cent thrift store frame has been transformed into a beautiful holiday display piece. I'm waiting on some new photos of my toddler nephews to replace Santa wrapping paper and this keepsake will be on it's merry way to my Grandmother for Christmas.

+ + + + + + + + + + + +

For more information on ColoriQue by Lisa Marie Jiminez or to purchase products please visit website HERE.

+ + + + + + + + + + + +

Thanks so much for visiting! CLICK HERE to pop over to the beginning of the Designer Crafts Connection "ColoriQue" Bloghop and enjoy more holiday decor inspiration.   Sb :)

** This is a sponsored post. Clearsnap® has provided Lisa Marie Jimenez ColoriQue paints, and U-Paint provided the metal blanks for use in this project in exchange for my creative ideas, views and opinions. My ideas and opinions are my own.

Friday, May 8, 2015

Say a SPECIAL Thanks for National Teacher's Day...


Greetings Friends! In a couple weeks school will be ending for summer break and I wanted to make a special gift for the teacher. If you search Pinterest there is a plethora of ideas - it's quite overwhelming. I found loads of fun ideas that I can do with stuff I have on hand that sent me off to the studio to rummage through my scrapbooking stash.


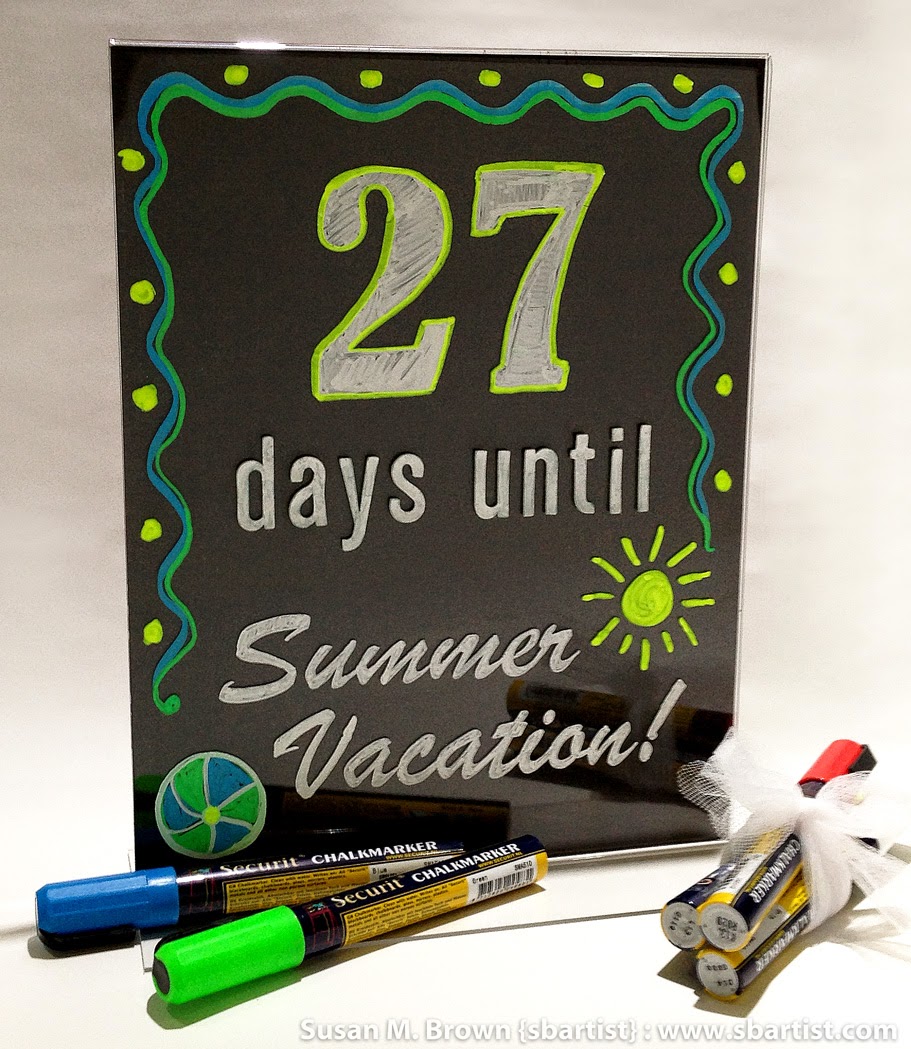
I'm sharing a quick and easy handmade Teacher appreciation gift with items you have in your craft stash, a Deflecto Craft Frame and Wet-Erase Markers. This project can be done in about an hour, the kids can even help, and the best part... it's re-usable and interactive, too!

For more information on the Deflecto line of products,


This month the Deflecto USA Ambassador Design Team is sharing a variety of projects Teacher's as well as for Mom's, Dad's and Grads using Deflecto Craft products so you'll want to CLICK HERE to jump over to the Deflecto Craft Facebook Page or Deflecto on Pinterest to see more of the teams creations.


For this project I used the 8 1/2" x 11" Deflecto Double Sided Portrait Frame Item #879201. A heavy-duty, two-sided clear frame featuring durable acrylic - this holder is tough enough to withstand frequent use... perfect for a busy teacher. It couldn't be easier to fill and decorate. I trimmed a black sheet double-sided scrapbooking paper to size and layered a large heart doily over the top.


My penmanship is not what it used to be so I did a little creative cheating - but it was more for being a SUPER TIME SAVER! I picked some fun fonts and printed out my text on the computer sized to fit the frame. I placed the printout in the frame and traced around the letters and colored them in using the non-smearing, fast-drying Deflecto Wet-Erase Markers. I have to admit this totally looks store bought.

I completed one side and let it dry completely before penning the other side. I recommend working upside-down and from left to right - it seems alien to do it this way, but it keeps your hand out of the wet chalk ink as you work.


The only other craft item I used was some American Crafts "Thickers" letter stickers applied to the outside of the frame to spell out "days until". This adds a little dimension and I used up a little something I had on hand. The stickers can be easily removed later if desired.


The great thing about the Deflecto Wet-Erase Markers is that with a quick wipe with a damp cloth, this can be changed and re-used over and over again. The black paper simulates a blackboard and the frame can be changed out to hold photos, calendar or other signage.


The finishing touch in blue - a personalized message.


With a handmade card and tied up bundle of the Wet-Erase Markers... this gift is ready for teacher. Wouldn't your child's teacher love to receive a thoughtful gift like this?

How would you create with Deflecto Craft Frames?

Thanks for visiting! Please join me each month when the Deflecto USA Ambassador Design Team will has a new Deflecto product challenge to debut.  :) Sb

For more information on the Deflecto line of products,

Wednesday, September 3, 2014

Preserving Memories like a ROCK STAR for the September Designer Crafts Connection Bloghop


Welcome! It's a new month... September which marks a new monthly Designer Crafts Connection Bloghop. This month's theme is all about "Preserving Memories". I'll admit I don't do a whole lot of traditional scrapbooking. Though from time to time, I do make little commemorative mini books or shadowboxes to document a special occasion or vacation... and today's make is a labor of L-O-V-E!!!


In July we took a weekend getaway to go see my favorite band on tour in North Carolina {I think the photos speak for themselves}. They did make a stop in South Florida - but on a Tuesday night... we are too old to stay up that late on a school work nite LOL! So we took a little getaway to have much needed downtime and adult fun. I printed out a bunch of photos on my Zink® hAppy™ right from my phone {and hubs also} and now I've got a bunch of adhesive back photos ready to go!


We are pretty much homebodies and don't to too much going out and stuff {thanks to technology and onDemand} - but we do go all out for a great concert. Our ticket package included a meet and greet and photo with the band, and an autographed photo to take with us. If you are a fan of Def Leppard - its common knowledge that they don't do a whole lot of signings because of the frauds being peddled on eBay. When I received this Deflecto 12 x 12 Craft Frame, I knew this would be perfect to showcase one of these signed pix {and the other I will have traditionally matted/framed for my hubs office at work}. The modern frame goes perfectly with my modern furnishings and gives me the ability to protect my keepsake and add more layers and dimension to the outside, too!


I got started matting and layering with glue dots my photo, black and silver cardstock and the blue Rowlux and gently slid into the frame. This looks pretty great as is... but there's more! With my photos {and some taken by a super talented Rock Star Wife}, some ephemera from the trip and some supplies on hand I have transformed this into an interactive display.

Supplies used: Deflecto 12x12 Craft Frame and three Deflecto Mini Craft Frames; 12x12 sheet of Dark Blue Sea Glass patterned Rowlux Illusion Film; Zink® hAppy™ photo printer; coordinating cardstock for matting; paper trimmer; Grafix Double Tack Mounting Film, silver shiny metallic school folder; recycled imaging film acetate {black}; Cuttlebug; Darice Filmstrip 12" Embossing Folder; Autographed photo and ephemera from vacation; washi tape; chalk inks; Glue Dots and Glue Lines adhesive products; and scissors.


The photo had a nice 1/4" white border so I accented with super skinny mattes in black and silver to balance with the signatures. I centered and left margins equal on the three sides and more on the bottom leaving space for all my extras.

I don't know why I only have one postcard from this particular trip - I usually buy more. I love to pick up postcards when I visit somewhere for a short visit and I don't have a lot of time to take my own photos. Anyway I've improvised to make a postcard accordion book. I love making little mini books and the front/back covers are actual postcards. I join cut sections of cardstock together to make it as long as needed {these were approximately 4 x 12 folded in half}.


For this project I needed a little GLAM and shine so I cut up a shiny metallic school folder pieced together with sections of double-sided adhesive sheets. I reinforced the folds with washi tape and rubbed the white edges with blue chalk ink. Now I have a place to put all those mini photos I printed! I folded over and mounted the back panel to one of the mini Deflecto Craft Frames which I will mount to the larger frame. I will be able to remove if needed by just sliding it off the frame and there's another place to add a photo, too.


Here's the opening spread a collage of loads of pix and the real guitar picks I scored from being in the third row. Thanks to Gene Simmons for flicking one straight at my head otherwise I wouldn't have seen it coming - LOL!


I have some black acetate that is recycled light exposed film from my imagesetter at work. I cut some to size and embossed with this fun 12" Darice filmstrip embossing folder to mount some of the mini photos on. My project has seemingly taken on a life of it's own - but since I don't have to put adhesive on my photos... I'm so excited to continue!


After cropping and mounting photos to the faux film, I bent and mounted to one of the mini Deflecto Craft Frames with a couple strategically placed super strength Glue Lines.


I mounted the smallest Deflecto Craft Frame upside down to the backside as a hook to suspend my meet and greet pass lanyards... again Glue Dots to the rescue!


I am so happy at how this turned out and that it's bright and colorful - the Rowlux Illusion Film makes everything "POP". This will be the centerpiece our shared computer desk in my studio where I have an assortment of framed photos from other trips and adventures {that might also be needing a Cre8time makeover now}.

Thanks for visiting. Please drop by on Sunday, September 7th as the Designer Crafts Connection get creative with buttons, felt and glue for the "Kunin/Beacon/Buttons Galore" Bloghop - you don't want to miss it! Sb :)

Continue on the Designer Crafts Connection "Preserving Memories" Bloghop by selecting hop back/forward on the logo below.

Monday, August 25, 2014

Framing it Up with the Deflecto Craft Line
of Acrylic Frames


Happy Monday! Today is my first offical posting as part of the Deflecto USA Ambassador Design TeamI'm so excited to be part of this team and have this opportunity to get creatively organized! For more information on the Deflecto line of products, please visit: http://www.deflecto.com/craft/


Today we "Frame it Up!" The entire Deflecto USA Ambassador Design Team is sharing a variety of creative and imaginative uses for the Deflecto line of acrylic frames... you probably even already own some of them. 


I received a generous assortment of Deflecto acrylic frames in a variety of sizes and shapes - some clear and some with colored borders. Today I am sharing what I have done with a few of these. Keep a lookout for upcoming projects where I will put the rest of these beautiful, crystal clear plexi frames to work in my creative space and projects.


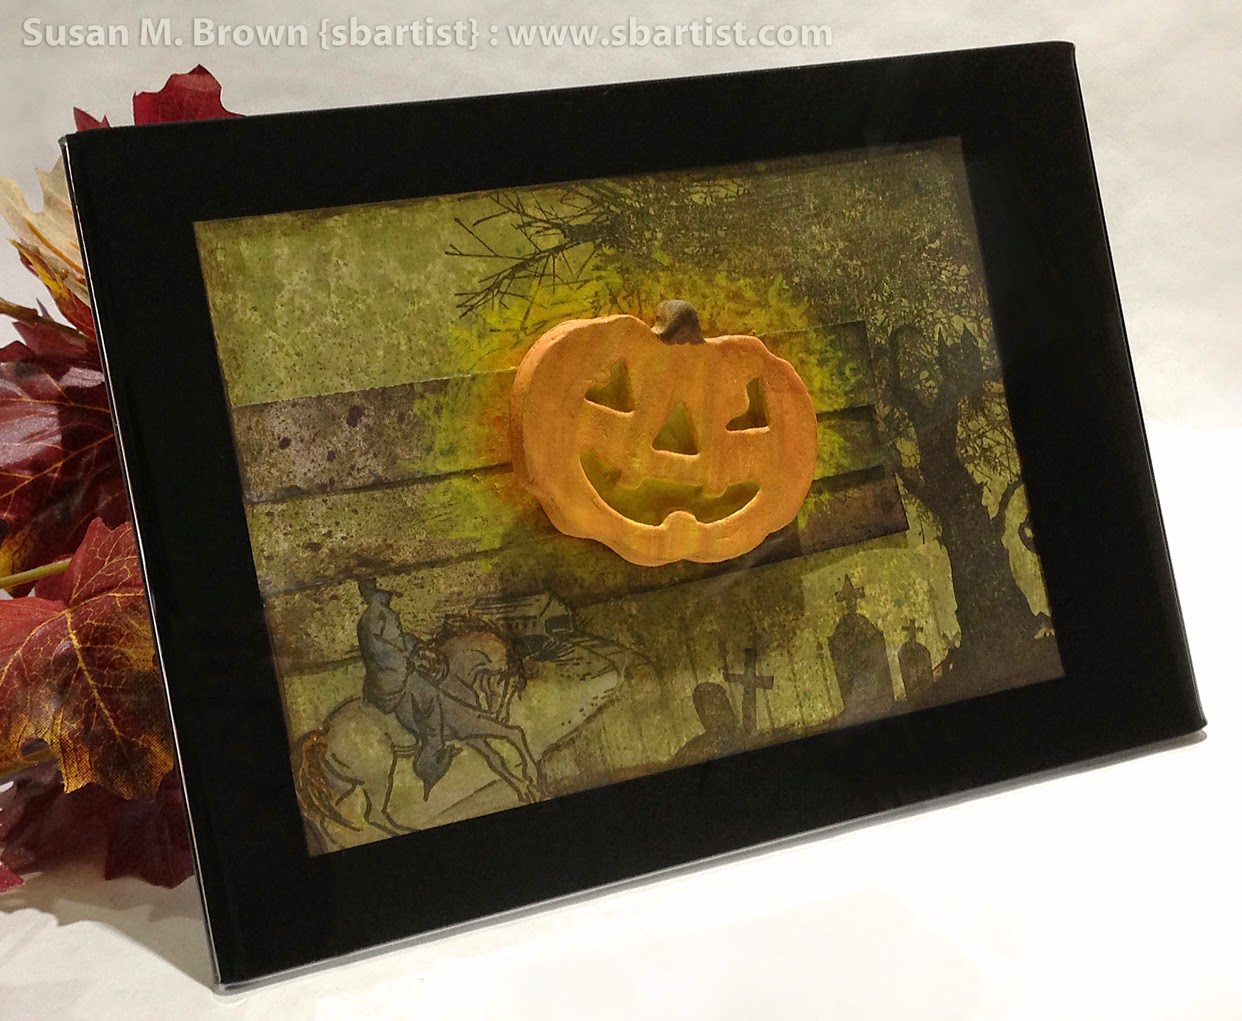
One thing that is great about these frames is that they are self-standing. You can use them vertically, as they are labeled and displayed... or use them horizontally. So I selected the black 5x7 Deflecto Craft Frame which has a built-in black opaque framed border to make a permanent home for one of my Halloween stamped creations.

I don't have the time or space to make a plethora of shadow boxes to house/display my creations, but I most certainly have space for a couple of modern, sleek frames that I can change out for each holiday... and that's what I've done here.


Here's a view from the backside. The acrylic wraps nicely around the back to give a nice secure fit to the contents. I gently pulled out the insert, cut my creation to size and gently inserted into the frame. My piece has two and three layers of paper in places and it fit nicely. I made sure to spray my oil pastel painted background art with a sealant before placing into the frame so that it won't transfer/smear as I slide it into the frame.


I had a molded/cast Creative Paperclay Pumpking mounted to the front of this piece on an Action Wobbler {a plastic springy gadget which makes items wobbly} that I gently removed and remounted with removable adhesive to the exterior of the frame.


My stamped headless horseman scene complete with a flying, wibbly-wobbling pumpkin head is perfectly displayed. To see how I created this halloween art please click here.


I receive three itty bitty clear acrylic frames and I have been putting these to a variety of uses. Albeit many are more utilitarian - but handy timesavers indeed! I LOVE these and they are so stinkin' cute!!!

At my craft show, they held little price signs and doubled as stands to lean items up against to stand vertical. These are perfect size for wallet size photos, ATCs {artist trading cards} or personalized place card settings. I can go on and on...


One creative use is that they are extremely helpful in photographing my creations. I've tried several different ways to stand up a card, and they always are drooping or a corner sags or it's perspective is skewed. These little frames are a LIFESAVER. I plan on getting more of these handy little guys.


One way is that you can just lean the card against the frame. Depending on how it's embellished this works perfect and I can angle my camera to square it up and press CLICK for a perfect shot {what a timesaver in photoshop, too}.


This is standing against the frame and you can see the shadows cast from the embellishments are a bit harsh... so I will try something else.


So I layed the frame down on it's backside - so it's sort of upside down with a low-profiling slope.


I placed my card upon the slope of the frame, set up the camera shot... and this time it is perfect!


Here's another view for my next card ready for proper photography.


Another nearly perfect photo. The top corners curl in slightly, but this is better than the distortion of putting a dimensional card on the scanner.

Now for the Pièce de résistance!


Stands for my altered Altoid tin. I normally plan some type of hanging/displaying into the creation process... but for this recycled project - by the time I realized it, I had already mounted everything inside. So in a drawer it sets. EUREKA!!! These itty-bitty little Deflecto Craft frames have brought my art back to the light of day! Using a couple glue dots, I adhered the frames to the back. It would hold with just the one, but the second helps keep it balanced and it open just the way I like it.


One added bonus of the larger frames... they make excellent light bouncing devices! I put a white paper in the frame and angled it to bounce some light into my altered box mounted upon the mini frames. This discovery is simply PERFECTION!


The bottoms of the frames are completely concealed and barely peek out from the bottom - more importantly I've had no drilling or glueing here. Within minutes I am again enjoying my stamped scene... a panda munching peacefully in a whimsical garden {please click here to view how I created this}.

What are you inspired to create
using the Deflecto Line of Craft Frames?

Thanks for visiting! Please join me the LAST MONDAY of each month when the Deflecto USA Ambassador Design Team will have a new Deflecto product challenge to debut.
 :) Sb

For more information on the Deflecto line of products,