Translate

**If you have previously subscribed to received my posts via feedburner or Bloglovin, those are inactive now. To receive my creative updates, please subscribe in the right sidebar.**
Showing posts with label ATC. Show all posts

Monday, October 23, 2023

Small things Bright and Beautiful... StencilGirl® Zine Challenge


Hello friends! It's a new season and though it's been awhile... I'm still creating! This has been a year of putting family and home first, and getting back to painting. I have lots to catch up on in the coming days and weeks.

Today I am excited to share the "StencilGirl® Zine Challenge"... a new collaboration project in which Tina Walker posed the challenge to create a one-sheet ZINE using StencilGirl® Stencils. These collab projects are fun and really stretch my creative muscles!!

For this challenge I used things that end up in my purse and pockets... the tags with quotes from my daily cup of tea. My ZINE is fashioned from a recycled ledger paper folded to ATC size (2 1/2" x 3 1/2"), which is the perfect size and scale to properly showcase these tags. My ZINE of "Wise Words from the Tea Leaves" is made using my stash of StencilGirl® ATC stencils.


This is the inspiration we were provided for this Zine Challenge. With a simple sheet of letter size paper folded following the illustration, a mini book is created. Size it up or down, this format can be arted up in a zillion ways!

I think this will be really interesting out of a large sheet of painted up watercolor paper, but for this challenge I am working small so I can use some of my stash of StencilGirl® ATC stencils that I've never used. I love to make "Artist Trading Cards" (ATCs) for trading with artsy friends. This small art is sized at 2 1/2" x 3 1/2" and making a book using this sizing proved to be quite fun!

I let the muse rule here and she always goes for the "one touch rule"... using things that I have picked up on search for other things. My base is a sheet of ledger paper on the table leftover from an altered composition book project. An interesting choice – OK why not?!

The paper is slightly larger than letter size. I want my end result to yield  ATC size pages so I do a few measurements and tear edges down to size. I want to stencil black on this greenish paper, though it is a bit thin. I'm concerned about bleed-through on this old paper. The way the paper folds to create the zine I won't be utilizing the back of sheet when folded down. I applied a light coat of black gesso to the back with an old hotel key card. Sorry no photo, I spilled my black gesso and had a mopup painting emergency. I'm happy to report that no paint went to waste! LOL!

With paper dry and reinforced, I followed the zine folding steps and went over folds with a bone folder to make them nice and sharp. Since my outer edges were torn, I also tore the center where the diagram says to cut. Fold down a quick and easy book!

Follow along as I share how I built up the layers on this spread in my Zine...


Overall I stenciled with Vicky Boutin Gold stencil paste using StencilGirl® L763 -- ATC Mixup NASSER


Wow!!! I love the shine and contrast on the ledger paper. 


Next I pounce blue acrylic through this wonky squares pattern on StencilGirl® stencil L543 -- ATC MIxup 1


Now we're getting somewhere! 
Loving this but I'm about to go crazy...


Grabbing what is on the table, I used a cheap office store brand glue stick through the star pattern on StencilGirl® L657 -- ATC Mixup DUBE


I am using a fun and messy technique – a glue stick resist. First, I apply glue stick through stencil, let dry. Then I apply a layer of black acrylic over the top. While wet, gently wipe paint away in a circular fashion to remove the glue stick with the excess paint to reveal the lovely layers below. 


This glue stick didn't mask everything like I had expected but the effect is pretty exciting! I go back with some pens and markers to complete and add some more stars. Next time I will get out my "art project" assigned glue stick, not the cheap gooey one for sealing envelopes.


I attach the tag, finish the final details with scribbles and pens. This page is the perfect backdrop for this tea tag wisdom.

"BRIGHT and BEAUTIFUL"


Completed spread.


Detail of tea bag tag quote...
"The universe is withing you. Bright and beautiful."
An inspiration worthy of being a mantra.

I love the size and scale of my Zine and it fits nice in the pocket of my purse. I am enjoying making additional volumes of this to use more of my tea bag tag quotes. I have a whole baggie of them that need a home.


StencilGirl® Stencils Used :


+ + + + + + + + +

I hope you enjoyed this project. How would you create your own ZINE? CLICK HERE to jump over to see the other zines made for the "StencilGirl® Zine Challenge".

Thanks for dropping by! :) Sb

Wednesday, March 18, 2020

So Many Favorites - So Little Time... Designer Crafts Connection celebrates National Craft Month


Hello Friends! Its been a while since I've done some arting -- and since it's National Craft Month I'm joining the Designer Craft Connection to bring you some inspiration using our favorites. It's been a whirlwind since attending Creativation in January and when I have time to play I like to get back to something that got me started in papercrafting... making ATCs {artist trading cards}. 


ATC's are small little masterpieces. One of my favorite ways to squeeze in some arting, try out some new products and using up scraps of this and that. Today I'm sharing this quick little project I made just for myself... an upcycled mini book that is a little bit steampunk and a little bit purple!


I love to create with recycled items and reinvent them by using up items items on my craft table. This project can be made in any colors or theme and is great for the kiddos, too!

This project began with this piece of distressed aluminum tape covered cardstock on my table. This tape is already self adhesive and is wonderful to use in creating steampunk projects and altering items with metal. I use it to make large sheets of distressed cardstock for use on all sorts of altered projects... and ATCs!


It's pretty easy to make a sheet of metal paper. You take a sheet of cardstock or recycled chipboard, then cut strips of the aluminum tape; adhering pieces in an overlapped fashion to cover the sheet. You can be as creative as you want doing this. Use a bone folder to burnish down and press out any air bubbles. Sand and distress surface as desired. Then you are ready to paint, emboss and stamp for a multitude of uses.

My sheet above has a pink smudgy coloring because my roll of aluminum tape happened to have red words printed on it and I removed by rubbing with nail polish remover. I liked the look of it with some red, so I didn't rub it all completely clean.


I have loads of recycled toilet paper tubes set aside for projects. The brand I get is now glue-less to the roll – which makes it that much easier to prep for crafty goodness.


I press the tubes flat and make a nice folded edge with my bone folder.


Using some Ranger Distress Paints, I quickly add some distressing and color to the edges. I just love the dauber tops on the bottles -- they make painting quick and easy. This can be done with chalk inks or regular ink pads also.


I went around the edges of seven (7) flattened tubes with Seedless Preserves and Tarnished Brass Ranger Distress Paints. A touch of color adds a little "POP" of color to the kraft color of the recycled tubes that will be the structure of my ATC holder.


I stack all of the tubes together and one by one added a line of tacky glue down the center and press another on top. You can create these type of pockets in a variety of shapes/sizes with envelopes or paper bags also. These tubes are the perfect size and shape to hold artist trading cards {ATCs}.

I align the tubes and clamp the stack together with some binder clips to dry. When dry this will be a sturdy pocket honeycomb booklet.


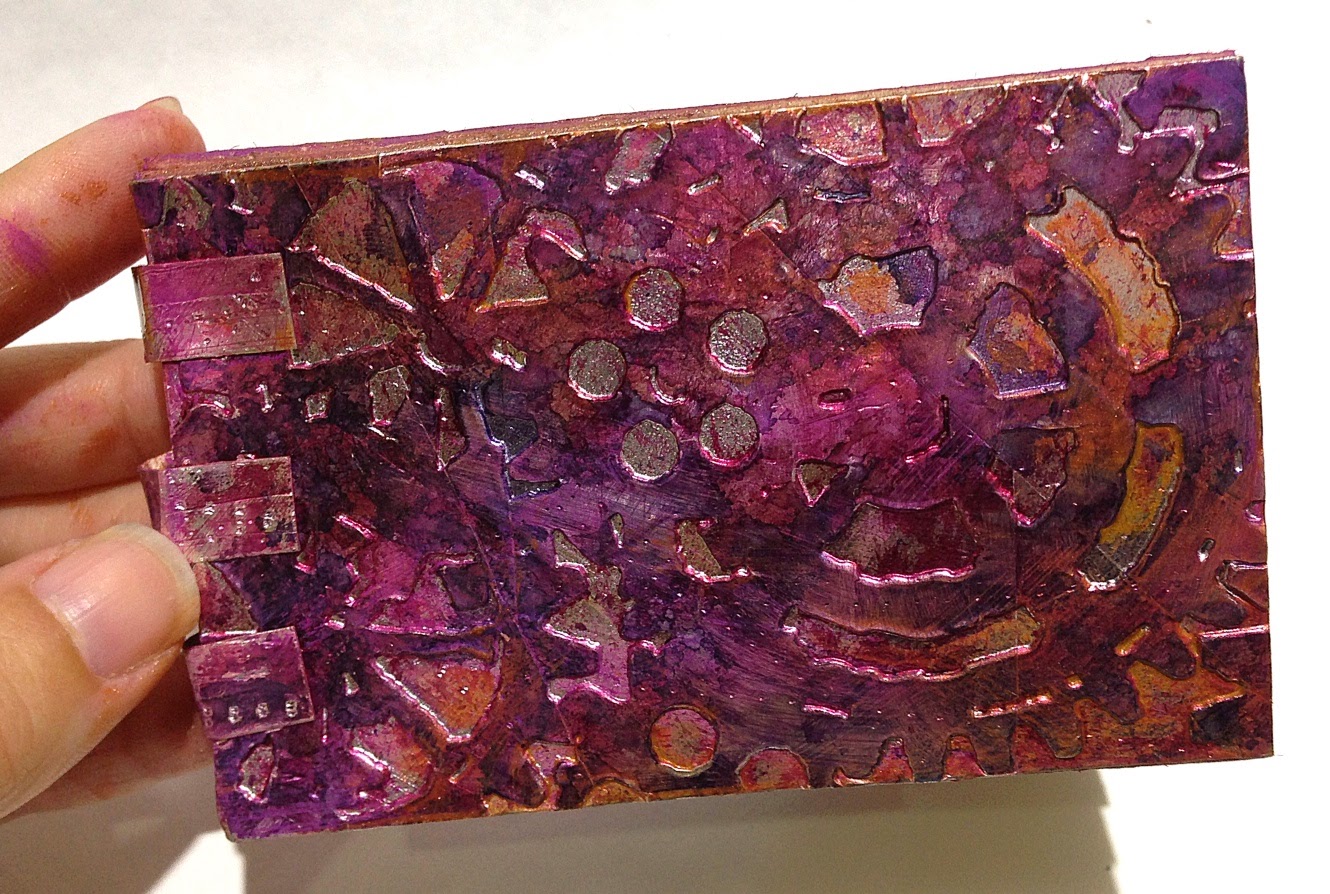
I use one of my favorite embossing folders in my Cuttlebug machine and dab with a variety of reds and purple Ranger Adirondack Alcohol Inks to add color and depth to my distressed aluminum cardstock.

I cut the sheet to size making a front and back covers for my mini honeycomb ATC cardholder. I had a thin strip leftover of the metal paper, so I cut into thirds and used it to add some detail to the spine area {nothing goes to waste}.


I add some embellishments -- a swatch of plum lace which looks lovely layered on top of the metal embossed cover, then some scraps of ribbons, fibers, lace, buttons, bling, found objects and goodies from my favorite stash of metal hardware. I inked some pale pink ribbon trim to match the color palette and altered a strand of pearls with alcohol inks to match too! Voila!

"STEAMPUNK" ATC Traveller


I hope this fun upcycled project inspires you to create. How you create your own? For more inspiration CLICK HERE to jump over to the beginning of the National Craft Month Foil Bloghop with the Designer Crafts Connection!


Thanks so much for visiting! Sb :)


Thursday, October 26, 2017

Mail Art Friends reap #Cre8time Halloween Goodness


Hello everyone! I have a Halloween make to share today-- one that I was inspired to create. I haven't made any jewelry lately so I was excited and inspired by the theme and jumped at the chance to make some new Witch-worthy jewels for a "Witch's Cupboard" charm swap with some art friends hosted by Michelle Frae Cummings

I knew immediately that I wanted to create some glowing apple charms. I have an old apple pin that I found at a thrift store in my "TO MOLD" box that is a nice size and would be a nice pendant or charm made in resin... and with Halloween just around the corner, perhaps a POISON apple??!


I would normally break out the Amazing Mold Putty, but with the high gloss enameled surface and the fact that I wanted to make multiples -- I decided on using Amazing Remelt to create molds for my Cre8time Witchcraft!


Amazing Remelt is a Non Toxic, one-part reusable mold making material for room temperature or low exotherm materials. Amazing Remelt softens at 120˚F and becomes liquid at 135˚-140˚F. It can be remelted and reused to make new molds time and time again. This is ideal for making molds for smaller items such as jewelry, embellishments, and chocolate molds. YES, this stuff is FOOD-SAFE and it works great with chocolate and fondant!!


Before making a mold I need to add some tape to the backside so that the molding material won't flow through the hole where the stem touches the apple. I burnish the tape down really good with a bone folder to ensure good adhesion.


A couple criss-crossed recycled stir-sticks through the pin back will help suspend the original over a small silicone bowl that I will be using as a mold box.


Amazing Remelt is easy-to-use but you need to be patient. Amazing Remelt requires melting... the best way is in the microwave LOW and SLOW {CLICK HERE to view preparation}. It can be melted in the container it comes in, but for molding small items, I prefer using this cup fashioned with Amazing Mold Putty which I formed around the outside of a shot glass. I like this cup because it can be baked up to 375º F, is easier to pour from, and it helps keep the melted material from cooling off too fast.


I place the mounted apple over the top of a small silicone bowl then pour the melted Amazing Remelt over the top, completely covering surface of item. I stop for a brief moment after first coating, then repeat with a second layer. The overpour is collected in silicone bowl below which will be the mold box in the following steps.


After cooling off for a couple minutes, the Amazing Remelt hardens, and I have a skin layer which helps prevent air bubbles from getting trapped on surface of original.


I fill the bowl and flip the mounted pin with remelt skin layer over, then place face down into the liquid Amazing Remelt. After leveling it on the bowl, add more remelt to fill up to edge of suspended apple pin. Mold making doesn't always look pretty... it just needs to WORK! I set this in the refrigerator for about a 1/2 hour to cool and harden.


My little apple mold is hardened and ready to pop out of the bowl and demold.


I love how Amazing Remelt gives you the detail quality of Amazing Mold Rubber – and it's reuseable {you know how I love GREENcrafting}!!


I can make my charms, then melt the molds down and mold something else later. I don't have to store umpteen apple molds for eternity. I plan to make a few extra molds for FOOD USE ONLY to make some poison apple Halloween treats with chocolate melts. YES, this molding product is foodsafe and is perfect for chocolate and fondant.


With molds ready, it's time to fill with Amazing Clear Cast Resin colored with Alumilite Fluorescent Green Dye and Alumilite Phosphorescent Powder {an additive that glows in the dark}. CLICK HERE to view mixing and preparation.


I mix up the resin and set aside to rest for about 15-20 minutes so the resin can COOL and DEGAS {letting the air bubbles escape}.


 The addition of phosphorescent powder makes magic in the dark.


Most of my time making these charms was spent on mold preparation. I made 16 molds which took me a a couple hours one morning plus a whole entire day. Making one mold takes about a 1/2 an hour... the time consuming part is melting the Amazing Remelt slowly and then waiting for it to harden to demold the original. 

Before pouring resin, I gently cut a slice in each mold where I suspend a headpin with two glass beads {these will be embedded in the resin}. I will use this to form a loop at the top to affix beads and a jump ring for hanging on a chain. With a tiny brush, I added a bit of color to the leaf and stem using Alumidust.


I gently pour resin, guiding it with a stir stick to fill each mold. I cover the tray and set aside to cure overnight.


VOILA... my apples are cured and are ready to embellish! I decided to use a glass leaf bead, so I bent and broke off the leaf of each resin apple. I gave each a light and quick sanding around edges with an emory board, then I finished each charm with 2 wire-wrapped beaded danglies placed onto the embedded headpin. I close headpin off and form a loop for a jumpring... these gorgeous glowing apples are complete.


How charming is the glowing green apple?!


After making the green apples... I couldn't stop there! I took this idea further by altering the original, then remolding/casting to make a glowing resin POISON apple! This right is a one-of-a-kind, but if anyone would love a custom pendant, I will entertain custom orders for with drips in your favorite color.

Here is mine with an accompanying ATC {artist trading card} as part of swap rules.


"Dip the apple in the brew,
let the Sleeping Death seep through..."


Here are the ghoulishly glam charms made by all the players. I'm going to have fun dressing these up into finished pieces and having SpOoKy jewels to wear for the coming weeks up to Halloween. CLICK on NAME to pop over to a tutorial {if available}.


Kathleen Sites


Ashani


P.J. Waldrop


Carol Hoffman

Thank you ladies for participating in this swap and for your beautiful work and craftsmanship. I look forward to joining in another for the holidays {ideas for themes are being tossed about}. 

I may have one or two Halloween makes up my sleeve before month's end. Thanks for dropping by and Happy Creating! :)  Sb