Translate

**If you have previously subscribed to received my posts via feedburner or Bloglovin, those are inactive now. To receive my creative updates, please subscribe in the right sidebar.**
Showing posts with label handmade. Show all posts

Sunday, November 30, 2025

Festive Paper House Decor... 12 Days of Christmas Ornaments Bloghop


Hello creative friends! Welcome to DAY FOUR of the 12 Days of Christmas Ornaments Bloghop. Pop over to Try-It, Like It for the details on all each days ornament tutorial. 
 
 
Today I am sharing how to create this adorable festive birdhouse ornament. This is a fun stash-busting project and can be done using what you have on hand. All you need is a few paper scraps, buttons or metal findings and ribbons & trims, this sweet house is ready to adorn the tree!

I was inspired by the red & white checks on this 1 1/2" wide wired burlap trim - it's perfect for the rooftop of my whimsical little bird house.

PLEASE NOTE: This was put together in a free-form fashion... like one of those recipes that you throw together using a handful of pantry staples. This project came together with ease and the size was determined by the size of my paper scraps & width of ribbon trim that I selected for the roof. No precise measuring! 

Let's get started!

To begin: from my stash I found and cut two matching strips of patterned paper. My paper has a distressed painted texture on both sides and I made width match the wired burlap trim I am using for the roof which is approximately 1 1/2" wide


Overlap the two strips together like a "plus sign", then glue together with white craft glue. Next cut a matching triangular peak to support roof from top and bottom of one strip. This overlapped section will be the base of house. When glue is dry, fold up the sides at edges of the base section. Punch a series of equally spaced holes along each edge. I used six – this may vary depending on your size paper. Keep in mind that an even number of holes are needed to complete stitched X shapes along each side.

 
Using a contrasting yarn, embroidery floss or baker's/burlap twine, stitch house walls together using a cross stitch "X" pattern and and knot off on the inside.


Completed house with all sides stitched – no glue necessary. 


I cut a section of a decorative wired burlap trim, folded in half, then folded edges over twice to add extra dimension. Any kind of ribbon or even decorative paper could be used. Cut a matching size section of patterned cardstock and fold in half. 


For extra stability, adhere the piece of scrap patterned cardstock using double-sided tape. For this step, I opt for a dry adhesive method as some glues may seep into and discolor ribbon. Please use your choice of adhesive based on your materials.


Create a hanger by tying a knot to form a loop with green burlap thread. Poke a small hole in center of roof with a pushpin and feed through keeping knot on the inside. To add extra detail, I strung on a bead cap. 


To create a base, I mount a red cardstock rectangle on the bottom that is slightly larger and added a thin natural burlap twine around the base. I nipped the tips off the corner edges with scissors.

To add a roof overhang, I cut and adhere a piece of red cardstock below that is slightly wider on each size under burlap roof piece. To finish: I glue the roof assembly onto the house structure using white craft glue and set aside to dry.


The finishing touches are a keyhole brad embellishment glued to the front of the house and a beautiful tied bow made of burlap ribbon adhered with a heavy-duty glue-dot. This ornament is so adorable! As you can see it can fit in my hand. Fully embellished this house is about 3 1/2" tall and 2 1/2" wide.


This ornament comes together easily using a minimal amount of supplies. Grab up all the little bits and bobs and make a whole bunch in different colors and sizes! These will be my handmade ornament gifts for family this year.
 
I invite you to join me and subscribe to my YouTube channel where I will share a video process of this ornament in a different color and pattern range on December 8th! While you are there you can view a video on a mixed-media Junque Fairy ornament.

If you have any questions, please leave a comment and your contact information spelled out {ie: youremail at service dot com} and I will be happy to respond. 
 
Thank you for stopping by. Check back for more fun projects!  :) Sb

Trim the Tree with Handmade Holiday Ornaments...

Hello creative friends! Handmade holiday gifts are my jam – especially ornaments. It's a tradition that I share with my Grandmother which has spread to other family members too. I am also into all sorts of art & crafts, sewing and of course, I just can't resist making ALL THE THINGS! 

That being said, 
I am excited that my creative friend Janet invited me to be a part of a special handmade event where each day brings a new craft tutorial to follow along and make some new handmade holiday ornaments... the 12 Days of Christmas Ornaments!


+ + + + +

To visit all the stops for the 12 Days of Christmas Ornaments visit Janet at https://tryit-likeit.com/12-days-of-christmas-ornaments/

Here's the list of all the Ornament Makers in this bloghop:

Day 1 – Janet Trieschman: Fabric Ball Ornament
Day 2 – Donna Wirthlin: Santa Fabric Star
Day 3 – Natalie Shaw: Waterslide Decal Ornaments
** Day 4 – Susan M. Brown {sbartist}: Festive Paper House Ornament ** YOU ARE HERE
Day 5 – Michelle James: Old World Santa Ornaments
Day 6 – Julie Nyanyo: Felt and Button Stars
Day 7 – Christie Troxell: Pinecone Flowers Wood Slice
Day 8 – Gail Griffin: Bejeweled Decorative Ornament
Day 9 – Katie Adams: 3D Laser Cut Reindeer Ornament
Day 10 – Janet Trieschman: Alcohol ink Ornament
Day 11 – Terry Ricioli: Rustic Wood Slice Ornament
Day 12 – Janet Trieschman: Christmas Tree

Thanks for stopping by – I hope you enjoy creating along. Merry Christmas and Happy Making. I'd love to hear about what type of ornaments you like to make. :) Sb

Thursday, November 13, 2025

NO-BAKE Gingerbread DIY Holiday DECOR... Day Four of the Gingerbread Crafts Hop


Welcome back creative friends!. It's DAY FOUR of the Gingerbread Crafts Hop and we're halfway there! Did you enjoy Janet's festive Shrink film earring tutorial? TODAY, Christie of @ritzy_parties is up on her INSTAGRAM acct sharing her take on the viral make of the season... and it's EASY-AS-PIE!

NO-BAKE Gingerbread Holiday DECOR!


Recycled cardboard boxes are magically transformed into a sugar coated row of holiday houses, fit for Candy Cane Lane.

The Gingerbread Crafts Hop is SIX days of crafty Christmas fun for everyone! November 10th through Saturday, November 15th myself along with my Creative Friends will share a gingerbread themed creation – every day filled with sugar, spice and EVERYthing NICE!

Follow along with us on INSTA to see some crafty inspiration! Please be sure to Like, Comment, Follow and Share the creative spirit!

Monday, November 10th – @juanitascasita Jane Rudolfo Shouse
Tuesday, November 11th – @sassyeyedsusan Susan M. Brown {sbartist} **THAT'S ME**
Wednesday, November 12th – @tryit2likeit Janet VanLone Trieschman
Thursday, November 13th – @ritzy_parties Christie Troxell
Friday, November 14th – @makeablecrafts Meg Daves
Saturday, November 15th — @ernavandyk Erna van Dyk

See you tomorrow for DAY FIVE... Meg will be sharing her Sweet Make with you tomorrow!!

;) Sb 


Wednesday, November 12, 2025

No-Bake Holiday Earrings... Day Three of the Gingerbread Crafts Hop


Welcome to DAY THREE of the Gingerbread Crafts Hop! Did you enjoy Susan's hand-painted Gingerbread House ornament?! TODAY, Janet of @tryit2likeit is up on her INSTAGRAM acct sharing a fun & festive Shrink film gingerbread tutorial!

Make these SWEET Gingerbread Friends!

 
Shrink film gingerbread can be used for earrings, charms, or decoration. They are so fun to make.  
 
The Gingerbread Crafts Hop is SIX days of crafty Christmas fun for everyone! November 10th through Saturday, November 15th myself along with my Creative Friends will share a gingerbread themed creation – every day filled with sugar, spice and EVERYthing NICE! 

Follow along with us on INSTA to see some crafty inspiration! Please be sure to Like, Comment, Follow and Share the creative spirit!

Monday, November 10th – @juanitascasita Jane Rudolfo Shouse
Tuesday, November 11th – @sassyeyedsusan Susan M. Brown {sbartist} **THAT'S ME**
Wednesday, November 12th – @tryit2likeit Janet VanLone Trieschman
Thursday, November 13th – @ritzy_parties Christie Troxell
Friday, November 14th – @makeablecrafts Meg Daves
Saturday, November 15th — @ernavandyk Erna van Dyk 

See you tomorrow for DAY FOUR... Christie will be sharing her Sweet Make with you tomorrow!!

;) Sb


Tuesday, November 11, 2025

Trimming the Tree with Handpainted Ornaments... Day 2 of the Gingerbread Crafts Hop


Welcome to DAY TWO of the Gingerbread Crafts Hop! Did you enjoy Jane's glittering Gingerbread House Cards?! 


TODAY, I am sharing a tutorial over on my INSTAGRAM acct transforming a nearly vintage ceramic ornament blank found in my box of Holiday Goodness using DecoArt Glass Paints!  

Handpainted Gingerbread Ornie Sneak Peek!

 
I'm so thrilled to have transformed this craft blank into a new ornament to hang on my tree with my collection of handmade pieces over the years. How do you decorate ceramic ornament blanks?
 
The Gingerbread Crafts Hop is SIX days of crafty Christmas fun for everyone! November 10th through Saturday, November 15th myself along with my Creative Friends will share a gingerbread themed creation – every day filled with sugar, spice and EVERYthing NICE! 

Follow along with us on INSTA to see some crafty inspiration! Please be sure to Like, Comment, Follow and Share the creative spirit!

Monday, November 10th – @juanitascasita Jane Rudolfo Shouse
Tuesday, November 11th – @sassyeyedsusan Susan M. Brown {sbartist} **THAT'S ME**
Wednesday, November 12th – @tryit2likeit Janet VanLone Trieschman
Thursday, November 13th – @ritzy_parties Christie Troxell
Friday, November 14th – @makeablecrafts Meg Daves
Saturday, November 15th — @ernavandyk Erna van Dyk 

See you tomorrow for DAY THREE... Janet will be sharing another Sweet Make with you tomorrow!!

;) Sb

Monday, November 10, 2025

All that Glitters in Gingerbread Land... Day one of Gingerbread Crafts Hop


Welcome to DAY ONE of the Gingerbread Crafts Hop! Today, Jane at @juanitascasita kicks it off the event… be sure to visit her INSTAGRAM acct to see what she's baking up in Gingerbread Land. 

Glittering Gingerbread Sneak Peek!


The Gingerbread Crafts Hop is SIX days of crafty Christmas fun for everyone! November 10th through Saturday, November 15th myself along with my Creative Friends will share a gingerbread themed creation – every day filled with sugar, spice and EVERYthing NICE! 

Follow along with us on INSTA to see some crafty inspiration! Please be sure to Like, Comment, Follow and Share the creative spirit!

Monday, November 10th – @juanitascasita Jane Rudolfo Shouse
Tuesday, November 11th – @sassyeyedsusan Susan M. Brown {sbartist} **THAT'S ME**
Wednesday, November 12th – @tryit2likeit Janet VanLone Trieschman
Thursday, November 13th – @ritzy_parties Christie Troxell
Friday, November 14th – @makeablecrafts Meg Daves
Saturday, November 15th — @ernavandyk Erna van Dyk 

See you tomorrow for DAY TWO... I look forward to sharing a Sweet Make with you Tomorrow!!

;) Sb

A Cold Snap in November... brings Gingerbread Wishes!

Still enjoying all things PUMPKIN Spice?? It's time for a rare November cold snap in SOFL. It must be a daydream?! 
 
Actually this time it's true... I'm counting the minutes and my Bumble Slippers are on standby, hot cocoa and marshmallows ready and the holiday music going because it's the most wonderful time of the year – Handmade Holidays! I love, love, LOVE making all the sparkly things and this year I am starting early thanks to my group of Creative Elves.


The Fall-o'Ween Crafty Crawl was so much fun – we're doing it again with Gingerbread Crafts! To get you excited for our SWEET Seasonal event I am doing with some Artsy Pals this week... enjoy this festive stamped card with a snarky twist.

YOU DO NOT want to miss
the kickoff of Crafting Season!


Our Gingerbread Crafts Hop is SIX days of crafty Christmas fun for everyone! Each day beginning Monday, November 10th through Saturday, November 15th myself along with my Creative Friends will share a gingerbread themed creation – every day filled with sugar, spice and EVERYthing NICE! My project will be revealed on DAY TWO, November 11th!

Follow along with us on INSTA to see some crafty inspiration!

Monday, November 10th – @juanitascasita Jane Rudolfo Shouse
Tuesday, November 11th – @sassyeyedsusan Susan M. Brown {sbartist} **THAT'S ME**
Wednesday, November 12th – @tryit2likeit Janet VanLone Trieschman
Thursday, November 13th – @ritzy_parties Christie Troxell
Friday, November 14th – @makeablecrafts Meg Daves
Saturday, November 15th — @ernavandyk Erna van Dyk

Monday Jane at @juanitascasita kicks it off the event… be sure to visit her INSTAGRAM acct to see what she's baking up in Gingerbread Land. I'll drop some reminders each day too!

Thanks for dropping by today. I look forward to sharing a creative week of Sweet Makes!!

;) Sb

Friday, August 22, 2025

BLACK MOON Masquerade... Day 5 of the Fall-o'Ween Crafty Crawl!


Welcome to the day FIVE of the Fall-o'Ween Crafty Crawl!! Did you snag the  Haunted House TREAT from Janet yesterday? If you just arrived today, be sure to go back and see all the fun! On Wednesday was a watercolor paint-a-long with ErnaTuesday Jane shared Glittery Glam Haunted House Cards, and Christie Smashed Halloween on Monday

Today I have an invitation for you... 
pop on over to MY INSTAGRAM acct @SassyEyedSusan – don't forget your mask!
 
Everyone is Invited!


You are Cordially invited

to attend a

MASQUERADE UNDER the STARS

at Nine o’Clock EDT

on the Eve of the
BLACK MOON

• Handmade Masks Requested •

Location - on IG @SassyEyedSusan  
 
Below is a list of the creatives that are joining me for this fabulous INSTAGRAM Fall-o'Ween Crafty Crawl – be sure to visit each day, enjoy the fun and leave a comment that I sent you! 
 
Monday, 8/18 — @ritzy_parties Christie Troxell  
Tuesday, 8/19 — @juanitascasita Jane Rudolfo Shouse 
Wednesday, 8/20 — @ernavandyk Erna van Dyk 
Thursday, 8/21 — @tryit2likeit Janet VanLone Trieschman 
* Friday, 8/22 — @sassyeyedsusan (ME) Susan M. Brown {sbartist} 
DAY 6 -- Saturday, 8/23 @makeablecrafts Meg Daves 
 

See you tomorrow for day SIX of the Fall-o'Ween Crafty Crawl with Meg Daves!

;) Sb

Wednesday, September 14, 2022

Let your #Cre8time Fly... Gina K. Designs and Designer Crafts Connection Bloghop


Greetings everyone! Today I am joining the creatives with the Designer Crafts Connection in getting inky for a new bloghop featuring projects made with Gina K. Designs stamps and die-cut ephemera.


Gina K. Designs carries the highest quality stamps, ink, cardstock, dies, stencils and more! Everything coordinates beautifully so you can start creating right away... inspiring with great ideas for paper crafting success!


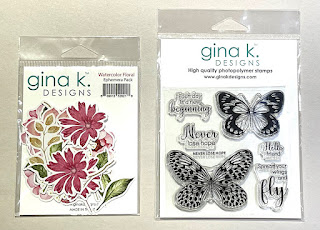
I love to customize a plain composition book and collage with lovely papers, stamps and ephemera. I was provided with these beautiful Gina K. Designs ephemera watercolor floral die-cuts and butterfly "Never Lose Hope" stamps which are perfect to decorate a new inspiration journal.


Supplies: Blank composition book; scissors, glue stick, black Staz-On ink; misc patterned paper and ledger paper; vellum paper; coordinating lace and ribbon; paintbrush; Ranger Old Paper Distress Oxide; double sided adhesive tape; Gina K. Designs butterfly "Never Lose Hope" stamps and ephemera watercolor floral die cuts.


Using Staz-On black ink, stamp many butterflies onto vellum and ledger paper.


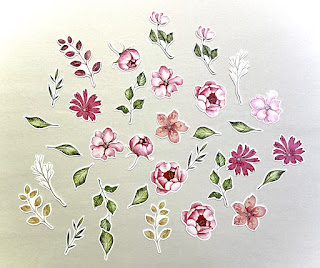
Look at all the flowery goodness here in the ephemera watercolor floral die-cut package!


Before gluing down floral pieces, I quickly antiqued with Ranger Old Paper Distress Oxide applied with a brush.


With just a quick brushing of ink, the die cut pieces look aged with bright colors and whites toned down.


Covering a journal is really straightforward. Trace around the cover onto the back of a patterned paper which is a nice cream with some sparkle detail (pretty sure this was leftover from something Christmas themed). I cut on the traced line and apply a liberal slathering of glue stick to the cover, then press paper onto the cover. Easy-peasy!


Fussy cut out all of the butterflies. I enjoy cutting out a pile of hand-stamped images.


Now I'm ready to grab the glue stick and apply things to the prepared journal.


The combination of the black ink on ledger paper with the antiqued florals give a shabby-chic feel.


I slightly overlap floral pieces and leaves to create depth.


I finish the edge of journal with a piece of lace layered with a tri-color ribbon adhered with double-sided adhesive. This ties everything together to complete my journal redux.

Shabby-Chic Journal takes flight!


With just a few supplies, I have transformed a plain composition book to something that looks like those sold at the bookstore.


The sparkle detail on the paper adds a bit of bling to the neutral colors.


I love the neutral colors with just a pop of color in the florals. This journal is ready to be filled with creative ideas and inspiration from my daily travels.

CLICK HERE to jump over to the Designer Crafts Connection blog to view more projects using Gina K. Designs Bloghop.

For more info on Gina K. Designs Products, project inspiration and to purchase visit Gina K. Designs website HERE.


Thanks so much for visiting! What would create with Gina K. Designs? Sb :)

** This is a sponsored post. Gina K. Designs, LLC provided products for use in this project in exchange for my creative ideas, views and opinions. My ideas and opinions are my own.

Friday, October 8, 2021

Color all the Things... Dive into the World of Artesprix® Sublimation Ink

Hello friends! It's finally Friday and I have something new and exciting to share that I have been keeping a secret all Summer. Earlier this year, I responded to the call for Artesprix® Design Team and I was invited to be a Guest Designer for the Artesprix® Blog.

Today I am thrilled to introduce you to the world of Artesprix® and working with Sublimation ink. 


My guest designer project is to feature Artesprix® Bookmarks, and I was sent this assortment of Artesprix® Sublimation Markers, Sublimation Stamp Pad, Blanks and everything I need to dive into the world of sublimation.

For my first project I grabbed a never used stencil from my stash and the Artesprix® Sublimation Markers to create a bright colorful bookmark... and though I tried to get my hubs to play with me, he only chose the colors! Artesprix® bookmark blanks are the perfect canvas to creating personalized art to mark your books.


So... what are Artesprix® Sublimation markers? 

Artesprix® markers have a specially formulated ink that transforms anything colored on plain copy paper into a heat-transferrable iron-on design onto polyester items. With the magical Artesprix® Sublimation Stamp Pad and Sublimation Markers and plain paper and a hand-drawn, stamped or stenciled design, I can customize all the things! What the WHAT?!! The holidays are just around the corner...


Materials needed: Plain Copy Paper; Pencil; Artesprix® Sublimation Markers; Artesprix® Heat Tape; Artesprix® Protective Paper Roll; Artesprix® Project Mat; Artesprix® Bookmarks 4ct; Stencil -- Art by Marlene MASKBM17 from Studio Light B.V.; and a Heat source -- Cricut Easy-Press Mini™ (Artesprix® Heat Press or Home Iron).

Ready to play...


Using a pencil trace Bookmark blank onto plain copy paper. For paper size, plan to leave approximately 2" on all sides to yield for coloring outside the blank shape and applying heat tape. Trace stencil design within bookmark outline and be sure to add about 1/8" to 1/4" of coloring outside the lines.


Using the yellow Sublimation Ink Marker I set off to fill in all of the lines.


The pens have a nice chisel tip that makes it easy to draw a thin or wide line.


First layer of color done... next the background.


Using the blue Sublimation Ink Marker, I filled in all the negative spaces.


The tiny areas were tricky but this is why I did the lighter color first.


OK... all colored! I think I want to add some outlines.


Using the Black fine tip Sublimation Ink Marker, I re-traced the stencil design shapes, then added some hand drawn lines and cross-hatching in a few areas to make it a bit more artsy.


I love it! Yes the color looks a bit dull... but not to worry -- it needs some heat to come to life!


Pre-heat Cricut Easy-Press Mini™on the highest temperature setting and prepare bookmark for thermal transfer magic by placing face down within pencil lines secured with Heat Tape. You can see why I colored outside the lines -- there will be no white edges when transferred.


With the Project Mat on bottom, I make a "Sublimation Sandwich” — a piece of Protective Paper at the top and bottom of your bookmark taped face down onto stenciled design. I used two layers of protective paper on top and bottom for good measure.


Now the fun part... apply heat! Starting at one end I press and hold Cricut Easy-Press Mini™for 45 seconds, then move to next unpressed area, slightly overlapping and pressing again. I repeat 3-4 times until entire length of bookmark has been heat pressed. 

I have to admit this is not what I intended to be doing when I purchased this little mini iron... but I love it!


Let cool a bit -- the bookmark is metal... and keeps heat a while. Take a peek check by gently peeling back one section to peek and see if thermal transfer is complete.


If it looks good, let bookmark fully cool then remove Heat Tape.


Wowee!!! Look how bright and vibrant the blue and yellow is!!


The heat transferred bookmark next to the hand-colored stencil design on paper.
This bookmark certainly won't be missed in the pages of a book.

The possibilities are endless with a variety of Artesprix® Blanks that can be customized with hand-drawn art or using my stash of stamps. These custom bookmarks are so easy to make and is a fun project to do with kids (heat part adult supervised of course).

What else did I make??! Hop on over to see my Guest Designer Project on the Artesprix® Blog... and see how my love of stamps meets bookmarks.

Thanks for visiting... I'd love to hear how you would art up your own bookmark using Artesprix® sublimation markers.

Happy creating! Sb

** This is a sponsored post. Artesprix® provided products for use in this project in exchange for my creative ideas, views and opinions. My ideas and opinions are my own.