Translate

**If you have previously subscribed to received my posts via feedburner or Bloglovin, those are inactive now. To receive my creative updates, please subscribe in the right sidebar.**
Showing posts with label about me; mixed-media; inspiration. Show all posts

Monday, January 27, 2020

Sparkling City Lights... a StencilGirl® Pop-Up Extravaganza

Disclosure: This post contains my amazon affiliate link for a book I am referencing in this post. This means that–at no extra cost to you, I can make a commission on a purchase you make if you use my link.


Hello Friends! It's a new year and January is always a whirlwind. Today I am proud to be part of a special COLLABORATIVE project hosted by Tina Walker and StencilGirl®... a StencilGirl Pop-Up Extravaganza! CLICK HERE to POP on over and be inspired to make your stencil art POP off the page!


I am a city girl from Chicago who lives in SoFL and I love my hometown skyline at night. So for this pop-up project, I stenciled a layered and mirrored skyline onto two base papers painted with an ombre of three colors of ColorShift paints, using only 2 stencils: S305 Apter, Text and Texture Transform and ATC Mix-Up Borloz L655.


After creating the skyline by repeating the stencil across my papers, I added highlights, water reflections and windows details using a couple Sakura Gelly Glaze pens.


 I traced this textural pattern over the row of buildings which brought the night sky to life!


A larger look...


I have quite a collection of books on bookmaking and folded paper techniques and for this artwork I selected a technique that creates a pop-up dueling accordion pullout from the book, "Pockets, Pullouts and Hiding Places".


For added contrast between the two layers, I trimmed one skyline down around the buildings before scoring, folding and assembling.

Sparkling City Lights


To frame this pop-up I have nestled inside of a notched cut-out accordian of navy blue cardstock. When closed and folded flat this mini will fit into an A2 envelope -- how fun is that?! Enjoy these details.


StencilGirl® stencils used: ATC Mix-Up by Andrew Borloz and Text and Texture Transform stencil by Seth Apter.

• • • • • •

Thanks for dropping by! I hope you are inspired add a POP of dimension to your handmade books and cards using StencilGirl® stencils! Have a creative day :) Sb

Wednesday, June 6, 2018

The TIME is NOW... for #thestencilfiedjournal Project -- Prompt No.1


Hello Friends! The beginning of summer is like NEW YEAR's for me. I focus on learning and stretching that creative muscle by playing along with many fun challenges happening over the summer. One of which is a new COLLABORATIVE project hosted by Tina Walker and StencilGirl®. Tina is officially one of StencilGirl's new Columnists with her focus being on Collaborations -- of which she is QUEEN! 


This week is the beginning of a new collaboration project with 80+artists participating from around the world. CLICK HERE to jump over to Tina Walker's blog who is hostess and organizer of this Cre8time adventure and see her journal creation and to give her some love for dreaming up another fun challenge!


For this challenge you can make or use a ready made journal or field book. I'm using one of these mini pocket-sized field books {approx 3" x 5" in size}. There's something about a pristine blank book -- just ready for a new adventure. 


This particular book has a faint grid pattern on the pages. I thought that would be a little interesting and not as daunting as blank white pages. 

With this small format, I can bring a handful of supplies with me to work on each week's prompt anywhere I go. And with my new work-for-myself and around my health lifestyle... I am always on the run...

I travel 3 days a week 50 miles away for work, and I left all my stuff stashed in my desk there smiling brightly at me upon my return yesterday. So let's pretend it's Monday!

I will briefly share a few steps of how I transformed this spread for Prompt No. 1 to share how quick and easy it is to squeeze some art journaling into your week.


I spread a thin layer of clear gesso across the pages with a recycled gift card I'm ready to go! 


In the effort of finding the clear gesso... I had to move a tube of Heidi Swapp butterscotch acrylic paint {circa 2005} and a Maya Road Maya Mist green mist. OH YEAH! One-touch rule is in full effect. I spritzed the green mist through the Mimosa 6 StencilGirl® stencil overlapping in different directions, then dabbed on some of the butterscotch yellow with a papertowel. 


I wanted to add a bit more color and contrast. I have a travel tin of 10 Caran-Dache crayons that go with me everywhere. I used the blue and green to color through the stencil, then used a purell hand wipe cloth to blend out the color. Base layer DONE!


Next I painted in butterscotch circles using my finger and added some smaller circle details from my assortment of Seth Apter StencilGirl® stencils awaiting. 


A few weeks back I took a little creative road trip to meet up with my art sister Cat Kerr to take an all day workshop with Seth Apter. A wonderful day of arting!


Channeling inspiration from Seth Apter's circle motifs, I added the phrase "I'm certain... the TIME is NOW" with some pens, Caran-Dache Crayons and finger smudging.


I love the tropical foilage feel from the stenciled background and the pops of yellow!


Love ALL the yummy layers and detail. I spent the most time on getting the letters to pop as some layers of pen ink just soaked right in to the back ground. My words exemplify the turning of a page where I am taking a business course for artists this month at the same time that this artsy challenge is beginning. Time is at a complete crunch, though I believe making time for learning and playing is always good!


You are invited to join the fun!
Here's Prompt No.1


The only rule is use ONLY StencilGirl® stencils {sorry, no other brands}. Anything else goes as you are inspired to follow the prompt.

Share your pages and keep
a lookout in blogland
and social media using

#thestencilfiedjournal

Gotta run... Thanks for dropping by! I hope you are inspired to go grab a blank journal and your StencilGirl® stencils and join in the fun! Have a creative day :) Sb

Friday, April 24, 2015

Recycled Notebook meets #MixedMedia with Viva Las VegaStamps! + Art Anthology


Hello friends! All week Viva Las VegaStamps! has teamed up with Art Anthology to bring you tons of inspiration with mixed-media stamped creations. Today I have a special project over at the Viva Las VegaStamps! Blog... a recycled notebook RE-Imagined!


So you don't miss anything please be sure you check out these links:


Art Anthology's Website: www.artanthologyinc.com


I have altered this journal that came to my husband as a goodie from the car dealership. It's a blank book, with lined pages – perfect for jotting down ideas and things to remember... BUT it's not me. Enter Art Anthology Gemstones ~ Dimensional Paint and Colorations Spray along with my stash of Viva Las VegaStamps! to decorate this journal in my favorite color PURPLE and also to disguise it from the hubs {so he doesn't realize I swiped this out of the recycling bin - LOL}.


In creating, I discovered the Art Anthology Gemstones ~ Dimensional Paint works great for monoprinting on my Amazing DIY No-Gelatin Printing Plate, and also for the resist technique.
Please CLICK HERE to jump over to Viva Las VegaStamps! Blog for see my tutorial and journal transformation.

• • • • • • • • • • • • •

SUPPLIES: From Viva Las VegaStamps"Harlequin Diamond Background" #18920"Pure Imagination" #19041"Ferris Wheel" #16038"Bee Hung Up" #19164"London Skyline" #10597"Triangle Banner" #19043"Chevron Banner" #19042Miracle Sheets; and StazOn Jet Black InkFrom Art AnthologyGemstones ~ Dimensional Paint in Emerald and Flourite; Colorations Spray in Wild Orchid. Other Supplies: white cardstock; recycled notebook; scissors; paper trimmer; small paintbrush; Sakura of America Gelly Roll® Stardust® Pen; and pencil.

• • • • • • • • • • • • •

Thanks so much for dropping by! Don't forget to check out the other works for this week of inspiration from VLVS! and Art Anthology... there is blog candy to be won. Happy Friday!  :) Sb

Wednesday, April 1, 2015

For the LOVE of a Man... and a GOOD PRANK!


It's April Fool's Day and I'm sharing a little devilish project today! All last week social media was buzzing with ideas and photos of creative pranks for April Fool's Day. I came across a cute prank which involved painting a bar of soap with clear nail polish to seal and replace in the soap dish... resulting in soap that doesn't work. LOL!!!

This is so hilarious...
and I'm taking it one step further!


I certainly don't have the patience to sit and methodically paint a bar of soap with nail polish - BUT - with my Amazing Casting Products... I could pull this one off! I thought this would be the perfect prank against my husband. Timing couldn't have been better! Over the weekend I hijacked our halfway used bar of soap from the shower.


I have my Amazing Mold Putty at the ready to mold a dummy bar of soap casted in a mixture of Amazing Casting Resin, Alumilite Pearlescent Powder, and Fluorescent "FLO" Green Dye.


Can you tell the real from the FAKE???


Before molding your bar of soap in Amazing Mold Putty – make sure that the soap is dry and totally free of moisture {meaning not fresh from the soap dish}. I prepared a batch of Amazing Mold Putty following the easy instructions and pressed around my bar of soap. Then I prepared a batch of Amazing Casting Resin mixed with Alumilite Pearlescent Powder and two drops of the Fluorescent "FLO" Green Dye... when cured, this gives a perfect minty green with a bit of variagated swirls – just like a real bar of soap. In about 15 minutes my cast resin duplicate was cured and ready for it's debut!


After a little sanding with emory board, I sprayed the resin piece with olive oil spray, then buffed with a towel to mimick the sheen of the soap and to gloss up the sanded edges. It even weighs about the same as my used bar of soap original.


I'm really impressed with how real this fabulous FAUX soap looks and feels. I made the swap and replaced the faux soap in the shower. Bahahahahahhahaha! It totally fooled the hubs. It's not often that I'm the one pulling off a prank... there's nothing like some good harmless fun!

Thanks for dropping by... hope you have a fantastically fun day! Sb ;)

Sunday, July 13, 2014

REPURPOSING with Natural Beauty... Designer Crafts Connection Burlap Fabric Bloghop


Welcome to a special Designer Crafts Connection Bloghop dedicated to all things Burlap. I'm very excited to have an opportunity to create using the wonderful products from BurlapFabric.com. I have so many projects in the works - some being "REPURPOSED". I'm beautifying items for functionality and organization in my studio {a room that is currently getting a much needed overhaul}.


Join us July 13th through 20th for this blog hop promoting Burlap Fabric. Burlap is so popular in crafts and decorating and we will be sharing some wonderful ideas and projects using it... there will also be a giveaway too {scroll down for Rafflecopter entry info}.


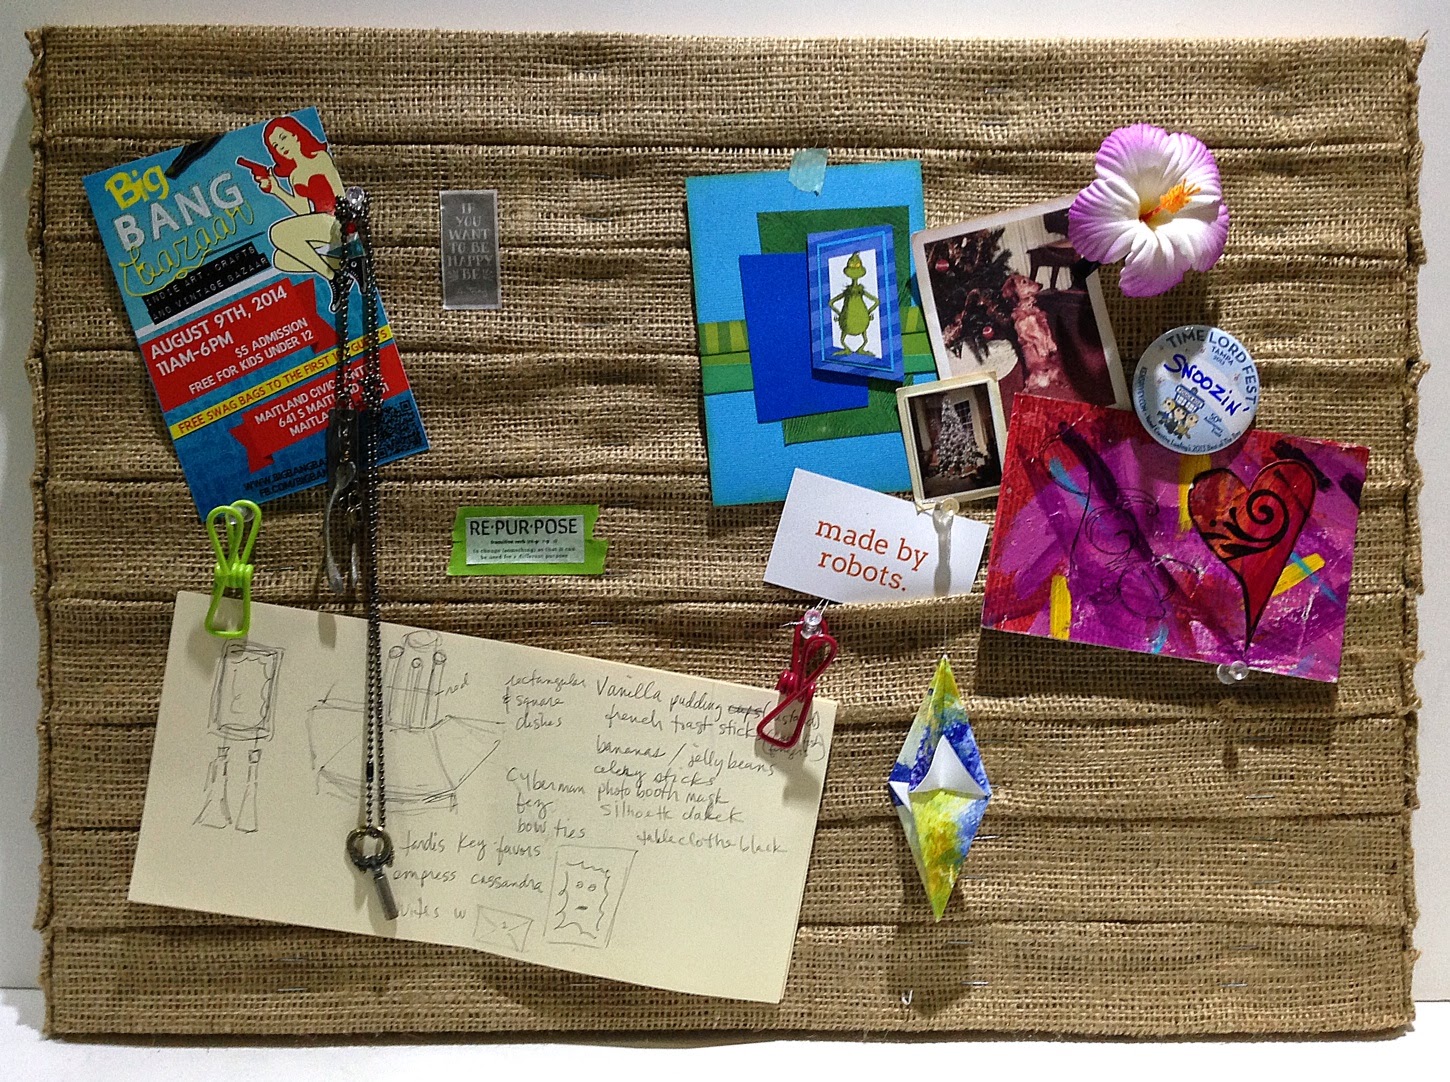
For my project today, I have altered this generic dry erase board that lives under my craft table... mainly out of sight and out of mind. It would be really nice if it could serve as a dual purpose - the backside being a bulletin board.


When I received the generous assortment of burlap fabrics from BurlapFabric.com for this event... I was thrilled to have received a purple check burlap trim and also some 14" wide burlap fabric!! I knew exactly what to do. Make another faux palette piece for my studio. I have a couple fun projects in the works with the yards of red burlap fabric too.


First thing I needed to cut a piece of foam core to mount into the backside of the frame to use as a bulletin board. Since I will be mounting the strips of burlap horizontally like a wooden palette would be, I will be able to use pushpins as well as clips.


Using some 3M Spray Adhesive, I mounted the foam core to the backside of the dry erase board. This just happened to fit the depth perfectly - aligning flush with the edge of the frame. Now I'm ready to alter this in a similar fashion to a 24" x 36" inspiration quote board I made a while back for my studio and was a huge project, because I created the whole thing from scratch {CLICK HERE to view}.


Before I started mounting the burlap strips, I wanted to give a wash of color to the stark white foam core so that I wouldn't notice it through the weave of the burlap fabric.


Using Vintage Photo Ranger Distress Stain, I swiped the dauber to apply color over the entire sheet of foam core. I'm not concerned at how it looks, I just don't want any white showing through the burlap. This did the trick and the large burlap fabric made this project easy to complete in under two hours {including the primping for photos}.


The burlap fabric I'm using is 14" wide by 10 yards. I can make several of these if I want! I cut three sections the length of the board with approximately 3" overhang on each side. Then I cut each of these sections into thirds lengthwise. 


To help keep the strips folded in thirds, I applied strips of masking tape. Final step is the stapling. I started along one edge, then on the opposite edge - alternating and working towards the center; adjusting the widths as I filled in.

I laid one strip across the board and wrapped the overhang around the side, setting with a staple gun loaded with 1/2" staples. I folded over the excess and stapled in place giving the faux wood board look {as in photo above}. I flipped over to the opposite edge, pulling the burlap strip taught, and repeated the stapling. To cover this board I used nine strips that are approximately 2 1/4" high. Using a regular stapler, I set some staples across the length which disappear into the burlap texture to help prevent sagging over time. I may go back and add some fabric glue to tack it down permanently later on.

Now for the FUN PART... adding all the stuff that's cluttering my desktop that needs to be properly displayed!


My dry erase board now has a dual function which matches my studio inspiration quote board which is a larger faux palette piece... and will certainly be utilized instead of being stashed under the desk.

+ + + + + + + + + + + +

Don't forget to enter to win the fabulous prize package from BurlapFabric.com valued at $100 that includes a really nice variety of natural and colored burlap yardage, ribbons, embellishments and totes.

http://burlapfabric.com/
http://www.pinterest.com/burlapfabric/
https://www.facebook.com/burlapfabric
https://plus.google.com/+BurlapFabric/about
http://instagram.com/burlapfabric
https://twitter.com/BurlapFabric
https://www.youtube.com/user/BurlapFabric

a Rafflecopter giveaway

+ + + + + + + + + + + +

Thanks for visiting. Continue on the Designer Crafts Connection "BURLAP" Bloghop by selecting hop back/forward on the logo below. The next stop on the hop is "Life in the Craft Lane™" with Julie McGuffie. Enjoy all the wonderful Burlap inspiration! Sb :)


Lisa Fulmer - lisalizalou.com
Marilyn Gossett - marilyngossett.blogspot.com
Sue Eldred - sueeldred.com
Susan M. Brown - sbartist.com (you are here!)
Carmen Flores Tanis - florestanisstudio.com
Cherish Flieder - somethingtocherish.com
Jennifer Priest - hydrangeahippo.com