Translate

**If you have previously subscribed to received my posts via email: Please subscribe to my posts via Bloglovin in the right sidebar.**

Sunday, August 31, 2014

Five Sundays in August... brings an Extra Day of #Cre8time!!!


Good Morning Everyone! It's the last weekend in August... and also Labor Day Weekend... the last weekend of summer as kids are heading back-to-school. Today brings an extra special challenge over at Anything But a Card Challenges!

The moon and stars have aligned to give us an EXTRA Sunday this month which messes up our 3 +1 system of challenges. Today is another FIFTH SUNDAY! This is an oddity in the calendar that is happening several times in 2014... SO we have added this fun MINI-Challenge today here at Anything But a Card Challenges!!! Are you ready to play and have some fun??!

ALSO we are adding to our team here at Anything But a Card Challenges... CLICK HERE to view our DT call which closes Sept. 13th. We encourage you to apply! ABAC has no sponsors + no expectations + no having to use particular stuff! No Rules and a variety of themes and possible makes = doing projects you REALLY want to do! We are all about CREATING and SHARING... ABAC is all inclusive – and all levels of expertise are welcome too. If you love to create everything under the sun that is NOT CARDS... throw your hat in and apply!


The Fifth Sunday Challenge... "USE FIVE"!! Use the number 5 or five items, five colors, five words... what ever FIVE represents to you. For those who want to go a little more literal - here's the definition, too! Loads of inspiration could be had over at Wikipedia's page for 5 (number).

* * * * * * * * * * * * 

five (faɪv)
n.
1. a cardinal number, four plus one.

2. a symbol for this number, as 5 or V.

3. a set of this many persons or things.

4. a five-dollar bill.

adj.
5. amounting to five in number.

[before 1000; Middle English; Old English fīf; c. Old Frisian, Old Saxon fīf, Old High German fimf, finf, Old Norse fimm, Gothic fimf, Latin quīnque, Greek pénte, Skt pancha]

* * * * * * * * * * * *

Please share any current project you have created and JUST REMEMBER... create anything EXCEPT a card for this challenge. Please mention and LINK BACK to the Anything But a Card Challenges Fifth Sunday Challenge. ALSO - Please new projects only {no-backlinking}. :)


Now to my project. From time to time, I join swaps with different groups I am in. The "FIVE" challenge helps reign things in when you have a broad theme to go with. So here are my five things that I used to create my ATCs:

1. a theme "down the rabbit hole"
2. a leftover sheet of marbelized painted paper {I made a bunch of these one day}
3. some fun rubber stamps from Viva Las VegaStamps!
4. a new fun harlequin washi tape I got at the Dollar Tree
5. ink pads for stamping images and distressing


My painted paper happens to also use five colors of Ranger Distress Paint... imagine that! One day a while back, I painted a bunch of sheets in different colors using this technique - once you get going... it's pretty easy and fun to do a bunch as you wait for paper to dry a bit between adding more layers of color.


This is loosely based on T!m Holtz' marbeling technique where you apply multiple colors of distress paint to your craft sheet, mist with water and drag the paper though the paint. I added all the colors in a splotchy fashion, and sprayed a lot of water which gives a more watercolor effect when paper is dragged.


I drag once, then respray more water to the craft sheet to pick up another layer of color. I repeat this until I've mopped up all the paint from my craft sheet. The colors are more muted, but there is a lot more pattern and texture from the paint floating in beads of water.

With a nice sheet to work with, I cut it down to make my ATC card blanks and set to work on the stamping and layering of elements. One special stamping trick I did was to layer two stamps on top of each other, the girl and a keyhole - placing the keyhole over one of her eyes; then I trimmed each keyhole out. This gives the perfect eye peering though the keyhole for this Alice in Wonderland themed ATC. The sentiment I've had for ages from VLVS! and I thought it went perfectly for the quirky white rabbit whose always proclaiming, "I'm Late!" These came together really quickly and they were fun to make.

Thanks for visiting! I hope you will play along in the FIVE challenge at ABAC and consider applying for the DT call and join our team of designers. Happy Sunday! :) Sb

Monday, August 25, 2014

Framing it Up with the Deflecto Craft Line
of Acrylic Frames


Happy Monday! Today is my first offical posting as part of the Deflecto USA Ambassador Design TeamI'm so excited to be part of this team and have this opportunity to get creatively organized! For more information on the Deflecto line of products, please visit: http://www.deflecto.com/craft/


Today we "Frame it Up!" The entire Deflecto USA Ambassador Design Team is sharing a variety of creative and imaginative uses for the Deflecto line of acrylic frames... you probably even already own some of them. 


I received a generous assortment of Deflecto acrylic frames in a variety of sizes and shapes - some clear and some with colored borders. Today I am sharing what I have done with a few of these. Keep a lookout for upcoming projects where I will put the rest of these beautiful, crystal clear plexi frames to work in my creative space and projects.


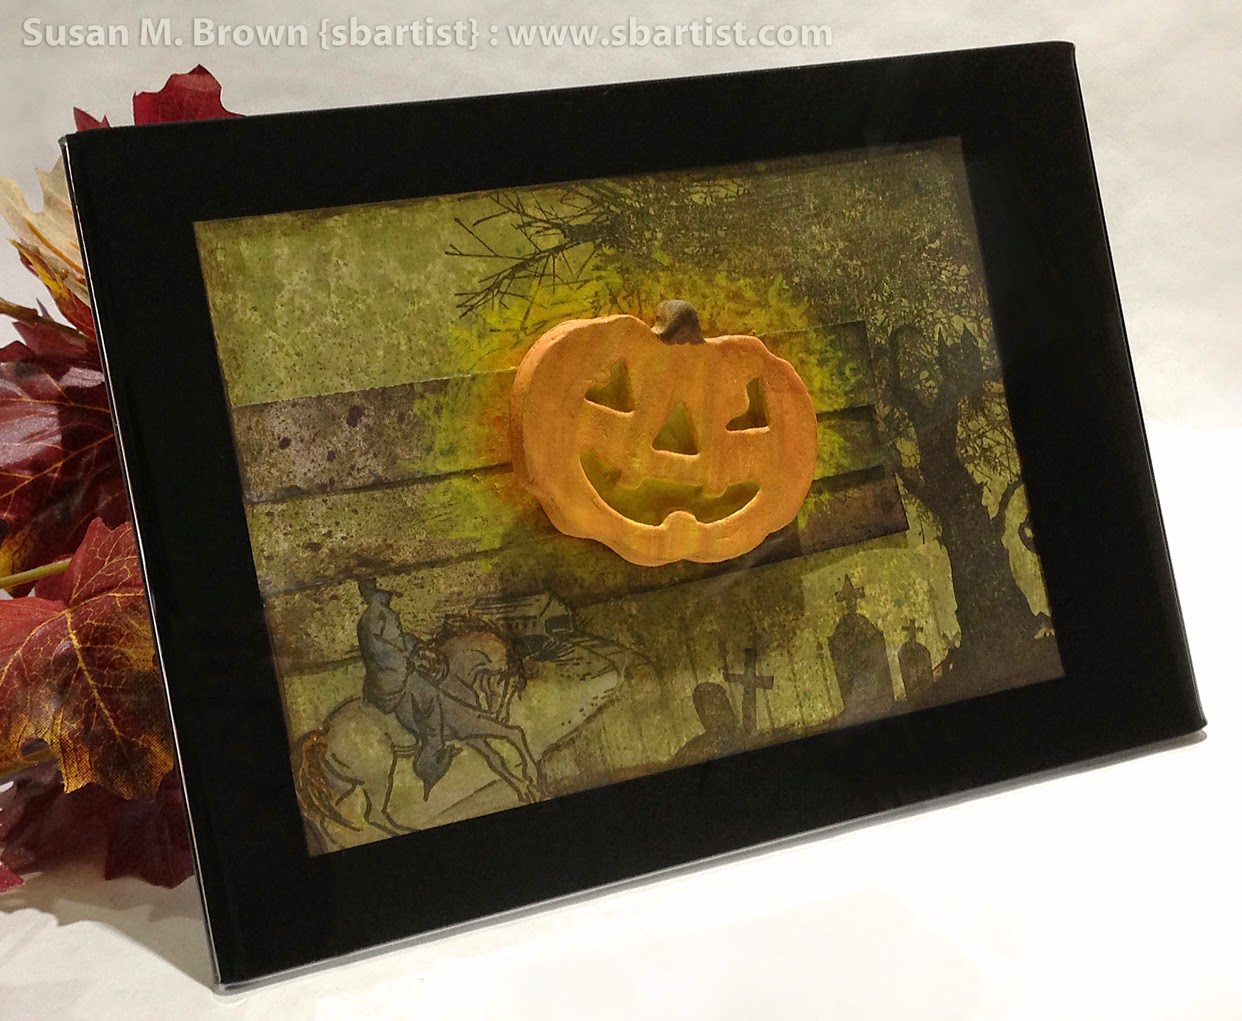
One thing that is great about these frames is that they are self-standing. You can use them vertically, as they are labeled and displayed... or use them horizontally. So I selected the black 5x7 Deflecto Craft Frame which has a built-in black opaque framed border to make a permanent home for one of my Halloween stamped creations.

I don't have the time or space to make a plethora of shadow boxes to house/display my creations, but I most certainly have space for a couple of modern, sleek frames that I can change out for each holiday... and that's what I've done here.


Here's a view from the backside. The acrylic wraps nicely around the back to give a nice secure fit to the contents. I gently pulled out the insert, cut my creation to size and gently inserted into the frame. My piece has two and three layers of paper in places and it fit nicely. I made sure to spray my oil pastel painted background art with a sealant before placing into the frame so that it won't transfer/smear as I slide it into the frame.


I had a molded/cast Creative Paperclay Pumpking mounted to the front of this piece on an Action Wobbler {a plastic springy gadget which makes items wobbly} that I gently removed and remounted with removable adhesive to the exterior of the frame.


My stamped headless horseman scene complete with a flying, wibbly-wobbling pumpkin head is perfectly displayed. To see how I created this halloween art please click here.


I receive three itty bitty clear acrylic frames and I have been putting these to a variety of uses. Albeit many are more utilitarian - but handy timesavers indeed! I LOVE these and they are so stinkin' cute!!!

At my craft show, they held little price signs and doubled as stands to lean items up against to stand vertical. These are perfect size for wallet size photos, ATCs {artist trading cards} or personalized place card settings. I can go on and on...


One creative use is that they are extremely helpful in photographing my creations. I've tried several different ways to stand up a card, and they always are drooping or a corner sags or it's perspective is skewed. These little frames are a LIFESAVER. I plan on getting more of these handy little guys.


One way is that you can just lean the card against the frame. Depending on how it's embellished this works perfect and I can angle my camera to square it up and press CLICK for a perfect shot {what a timesaver in photoshop, too}.


This is standing against the frame and you can see the shadows cast from the embellishments are a bit harsh... so I will try something else.


So I layed the frame down on it's backside - so it's sort of upside down with a low-profiling slope.


I placed my card upon the slope of the frame, set up the camera shot... and this time it is perfect!


Here's another view for my next card ready for proper photography.


Another nearly perfect photo. The top corners curl in slightly, but this is better than the distortion of putting a dimensional card on the scanner.

Now for the Pièce de résistance!


Stands for my altered Altoid tin. I normally plan some type of hanging/displaying into the creation process... but for this recycled project - by the time I realized it, I had already mounted everything inside. So in a drawer it sets. EUREKA!!! These itty-bitty little Deflecto Craft frames have brought my art back to the light of day! Using a couple glue dots, I adhered the frames to the back. It would hold with just the one, but the second helps keep it balanced and it open just the way I like it.


One added bonus of the larger frames... they make excellent light bouncing devices! I put a white paper in the frame and angled it to bounce some light into my altered box mounted upon the mini frames. This discovery is simply PERFECTION!


The bottoms of the frames are completely concealed and barely peek out from the bottom - more importantly I've had no drilling or glueing here. Within minutes I am again enjoying my stamped scene... a panda munching peacefully in a whimsical garden {please click here to view how I created this}.

What are you inspired to create
using the Deflecto Line of Craft Frames?

Thanks for visiting! Please join me the LAST MONDAY of each month when the Deflecto USA Ambassador Design Team will have a new Deflecto product challenge to debut.
 :) Sb

For more information on the Deflecto line of products,


Sunday, August 24, 2014

Art is the Key to Happiness... and the #BlueBox


Hello everyone! I'm off on a whirlwind weekend attending my first official artist workshop and just wanted to share a little recap. If it wasn't for ARTing... I would be at home glued to all the Doctor Who regalia and fandom of the new twelfth incarnation.


Friday after work I packed up the MINI and set off to Central FL for a creative weekend away to learn from the amazing Cat Kerr.


The workshop was being held at Art More Place in Melbourne, Florida... a magical place that I plan to be visiting again. I met a wonderful group of creative ladies who share love for jewelry making.


There was plenty of space to work and loads of inspiration all around.


I learned the art of soldering - something completely NEW and alien to me. It was a challenge and it took me all the way until the last jump ring to realize I needed to hold the tools in opposite hands {being ambidextrous sometimes makes being creative a little trying when learning new things}.


We had a wonderful home cooked lunch indoor picnic style. Good thing this was all indoors - is was about 100 degrees outside.


Lunch was healthy and divine! Vegetarian style buttersquash coconut chili over rice, fresh fruit salad, sliced watermelon and macroons. Delicious, comforting and fuel to power us through the afternoon of creating.


Hammering inspirational words and sentiments into my charms.


Everyone's finished work from the day's learning. Mine are the three capsules that are alone. I'm making special keepsake gifts with them so I won't be sharing these until later.


Here is my completed official "Tardis Key" necklace complete with inspiring solder charm that I created in the class {the key is a find on one of my artful junque-ing expeditions}. It was refreshing to take a break and go off the grid to learn some new things. Now it's time to pack up and go back home... my DVR is calling "...oooh WE oooh!" :) Sb

Thursday, August 21, 2014

Remain CALM... and Craft On with Some Fantastic NEWS!!!


Hello Everyone! I'm in total WHOvian obsession mode watching the marathon and working on all the crafty projects for the big event... the debut of Doctor No. 12 this weekend. I will be at a creative workshop all weekend - but I still plan to squeeze in my BBC time.


Meanwhile back here on Earth - I have some wonderful news to share. This month I became part of wonderful new team of creatives that form the Deflecto USA Ambassador Design Team. I am so excited to be a part of this team! To some of you Deflecto may seem a little familiar - if you share my love for trips to the office supply store for organizational goodies... then you might share in my excitement.


Save the DATE! Please join us Monday, August 25th as we "Frame it Up!" The entire Deflecto USA Ambassador Design Team will be sharing a variety of creative and imaginative uses for the Deflecto line of acrylic frames... you probably even already own them. Each LAST MONDAY of each month the team will have a new challenge to debut. Stay tuned to see how I get creatively organized! :) Sb

For more information on the Deflecto line of products,

Tuesday, August 19, 2014

Countdown to #Doctor Twelve... Blue Police Box in Amazing Clear Cast Resin


Hello Everyone! I'm so excited that the long wait is almost over and the new season of Doctor Who begins in just 5 days. I have a several projects of WHOvian nature just for this week as the excitement builds.

Remember a while back I created a pendant from a rubber stamp using Amazing Mold Putty and Amazing Casting Resin??? Today, I am sharing another mold that I've created to show the AMAZING detail captured by Amazing Mold Rubber... except this is a FANDOM favorite – the Blue Police Box from Doctor Who.

**PLEASE NOTE** I am the illustrator of this stamp and have obtained permission from the manufacturer, Viva Las VegaStamps! in order to do this {and for the pendant done previously}. Before doing a project such as this - please check with each stamp company's ANGEL POLICY to make sure you aren't in violation.


This mold I created along with several others prepared when mixing an entire container of Amazing Mold Rubber {please CLICK HERE to view mixing/preparation}. When the mold was cured, I painted a variety of blue, gold and pearl Alumidust directly to the mold using a fine paintbrush, and poured a layer of Amazing Clear Cast Resin. I could have used this "AS IS" but I wanted it to have the glowing bright blue color of a proper vessel for time travel.


This is easily remedied! I placed resin piece back into mold and I prepared a small batch of Amazing Clear Cast Resin by mixing equal parts of "A" and "B" {CLICK HERE to view preparation}. To that I added a couple dabs of Blue Alumidust using a recycled coffee stir stick from Starbucks. I just picked a bit up on the end of the stick about 3 times.


I stirred completely, then poured
on top of the cured resin piece.


I used the stick to spread evenly
and fill the remaining space in the mold.


After curing overnight – my Blue Police Box is truly GLOWING! I trimmed off the flashing with scissors and gently filed the edges with an emory board. Now I have a companion embellishment to go with my "Ode to the Raggety Man {Doctor 11}" Mini Book. CLICK HERE to jump over see my "Companion" Doctor WHO Mini Book.


A glowing BLUE BOX
for my Time Traveler!

I need to make a little trip to the hardware store... an then I have some special plans for my resin blue box.

Stay tuned... I will be sharing more WHOvian creations throughout the week! :) Sb

Tuesday, August 5, 2014

Taking #Cre8time Back to School...
Designer Crafts Connection August Bloghop


Welcome! It's the first Monday of August which marks the monthly Designer Crafts Connection Bloghop. This month's theme is "Back to School"... crafting with school supplies - who can resist. I always loved this time of year - getting new crayons, pencils and other crafty school goodness... and I still enjoy stocking up on my stash of glue sticks and getting a new composition book to doodle and sketch in.


Using a handful of supplies, I have created some fun Back-to-School treats for my nieces. I'll admit I had loads of fun making these... maybe even more than the girls will have! 

Supplies used: scissors; push pins; binder clips; mini pencils, party favor stencils; ruler stencils; mini composition books, brown kraft shipping paper; standard notebook paper; black dye ink; Sakura of America Gelly Roll® Stardust® pens; pencil sharpeners; mini erasers; clear rubber stamps to coordinate; glue stick; circle and medallion punch; Herma Dotto adhesive runner by EK Success; and black marker.


I set out to make some of these plain utilitarian items fun and colorful. I added some rainbow colored mini DUCK Brand tape to the binder clips. This is so quick and easy and gets the WOW factor!! I grabbed a couple punches and scrap cardstock to create custom seals with the year drawn in stencil numbers. Lastly, I cut some squares of brown paper for shipping to make "brown-bag" covers for the mini composition books.


We all remember back in the day when we had to cover our schoolbook with brown paper bags... right??! How about a little mini covered composition book! It's so stinkin' cute... and screams for doodling and embellishing.


School supplies are so much fun and when I spied these mini erasers - I had other plans... making mini stamps. I layered some squares of chipboard onto a pushpin for shims and layered two erasers of the same shape on to create a cute little stamp. I could go even further and come back and make others and carve away the colored detail to make a whole set. But these are perfect for what I want to do.


Using a single sheet of notebook paper - I cut off about 4" from the bottom. I took the binding edge and folded that in half to the pink margin line and ran a line of dotto adhesive; making sure to skip over the holes. Then I folded the sheet in half and took the right edge, aligned it flush with the left and pressed in place on the adhesive. Now I have the closed sack - it just needs the bottom folded and closed up. I folded the corners in to make some score lines then opened it up and reverse tucked them inside and folded the outer two flaps over like flaps of an envelope. A small line of Dotto adhesive on the top flap holds it closed.


Easy-peasy! Four little mini notebook paper
treat bags ready to decorate.


Now that the treat bags, book covers and new mini stamps are completed... it's time to play! I set to work playing as I embellished the cover of the book and treat bags using my new mini stamps combined with doodling with Sakura of America Gelly Roll® Stardust® pens and some Hanna Montana clear stamps {I've been hoarding these for ages}.


In retrospect, I might glue two sheets of notebook paper together {side-by-side} so that I could create a larger treat bag. With the brown paper cover on, the book no longer fit in the bag... which was OK because I had plenty of goodies to completely fill the bag! I could tie the two together with some fun colorful shoelaces or book bands.


I think my nieces will be pretty excited to receive these. They will have a lot of fun doodling and jazzing up the mini composition books covered "OLD-SCHOOL" style.

Thanks for visiting. Continue on the Designer Crafts Connection "Back to School" Bloghop by selecting hop back/forward on the logo below.
Blog Widget by LinkWithin