Translate

**If you have previously subscribed to received my posts via feedburner or Bloglovin, those are inactive now. To receive my creative updates, please subscribe in the right sidebar.**
Showing posts with label designer crafts connection. Show all posts

Wednesday, September 14, 2022

Let your #Cre8time Fly... Gina K. Designs and Designer Crafts Connection Bloghop


Greetings everyone! Today I am joining the creatives with the Designer Crafts Connection in getting inky for a new bloghop featuring projects made with Gina K. Designs stamps and die-cut ephemera.


Gina K. Designs carries the highest quality stamps, ink, cardstock, dies, stencils and more! Everything coordinates beautifully so you can start creating right away... inspiring with great ideas for paper crafting success!
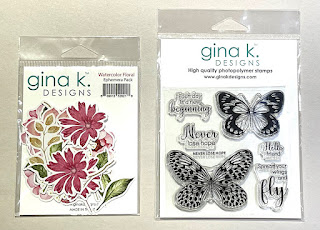

I love to customize a plain composition book and collage with lovely papers, stamps and ephemera. I was provided with these beautiful Gina K. Designs ephemera watercolor floral die-cuts and butterfly "Never Lose Hope" stamps which are perfect to decorate a new inspiration journal.


Supplies: Blank composition book; scissors, glue stick, black Staz-On ink; misc patterned paper and ledger paper; vellum paper; coordinating lace and ribbon; paintbrush; Ranger Old Paper Distress Oxide; double sided adhesive tape; Gina K. Designs butterfly "Never Lose Hope" stamps and ephemera watercolor floral die cuts.


Using Staz-On black ink, stamp many butterflies onto vellum and ledger paper.
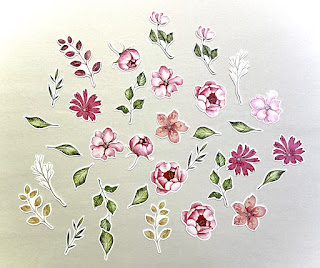

Look at all the flowery goodness here in the ephemera watercolor floral die-cut package!


Before gluing down floral pieces, I quickly antiqued with Ranger Old Paper Distress Oxide applied with a brush.


With just a quick brushing of ink, the die cut pieces look aged with bright colors and whites toned down.


Covering a journal is really straightforward. Trace around the cover onto the back of a patterned paper which is a nice cream with some sparkle detail (pretty sure this was leftover from something Christmas themed). I cut on the traced line and apply a liberal slathering of glue stick to the cover, then press paper onto the cover. Easy-peasy!


Fussy cut out all of the butterflies. I enjoy cutting out a pile of hand-stamped images.


Now I'm ready to grab the glue stick and apply things to the prepared journal.


The combination of the black ink on ledger paper with the antiqued florals give a shabby-chic feel.


I slightly overlap floral pieces and leaves to create depth.


I finish the edge of journal with a piece of lace layered with a tri-color ribbon adhered with double-sided adhesive. This ties everything together to complete my journal redux.

Shabby-Chic Journal takes flight!


With just a few supplies, I have transformed a plain composition book to something that looks like those sold at the bookstore.


The sparkle detail on the paper adds a bit of bling to the neutral colors.


I love the neutral colors with just a pop of color in the florals. This journal is ready to be filled with creative ideas and inspiration from my daily travels.

CLICK HERE to jump over to the Designer Crafts Connection blog to view more projects using Gina K. Designs Bloghop.

For more info on Gina K. Designs Products, project inspiration and to purchase visit Gina K. Designs website HERE.


Thanks so much for visiting! What would create with Gina K. Designs? Sb :)

** This is a sponsored post. Gina K. Designs, LLC provided products for use in this project in exchange for my creative ideas, views and opinions. My ideas and opinions are my own.

Thursday, March 10, 2022

Pinch Me... I'm ShamROCKin' a DIY Ribbon Rosette #NationalCraftMonth


Hello friends... March is National Crafts Month and St. Patrick's Day is right around the corner! Today I'm sharing a quick and easy ribbon rosette project that is perfect for pinning on the winning float at the annual St. Patrick's Day Parade!


For this project I gather a few supplies: gold oly*fun® metallic fabric, scrap of green cardstock, scissors, paper trimmer, hot glue, Scor-Pal®, double-sided adhesive sheets; and fun Irish themed button flair, embellishments and stickers from my fav dollar store.


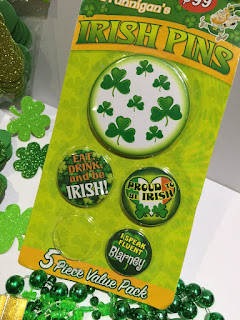
I have these pins from the dollar store in my crafty stash that would be perfect to transform into ribbon rosettes using gold metallic oly*fun® -- a fun reflective fabric that adds the perfect amount sparkle & shine to cardmaking and other craft projects!!


To make fabric a bit stiffer to fold and hold shape, I mount to green cardstock.


On a scrap of 6" x 9" green cardstock, I placed a cut-to-size section of double-sided adhesive sheet, removed backing, then mounted piece gold oly*fun® and trimmed back the edges.


Following pattern for making rosettes using my Scor-Pal®, I scored both sides of the paper-backed fabric to create peaks and valleys at 1/2" increments.


I divide this scored sheet into three, 2" sections, With some double sided tape, I joined the three sections together into one long strip. Fold back and forth on score lines to make the accordions. When shaped this will make a large rosette to set off my 3" button!


Now the fun begins! Shape the according into a circle and glue in place. It seems to take about 4 hands to form and hold a rosette down to secure, but once you do it a time or two it's pretty easy. For this I apply a ring of hot glue around the edge in the center and placed a faux gold coin on top... Ta-DA! Hold coin in place until glue cools and it is secure then repeat on other side.


I fashion a ribbon tail out of another section of oly*fun® backed cardstock, a smaller section popped up on chipboard cut on my guillotine paper cutter... easy-peasy! Glue the feature button pinback onto the front of the rosette, and added some fun foamy & glittery shamrock stickers to finish things off. Place a sticky back wall hook on the back upside-down and it's ready to hang on the winning float!


I just love the shimmer and shine of the metallic oly*fun®! I can't wait to be ShamROCKin' this over to award to my favorite float at the St. Patrick's Day Parade!

A ShamROCKin' Award....


What are you creating during National Crafts Month?! I'm enjoying the art of cut paper and glue over at the Collage-Lab SPRING FLING Virtual Retreat... you can still join the fun -- all classes are accessible until December 2022.


Thanks for stopping by and have a great day! Clover on over to the Designer Crafts Connection blog for more fun craft ideas!

Happy creating! :) Sb

Thursday, December 2, 2021

Fit to be TAGGED... Artesprix® Sublimation Bloghop


Greetings everyone! Today I am here to answer the age-old question... CLEAN or DIRTY?! Today I am joining the creatives with the Designer Crafts Connection for a new fun bloghop featuring projects made with Artesprix® Sublimation Markers and blanks. 


I shared a bookmark project using Artesprix® back in October... and I am so excited to share how I use these tags with iron-on-inks to creatively solve a problem presented by my husband!


What are Artesprix® Sublimation markers? Artesprix® markers have a specially formulated ink that transforms anything colored on plain copy paper into a heat-transferrable iron-on design onto polyester items. With the magical Artesprix® Sublimation Markers and plain paper and some fun type I reversed on the computer I am making a custom tag for my dishwasher.


Materials used: Plain Copy Paper; Pencil; Artesprix® Sublimation Markers; Artesprix® Heat Tape; Artesprix® Protective Paper Roll; Artesprix® Project Mat; Artesprix® Plastic Bag Tags 2ct; Graphite tracing sheet; reversed computer text; Artesprix® Sublimation Stamp ink refill; clear self adhesive hanger; and a Heat source -- Cricut Easy-Press.


First thing I make some reversed type to spell out "clean" and "dirty" using some fun fonts to size and scale of the tag blank and print onto plain paper.


I place tag blank into center of a half sheet of plain copy paper and trace around tag blank using a pencil. This will be for the "clean" side artwork.


For the "clean" art, I made a cloud bubble around the word and lines to make rays. I could have free-handed drawn these, but since I was using the computer, I added them to the text. I placed reverse text over a sheet of graphite tracing paper (same as pencil lead) and transferred the design to prepared sheet with blank outlined. Pencil will not transfer onto Artespix® blanks.


I have fun coloring in the design with Artesprix® Sublimation Markers. I selected a couple of blue colors.


The complete colored design. Inside the cloud I used a watercolor technique to apply the pen ink with a water brush to soften color and add a bit of dimension. I can't wait to see how the color POPs when this is heat transferred!


I followed the same process to trace the word "dirty" onto a pre-prepared colored paper. 


This background took a bit of experimentation and I did not know how this would come out so I did not capture the process. I promise will share process of this in another project post. With some time and patience, I did get a couple papers that looked promising and I traced the tag shape onto one and centered the word within the lines.


Outline and fill in the letters using the Black fine tip Sublimation marker.


Now I'm ready to heat things up and make some magic!


I select a clear plastic hook that works with the size of the hole of the tag and set aside for later.


Set my Cricut Easy Press to 400º for sixty seconds following the Artesprix® directions for tag blanks.


Place tag blank face down onto artwork and secure with Artesprix® heat tape.


Tear two sheets of Artesprix® Protective Paper, prepare a sublimation sandwich on top of the Artesprix® Project Mat. The blank with artwork taped in place are sandwiched between protective paper on top and bottom.


Heat for 60 seconds and then take a peek test to see if transfer is complete. Good to go!


Full reveal of "Dirty" side of tag! I LOVE IT!! I let this cool completely, then repeat the process to transfer "CLEAN" art on the other side.


I place the backside of tag down over the "clean" art, tape in place and repeat the heat transfer process.


After applying heat - take a peek before removing tape.


VOILA!! Look at that - so cool. I've transferred a completely different design onto the backside using the same products and process – just changing up the design and colors.


I place the a clear self-adhesive hook in the center of the dishwasher door. Its the perfect size to hold the sign!


I turn the tag sideways to loop the hook... easy-peasy!

TA-DA!!


This is going to work GREAT! No more accidental double washing LOL!


Now to solve the next burning question... utensils UP or utensils down?! I like my utensils clean so I put them UP.


This is totally FUNctional – my husband and I will now be able to remember if we turned the dishes on or not.

CLICK HERE to jump over to the beginning of the Artesprix® Sublimation Bloghop at the Designer Crafts Connection blog to view more projects using Artesprix®.

For more info on Artesprix® Products, project inspiration and to purchase these magical iron-on-ink pens, visit Artesprix® website HERE.


Thanks so much for visiting! What would create with Artesprix® Sublimation Markers? Sb :)

** This is a sponsored post. Artesprix® provided products for use in this project in exchange for my creative ideas, views and opinions. My ideas and opinions are my own.