Translate

**If you have previously subscribed to received my posts via feedburner or Bloglovin, those are inactive now. To receive my creative updates, please subscribe in the right sidebar.**
Showing posts with label seasonal. Show all posts

Friday, August 22, 2025

BLACK MOON Masquerade... Day 5 of the Fall-o'Ween Crafty Crawl!


Welcome to the day FIVE of the Fall-o'Ween Crafty Crawl!! Did you snag the  Haunted House TREAT from Janet yesterday? If you just arrived today, be sure to go back and see all the fun! On Wednesday was a watercolor paint-a-long with ErnaTuesday Jane shared Glittery Glam Haunted House Cards, and Christie Smashed Halloween on Monday

Today I have an invitation for you... 
pop on over to MY INSTAGRAM acct @SassyEyedSusan – don't forget your mask!
 
Everyone is Invited!


You are Cordially invited

to attend a

MASQUERADE UNDER the STARS

at Nine o’Clock EDT

on the Eve of the
BLACK MOON

• Handmade Masks Requested •

Location - on IG @SassyEyedSusan  
 
Below is a list of the creatives that are joining me for this fabulous INSTAGRAM Fall-o'Ween Crafty Crawl – be sure to visit each day, enjoy the fun and leave a comment that I sent you! 
 
Monday, 8/18 — @ritzy_parties Christie Troxell  
Tuesday, 8/19 — @juanitascasita Jane Rudolfo Shouse 
Wednesday, 8/20 — @ernavandyk Erna van Dyk 
Thursday, 8/21 — @tryit2likeit Janet VanLone Trieschman 
* Friday, 8/22 — @sassyeyedsusan (ME) Susan M. Brown {sbartist} 
DAY 6 -- Saturday, 8/23 @makeablecrafts Meg Daves 
 

See you tomorrow for day SIX of the Fall-o'Ween Crafty Crawl with Meg Daves!

;) Sb

Thursday, August 21, 2025

Halloween TREATS for ALL... Day 4 of the Fall-o'Ween Crafty Crawl!


Welcome to the day Four of the Fall-o'Ween Crafty Crawl!! Did you enjoy relaxing mixing watercolors painting a harvest moon scene with Erna yesterday? If you just arrived today, be sure to go back and see all the fun! On Tuesday Jane shared Glittery Glam Haunted House Cards, and Christie Smashed Halloween on Monday

Today Janet with Try It - Like It - Create It 
brings the Halloween TREATS for everyone!  Enjoy some spooky papercrafting fun with a FREEBIE to create with... an awesome layered Haunted House Diorama SVG file, just in time for Halloween paper crafting! 

Download your FREE SVG right here: 
and let the crafting begin!

No tricks... pop on over to Janet's INSTAGRAM acct to see how quick and easy this lovely layered haunted house comes together! 

Enjoy a Spooktacular Sneak PEEK!


Below is a list of the creatives that are joining me for this fabulous INSTAGRAM Fall-o'Ween Crafty Crawl – be sure to visit each day, enjoy the fun and leave a comment that I sent you! 
 
Monday, 8/18 — @ritzy_parties Christie Troxell  
Tuesday, 8/19 — @juanitascasita Jane Rudolfo Shouse 
Wednesday, 8/20 — @ernavandyk Erna van Dyk 
Thursday, 8/21 — @tryit2likeit Janet VanLone Trieschman 
* Friday, 8/22 — @sassyeyedsusan (ME) Susan M. Brown {sbartist} 
Saturday, 8/23 @makeablecrafts Meg Daves
 

See you tomorrow for day FIVE of the Fall-o'Ween Crafty Crawl with yours truly!

;)Sb


Wednesday, August 20, 2025

Over the Harvest Moon... Day 3 of the Fall-o'Ween Crafty Crawl!


Welcome to the day THREE of the Fall-o'Ween Crafty Crawl!! What did you think of Jane's Glittery Glam Haunted House Cards and how would you make Christie's Smashing Halloween Treats?! 

Today brings something a little different... and also relaxing – make a deliciously haunted painted watercolor scene with Erna at 
@ernavandyk

Go grab your paints, some paper and just one brush 
and visit Erna's INSTAGRAM acct to see how to paint this Glamorous Witch flying over the Harvest Moon! 

Go Batty with this Sneak PEEK!
 

Fly over to SEE ERNA Paint this Watercolor Scene!

Below is a list of the creatives that are joining me for this fabulous INSTAGRAM Fall-o'Ween Crafty Crawl – be sure to visit each day, enjoy the fun and leave a comment that I sent you! 
 
Monday, 8/18 — @ritzy_parties Christie Troxell  
Tuesday, 8/19 — @juanitascasita Jane Rudolfo Shouse 
Wednesday, 8/20 — @ernavandyk Erna van Dyk 
Thursday, 8/21 — @tryit2likeit Janet VanLone Trieschman 
* Friday, 8/22 — @sassyeyedsusan (ME) Susan M. Brown {sbartist} 
Saturday, 8/23 @makeablecrafts Meg Daves
 

See you tomorrow for day FOUR of the Fall-o'Ween Crafty Crawl!

;)Sb

Tuesday, August 19, 2025

Houses of Haunted Delight... Day 2 of the Fall-o'Ween Crafty Crawl!


Welcome to the day TWO of the Fall-o'Ween Crafty Crawl!! How did you like Christie's Smashing Halloween Treats?! Ready for more... 
 
Today Jane at @JuanitasCasita shares a trio of Glittery Glam Haunted House Cards... pop over and visit  INSTAGRAM acct to see what mysterious make she has in store for you! 

Here's a Glam Sneak PEEK!
 

Houses of Haunted Delight! CLICK TO SEE MORE!

Below is a list of the creatives that are joining me for this fabulous INSTAGRAM Fall-o'Ween Crafty Crawl – be sure to visit each day, enjoy the fun and leave a comment that I sent you! 
 
Monday, 8/18 — @ritzy_parties Christie Troxell  
Tuesday, 8/19 — @juanitascasita Jane Rudolfo Shouse 
Wednesday, 8/20 — @ernavandyk Erna van Dyk 
Thursday, 8/21 — @tryit2likeit Janet VanLone Trieschman 
Friday, 8/22 — @sassyeyedsusan (ME) Susan M. Brown {sbartist} 
Saturday, 8/23 @makeablecrafts Meg Daves


See you tomorrow for day three of the Fall-o'Ween Crafty Crawl!

;)Sb

Monday, August 18, 2025

It's a Graveyard SMASH... Day 1 of the Fall-o'Ween Crafty Crawl!


Welcome to the official kick-off of FALL and all the SpO🎃Ky things! Join me and my artsy, crafty creative friends for a Fall-o'Ween Crafty Crawl!! Each day a different creative will share something ghoulishly awesome to get you inspired for the spooky season or maybe something fabulously for Fall. My project will be revealed on Friday, August 22nd!

Below is a list of the creatives that are joining me for this fabulous INSTAGRAM Fall-o'Ween Crafty Crawl – be sure to visit each day, enjoy the fun and leave a comment that I sent you! 
 
Monday, 8/18 — @ritzy_parties Christie Troxell  
Tuesday, 8/19 — @juanitascasita Jane Rudolfo Shouse 
Wednesday, 8/20 — @ernavandyk Erna van Dyk 
Thursday, 8/21 — @tryit2likeit Janet VanLone Trieschman 
Friday, 8/22 — @sassyeyedsusan (ME) Susan M. Brown {sbartist} 
Saturday, 8/23 @makeablecrafts Meg Daves
 
Today Christie at @ritzy_parties kicks it off the event… be sure to visit her INSTAGRAM acct to see what spooky secret craft she has in store for you! 
 
Here's a Sweet Sneak PEEK!
 

It's a Graveyard Smash Party! CLICK TO SEE MORE! 

See you tomorrow for another installment of the Fall-o'Ween Crafty Crawl!

;)Sb

Friday, August 15, 2025

Goodbye Summer - Hello Fall-o'Ween...


Summer is relentless in SOFL... seems like it never ends and this year it's blazing hot everywhere else too! Everyone is ready for cooler things like Fall + Halloween... all things pumpkin and spice. I love it! Gimme some googlie eyes, candy corn and some spooky fun crafty goodness and I am a happy camper.
 

I'm sharing a throwback card for Flashback Friday and to give everyone a heads up for a fun event I am doing with some Artsy Pals next week...  
 
YOU DO NOT want to miss the OFFICIAL kickoff of Fall-o'Ween!


Thanks for dropping by today. Have creative weekend and I look forward to seeing you Monday and I'll tell you more about it!
:) Sb

Thursday, March 10, 2022

Pinch Me... I'm ShamROCKin' a DIY Ribbon Rosette #NationalCraftMonth


Hello friends... March is National Crafts Month and St. Patrick's Day is right around the corner! Today I'm sharing a quick and easy ribbon rosette project that is perfect for pinning on the winning float at the annual St. Patrick's Day Parade!


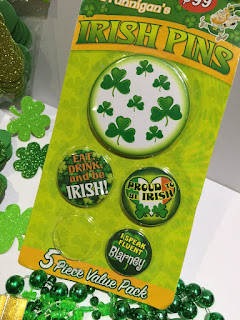
For this project I gather a few supplies: gold oly*fun® metallic fabric, scrap of green cardstock, scissors, paper trimmer, hot glue, Scor-Pal®, double-sided adhesive sheets; and fun Irish themed button flair, embellishments and stickers from my fav dollar store.


I have these pins from the dollar store in my crafty stash that would be perfect to transform into ribbon rosettes using gold metallic oly*fun® -- a fun reflective fabric that adds the perfect amount sparkle & shine to cardmaking and other craft projects!!


To make fabric a bit stiffer to fold and hold shape, I mount to green cardstock.


On a scrap of 6" x 9" green cardstock, I placed a cut-to-size section of double-sided adhesive sheet, removed backing, then mounted piece gold oly*fun® and trimmed back the edges.


Following pattern for making rosettes using my Scor-Pal®, I scored both sides of the paper-backed fabric to create peaks and valleys at 1/2" increments.


I divide this scored sheet into three, 2" sections, With some double sided tape, I joined the three sections together into one long strip. Fold back and forth on score lines to make the accordions. When shaped this will make a large rosette to set off my 3" button!


Now the fun begins! Shape the according into a circle and glue in place. It seems to take about 4 hands to form and hold a rosette down to secure, but once you do it a time or two it's pretty easy. For this I apply a ring of hot glue around the edge in the center and placed a faux gold coin on top... Ta-DA! Hold coin in place until glue cools and it is secure then repeat on other side.


I fashion a ribbon tail out of another section of oly*fun® backed cardstock, a smaller section popped up on chipboard cut on my guillotine paper cutter... easy-peasy! Glue the feature button pinback onto the front of the rosette, and added some fun foamy & glittery shamrock stickers to finish things off. Place a sticky back wall hook on the back upside-down and it's ready to hang on the winning float!


I just love the shimmer and shine of the metallic oly*fun®! I can't wait to be ShamROCKin' this over to award to my favorite float at the St. Patrick's Day Parade!

A ShamROCKin' Award....


What are you creating during National Crafts Month?! I'm enjoying the art of cut paper and glue over at the Collage-Lab SPRING FLING Virtual Retreat... you can still join the fun -- all classes are accessible until December 2022.


Thanks for stopping by and have a great day! Clover on over to the Designer Crafts Connection blog for more fun craft ideas!

Happy creating! :) Sb

Thursday, October 14, 2021

Shapes for all Seasons... Grafix® Creative Plastic Films Bloghop


Greetings everyone! Today I am joining the Designer Crafts Connection for another bloghop featuring projects made with Grafix® Creative Plastic Films. You might be familar with Grafix® products such as shrink plastic, adhesive sheets or transfer paper... but they have so many other surfaces to delight artists and crafters alike!


Discover your creativity with Grafix®... is your source for specialty plastic films for Arts, Crafts, Graphics, Drafting & Design! For more than 50 years, Grafix® quality plastic films, specialty papers, and Incredible Art Products® have been inspiring artists, crafters, and designers to create the beautiful and innovative.


I was provided the Grafix® Disc Bound Mixed Media Journal and a multi-pack of Grafix® Metallic Foil Board and Paper to create with.


Grafix® Plastic Films are something I have never tried and I am excited that this Mixed Media Journal is a 6" x 9" size with an assortment of 6 surfaces pre-punched for disc-binding... ready to create!


These 6 unique surfaces which are geared toward a variety of mixed media applications. Try inks, stamps, stencils, markers, embossing, painting, drawing, and more! The ideas are whirling around in my head -- I'm not sure where to begin.


Hello bling! The Grafix® Metallic Foil Board and Paper is sure to steal the show! A multi-pack of 5 colors, 2 sheets each in 10" x 13" size.


I knew exactly what I wanted to do. Cut the paper and plastic film with die cuts! I make an effort to support fellow creatives as much as possible. I have a set of Crafty Chica Sizzix® dies that are for celebrating Dia De Los Muertos (from 5 years ago). Where I work we have an annual Community Celebration for this Holiday and I have had these for making projects with kids at the event. I've never really made an entire project - so this is going to be fun with this fabulous metallic paper!


I will also die cut some florals using Crafty Chica Makers Movement® dies that I purchased online. These were released this summer.


All I have done is die cut my papers and plastic film (I chose the .010” Clear Dura-Lar sheets). I am loving all the bling from this metallic paper... it is true mirror card! When assembled and embellished, this sugar skull will be turned into a mini mask by mounting onto a glitter pencil.

After testing my entire bag of pens on scraps of the Dura-Lar to see which took and looked best (happy to report most pens worked fabulous), I set off on drawing and doodling in the details.

I decorated each of my sugar skulls with a few metallic markers and chalk-ink pens. The front is the Dura-Lar mounted over green foil / the reverse is Dura-Lar over gold foil.

The more layers the more personality!

Layer film sugar skull on top of the foil paper... WOW! I finished by adding details in the metallic areas too.


I also die cut a skull shape with the Grafix® Double Tack Mounting Film to mount each side back-to-back.


I aligned the Grafix® Double Tack Mounting Film to the back of one side, place pencil then layer and join surfaces together.


I used some Diamond Glaze to adhere the layered foil pieces and gem accents.


This Catrina is ready for her close-up!


The hand drawn embellishments, marks and doodles to bring these Sugar Skulls to life!


I love the contrast of the front and the back just from varying colors. The pens worked great on the Clear Dura-Lar and dried quicker than expected. I can't wait to share this at our Viva la Vida Altar Celebration this weekend. 

CLICK HERE to jump over to the beginning of the Grafix® Creative Plastic Films Bloghop at the Designer Crafts Connection blog to view more inspiration and projects using Creative Plastic Films.
For more info on Grafix® Productsproject inspiration and purchase these fantastic surfaces visit Grafix® website HERE.


Thanks so much for visiting! I'd love to hear what you would create with Grafix® Creative Plastic Films.  Sb :)

** This is a sponsored post.  Grafix® provided products for use in this project in exchange for my creative ideas, views and opinions. My ideas and opinions are my own.

Wednesday, September 9, 2020

Bats in the Ribbon Stash... SpOoKy Cute DIY Ribbon Ornaments


Hello creative friends! I'm excited to be part of the Creative Halloween Crafts being shared this week! Halloween is one of my favorite holidays for making goodies. Gather around the kids because this project is super easy and fun for all ages! 


When did Fall arrive?! Here in South Florida SUMMER is pretty much year round – nevertheless Halloween is just around the corner. What do you do with all of your leftovers from Halloween's Past that didn't see the light of day??! You alter them into something fun! 


I'm transforming this fun dollar bin find into some super SpOoky Cute cookie cutter ornaments by wrapping them up in colorful seasonal ribbons. The hardest part is selecting the ribbon! 

For this project you need: ribbons/trim in seasonal colors; an adhesive runner* (or double-sided tape); scissors; a black permanent marker; and some holiday spirit!

*I have used my favorite Herma Dotto adhesive (an old school dry adhesive runner) that I reserve for applying ribbon to things. For this project, you can use whatever adhesive you have on hand: glue dots, double-stick tape... even craft glue works. 


PUMPKIN: For base I'm using a beautiful variegated orange ribbon. I add a stripe of Herma Dotto adhesive to the end to tack in place at the top of stem, then begin winding ribbon around to cover metal. Continue wrapping, slightly overlapping the previous wrap and continue all the way around the cookie cutter. When back at the beginning, add another stripe of Dotto adhesive to secure the end. Easy Peasy!


I select an orange, gold and green check pattern, then wind around outer edge of pumpkin shape to measure and cut to size. I apply adhesive along the entire length and press into place. I leave about a 2" overhang and looped this back over onto itself to form a leaf shape. 


Next step is to add a hanger - for this I'm using a sheer green ribbon. I cut a piece about 10" long and tie to the top of the stem, knotting in place with the two loose ends meeting at the top. Place two ends over each other and tie in a knot closed loop to form hanger. The finishing touch is the stem. For this I cut another small section of green ribbon, add some adhesive to the end and wrap around the entire stem (like the first step). Then I back trimmed and tacked down the loose end to complete. This ornament is so adorable and totally full of Pumpkin Spice! 


Now to embellish the bat cookie cutter. I have chose a two-tone silver/grey ribbon that is lighter on one side and slightly darker on the other. I applied Dotto adhesive down the length of this ribbon and applied around the outer edge of the cookie cutter. 


I repeat by layering a contrasting patterned ribbon centered right on top – a quick and easy transformation! 


This ornament needs a hanger but I don't have anything black on hand... no worries! I grabbed a black Sharpie marker and quickly color a section of natural burlap string. 


These are so fun and great project for the kids! Fill them with wrapped candies and a gift card and these would make a fantastic seasonal teachers' gift with a handmade touch.

I'd love to hear how you are
decorating with cooking utensils!

For more fun Creative Halloween Craft ideas,
pop over HERE to see what my creative friends are making. 

Stay tuned - On FRIDAY I will share what becomes of Frankenstein's head! Thanks for visiting.  Sb :)